Manually Reset the Switch
When the switch fails to work and cannot be reset by using the web-based utility, the switch can be manually reset to restore the factory default configuration.
Step 3
Once all the port Light-Emitting Diodes (LEDs) light up, release the Reset button.
Telnet and SSH services are disabled by default. You will have to access the console of the switch using the computer that is directly connected to your switch through the serial cable.
Log in to the switch console. The default username and password is cisco/cisco.
Step 6
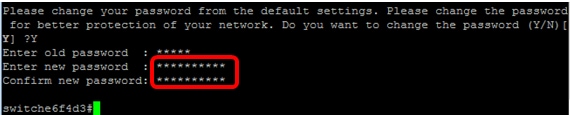
You will be prompted to configure new password for better protection of your network. Press Y for Yes or N for No on your keyboard.

In this example, Y is pressed. If N is pressed, skip to .
Enter the old password then press Enter on your keyboard.

Step 8 (Optional)
Enter and confirm the new password accordingly then press Enter on your keyboard.
Step 9. Enter the Global Configuration mode of the switch by entering the following:
CBS350#configure terminal
To change the hostname of your switch, enter the following:
CBS350(config)#hostname
To enable the Telnet service on your switch, enter the following command:
CBS350(config)#ip telnet server
Manually Reset the Switch
When the switch fails to work and cannot be reset by using the web-based utility, the switch can be manually reset to restore the factory default configuration.
Step 1. Disconnect all Ethernet cables from the switch.
Step 2. Using a pin, press and hold the Reset button on the switch for 15 to 20 seconds.
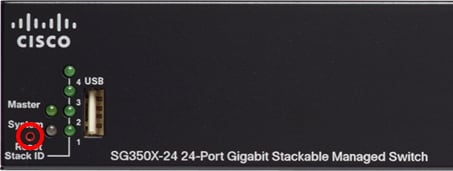 In this example, SG350X-24 24-Port Gigabit Stackable Managed Switch is used.
Step 3. Once all the port Light-Emitting Diodes (LEDs) light up, release the Reset button.
Telnet and SSH services are disabled by default. You will have to access the console of the switch using the computer that is directly connected to your switch through the serial cable.
Step 4. Connect your computer directly to the switch using a serial cable.
Step 5. Log in to the switch console. The default username and password is cisco/cisco.
Step 6. You will be prompted to configure new password for better protection of your network. Press Y for Yes or N for No on your keyboard.
In this example, Y is pressed. If N is pressed, skip to .
Step 7. (Optional) Enter the old password then press Enter on your keyboard.
Step 8. (Optional) Enter and confirm the new password accordingly then press Enter on your keyboard.
Step 9. Enter the Global Configuration mode of the switch by entering the following:
SG350X#configure terminal
Step 10. (Optional) To change the hostname of your switch, enter the following:
SG350X(config)#hostname In this example, SG350X is used.
Step 11. (Optional) To enable the Telnet service on your switch, enter the following command:
SG350X(config)#ip telnet server
Step 12. (Optional) To enable the SSH service on your switch, enter the following command:
SG350X(config)#ip ssh server
Manually Reboot the Switch
Important: When a switch is rebooted, the running configuration file is deleted. Before proceeding with the reboot instructions, make sure to save all the running configuration settings to avoid data loss. If you would like assistance with the reboot, check out the article Download or Back Up Configuration Files on a Switch.
Log in to the web-based utility of the switch and choose Administration > Reboot.
Step 2
In the Reboot area, click the radio button that corresponds to the desired time at which the switch reboots.
The options are:
Immediate — Switch reboots immediately once Reboot is clicked.

Date — Switch reboots on the configured date and time. Choose the month and date on which you want the switch to be rebooted and the specific time on that particular day to reboot the switch.
![System management configuration guide, cisco ios xe gibraltar 16.12.x (catalyst 9500 switches) - performing factory reset [support] - cisco](https://wudgleyd.ru/wp-content/uploads/d/8/6/d8694a97e518e197defc10bf1e4d7972.jpeg)


In — Switch reboots after the configured time has passed. Choose the number of days and hours the switch waits to reboot. Once that fixed time passes, the switch reboots.

Step 3
(Optional) Check the Restore to Factory Defaults check box to reboot the switch to the factory default configuration.
Step 4
(Optional) Check the Clear Startup Configuration File check box to clear the configuration on the switch after reboot.
Step 5
Reboot
Note: In this example, Immediate is chosen and Restore to Factory Defaults is checked.

Note: DHCP Auto Configuration is enabled by default in the factory settings. In order to properly reboot the switch to factory defaults, you need to disable the DHCP Auto Configuration so the switch does not automatically download a configuration from a local server. To learn more about this feature, click here for instructions.
You have now successfully rebooted your switch.
Cisco: резервное копирование конфигурации на tftp сервер
Для этого первым делом вам потребуется «поднять» на своей рабочей станции или выделенном сервере сервис TFTP. На ОС семейства Windows можно использовать такие решения, как tftpd32, Cisco TFTP Server или любое другое доступное ПО. На ОС семейства Linux обычно уже имеется готовый tftp-сервер tftpd, который необходимо настроить и прописать в автозагрузку. Если сервер вдруг окажется недоступным с оборудования Cisco, нужно будет проверить наличие маршрутизации к нему и добавить правило на фаерволе, открывающее порт udp 69 на ip-адрес сервера. Если данные действия не помогли, необходимо проверить ACL (Access control lists) на самом устройстве Cisco на предмет разрешения исходящих соединений, что случается довольно редко.
Итак, после выполнения всех рекомендаций, можно приступить непосредственно к самому копированию конфигурации cisco на ftp.
Зайдите на устройство Cisco с помощью Telnet или SSH, далее в привилегированный режим, введите пароль для команды «enable» и скопируйте конфигурацию, как показано на скриншоте:
Будут запрошены ip-адрес tftp-сервера и название файла для сохранения, которые необходимо ввести вручную. Открыв консоль tftp-сервера, убедитесь, что файл успешно принят.
Если же необходимо скопировать конфигурацию с tftp обратно на Cisco, то сделать это можно все с точностью «до наоборот»:
При этом не забудьте скопировать текущую конфигурацию в конфигурацию при запуске, как было показано на первом рисунке.
Reset the lightweight configuration on the AP
When you move your AP to a different location in your network and the AP cannot join the previous WLC, or if you want to manually reconfigure the AP to join another WLC, you have to enter the new controller information in order to allow your AP to associate with a different controller.
Reset AP through the AireOS or Catalyst WLC
In addition to the previous methods, you can also reset the configuration of the LAP from the WLC. When the LAP is registered to the controller, you can use these commands from the controller in order to reset the configuration on the LAP:
-
Use clear ap config <ap-name> keep-ip-config command in order to clear all of the AP’s configurations to default, except for the AP’s static IP configuration.
-
Use clear ap config <ap-name> command in order to clear all of the AP’s configurations to default, which includes the AP’s static IP configuration.
Reset AP through CLI
In order to use that method you need to login to AP console mode in priviledge exec mode:
For Cisco IOS based APs:
AP#clear capwap ap ? all-config <-- if you need to reset AP to factory default (this command causes system) controller <-- if you need to clear static configuration for WLC IP address (this command may cause termination session to WLC and new DTLS handshake) dot1x <-- if you need to reset dot1x credentials for AP authentication hostname <-- if you need to reset AP host name config ip <-- if you need to remove static IP configuration on AP. (this command may cause termination session to WLC and new DTLS handshake)
For ClickOS based APs:
AP#capwap ap erase ? all <-- Erase all AP config (this commands causes AP to reboot) static-ip <-- Erase static IP/DNS config (this command causes termination session to WLC and new DTLS handshake)
Reset AP through with reset button.
In order to use that method you need to have physical access to AP. Process is the same for both Cisco IOS and ClickOS APs.
- Disconnect power from AP.
- Press and hold «Mode button» on AP and provide power to AP.
- Keep mode button hold for 20seconds or more.
On Cisco IOS based APs:
IOS Bootloader - Starting system. flash is writableTide XL MB - 40MB of flash ...button pressed for 22 seconds
On ClickOS based APs:
AP#Button is pressed. Configuration reset activated.. Keep the button pressed for > 20 seconds for full reset Wait for the button to be released .... Button pressed for 22 seconds
Troubleshoot
You can use this debug command on a LAP with a console port to troubleshoot problem related to IP address assignment:
- On Cisco IOS based APs:
- On ClickOS based APs:
- debug dhcp events
- debug dhcp errors
- debug dhcp packets
Note: If the AP has no console port, it is necessary to take a wired sniffer trace of the port that the LAP is plugged into to see what packets are received by and transmitted to the LAP.
You can use these debug commands in order to monitor the discovery process through the WLC CLI.
On Cisco IOS and ClickOS based APs:
- debug capwap client events
- debug capwap client errors
- debug capwap client detail
Factory Reset on Cisco Router or Switch IOS
The following procedure is the steps when we are going to factory reset a Cisco router.
1. In the global configuration mode, create a hostname first on the router as we will use it for verification if the router is already reset into the factory settings.
Router(config)#hostname Router 1
2. Verify the configuration by using one of the following commands.
Router 1#sh running-config
Building configuration...
Current configuration: 526 bytes
!
version 15.1
no service timestamps log datetime msec
no service timestamps debug datetime msec
no service password-encryption
!
hostname Router 1
!
!
3. Save the configuration using the ‘copy running-config startup-config’ command.
Router 1#copy running-config startup-config
Router 1#write
4. Resetting the Cisco router to factory default involves erasing the NVRAM.
Router 1#write erase
Erasing the nvram filesystem will remove all configuration files!
Continue? y
Erase of nvram: complete
%SYS-7-NV_BLOCK_INIT: Initialized the geometry of nvram
5. Reload the Cisco router to complete resetting to the factory defaults, and the startup wizard or initial system configuration dialog will appear.
Router 1#reload
6. Verify if the Cisco router is reset to factory default by checking if “hostname Router 1” is disappeared and changed to default.
Router#sh running-config
Building configuration...
Current configuration: 584 bytes
!
version 15.1
no service timestamps log datetime msec
no service timestamps debug datetime msec
no service password-encryption
!
hostname Router
!
!
Manually Reload the Switch through the CLI
The available commands may vary depending on the exact model of your device. In this example, SG350X-48MP switch is used.
Step 1. Log in to the switch console. The default username and password is cisco/cisco. If you have configured a new username or password, enter the credentials instead.
In this example, the switch is accessed through SSH.
Important: When a switch is reloaded, the running configuration file is deleted. Before proceeding with the reload instructions, make sure to save all the running configuration settings to avoid data loss.
Step 2. In the Privileged EXEC mode of the switch, save the configured settings to the startup configuration file, by entering the following:
If you wish to proceed without saving the running configuration settings, skip to .
SG350X#copy running-config startup-config![]()
Step 3. Press Y for Yes or N for No on your keyboard once the Overwrite file … prompt appears.


![Cisco wireless controller configuration guide, release 8.1 - managing
configuration [cisco wireless lan controller software] - cisco](https://wudgleyd.ru/wp-content/uploads/a/3/8/a387bd9af6a6fa9b8c130dbf0da8bded.gif)
![Cisco unified communications manager express system administrator guide - reset and restart
cisco unified ip phones [cisco unified communications manager express] - cisco](https://wudgleyd.ru/wp-content/uploads/b/d/c/bdcdcf732272ed923e8f89af8de0cf2c.png)
![System management configuration guide, cisco ios xe fuji 16.9.x (catalyst 9300 switches) - factory reset [support] - cisco](https://wudgleyd.ru/wp-content/uploads/5/a/3/5a3a1b7f6c7b370740b58406f91b44da.jpeg)
 In this example, Y is pressed.
Step 4. To reload the switch, enter either of the following commands:
- reload — Use the reload command to reload the switch immediately.
- reload {{in hhh:mm | mmm | at hh:mm }} — Use this command to specify scheduled switch reload.
— in hhh:mm | mmm — Schedules a reload of the image to take effect in the specified minutes or hours and minutes. The reload must take place within approximately 24 days.
— at hh:mm — Schedules a reload of the image to take place at the specified time by using a 24-hour format. If you specify the month and day, the reload is scheduled to take place at the specified time and date. If you do not specify the month and day, the reload takes place at the specified time on the current day (if the specified time is later than the current time) or on the next day (if the specified time is earlier than the current time). Specifying 00:00 schedules the reload for midnight. The reload must take place within 24 hours.
This option can only be used if the system time settings of the switch have been configured. To learn how, click here for instructions.
— day — Number of the day in the range from 1 to 31.
— month — The month of the year in the range from Jan to Dec.
SG350X#reload at 10:00 11 Apr In this example, reload at 10:00 11 Apr is used.

Step 5. Press Y for Yes or N for No on your keyboard once the This command will reset the whole system and disconnect your current session prompt appears.
 In this example, Y is pressed.
Step 6. (Optional) To display information about a scheduled reload, enter the following:
SG350X#show reload
Step 7. (Optional) To cancel the scheduled reload, enter the reloadcancel command.
SG350X#reload cancel
You will be notified that the scheduled reload was aborted.

You should now have successfully reloaded your switch through the CLI.
In the example below, the immediate reload is used and Y is entered on both questions.

You have now successfully reset the switch manually. To learn how to assign an IP address on your switch through the CLI, click here.
If you want to perform the reset through the GUI, check out Reboot and Factory Default Reset on 300 Series Managed Switches.
Other articles on this topic:
- Access an SMB Switch CLI using SSH or Telnet
- Configure SSH Server Authentication Settings on a Switch through the CLI
- Configure Secure Shell (SSH) Server Authentication Settings on a Switch
- Configure Secure Shell (SSH) User Authentication Settings on a Switch
Objective
The Reload function of the Cisco Small Business Switches is useful when certain changes in the settings require a reboot to completely apply the configuration settings, or if the device is not functioning as expected. The configuration settings of the network device get reflected after the device restarts.
The Reset feature is used to remove the running or current configuration settings on the network device and restore it to the original default settings. Manual reset is recommended when the whole device needs to be reconfigured.
This article provides instructions on how to manually reset a Cisco Business 350 series switch as well as how to reload or reset through the CLI.
Applicable Devices | Software Version
- CBS350
(Data Sheet) | 3.0.0.69 (Download latest) - CBS350-2X
(Data Sheet) | 3.0.0.69 (Download latest) - CBS350-4X
(Data Sheet) | 3.0.0.69 (Download latest)
Objective
The Reboot feature of the network device is useful when certain changes in the settings require a reboot to completely apply the configuration settings, or if the device is not functioning as expected. The configuration settings of the network device get reflected after the device restarts.
The Reset feature is used to remove the running or current configuration settings on the network device and restore it to the original default settings. Manual reset is recommended when the whole device needs to be reconfigured, or in case you forget the password and not able to recover by any means such as accessing the console using Telnet or Command Line Interface (CLI).
This article provides instructions on how to manually reboot or reset your switch. If you would like to use the CLI for the reset, click here to access the CLI version.
Applicable Devices | Firmware Version
- Sx250 Series | 2.2.5.68 (Download latest)
- Sx300 Series | 1.4.7.05 (Download latest)
- Sx350 Series | 2.2.5.68 (Download latest)
- SG350X Series | 2.2.5.68 (Download latest)
- Sx550X Series | 2.2.5.68 (Download latest)
Восстановление забытого пароля
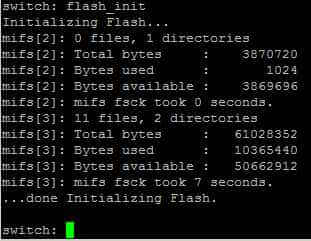
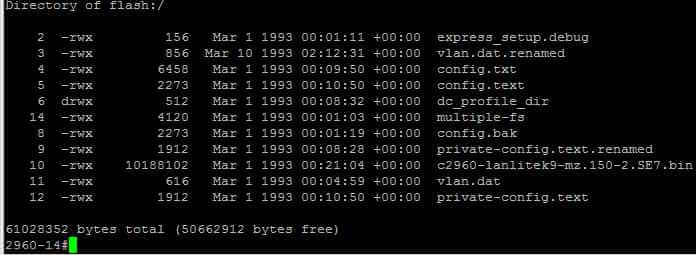
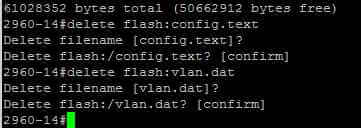
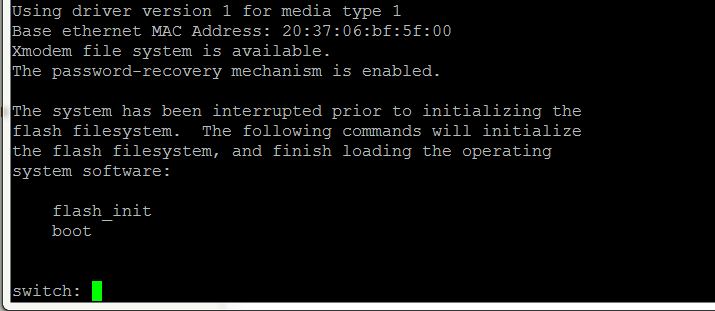
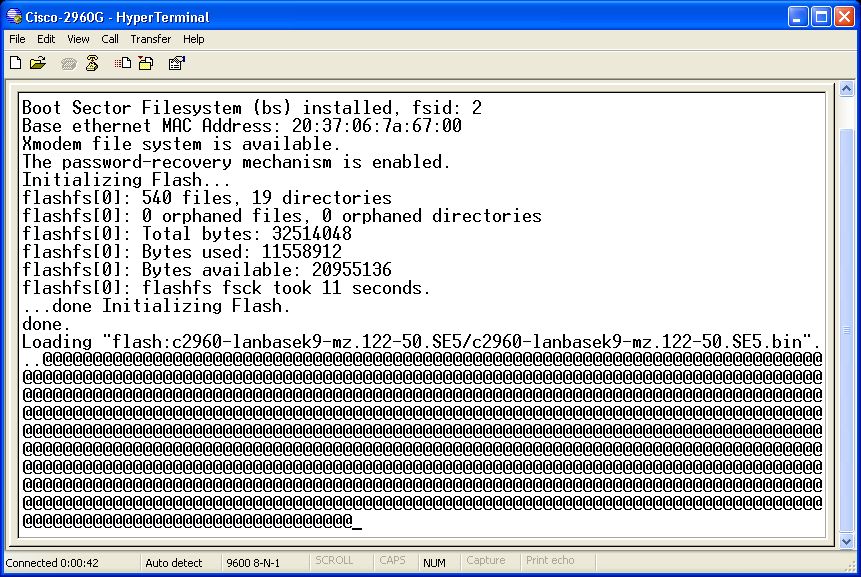
Если вы не знаете пароль к коммутатору, то его нужно сбросить. Для этого выполните следующие действия: Подключитесь к коммутатору через консоль. Как это сделать — подробно описано в пункте Подключение к коммутатору. Но на этот раз подключаться надо немного по-другому. Нам надо зайти в bootloader. Для этого, перед включением питания коммутатора, нажмите и удерживайте кнопку «mode» (кнопка на передней панели, слева, обычно подписана). Включайте питание удерживая это кнопку, и держите её до тех пор, пока вы не увидите на консоли приглашение bootloader-а. Это должно произойти через несколько секунд после включения питания. От сюда вы можете управлять файлами во флеш памяти коммутатора. Но перед этим её надо инициализировать. Для этого наберите команду flash_init. После этого вы можете просматривать, копировать, удалять файлы и каталоги из памяти. Команды для этого почти такие же, как в операционной системе MS-DOC. Для того, что бы просмотреть содержимое флэш памяти, наберите команду dir flash: Замечу, что если в MS_DOC вы бы набирали «C:» или «D:», то тут надо набирать «flash:», т.е. знак «» не нужен. После набора этой команды, вы должны увидеть примерно следующее:
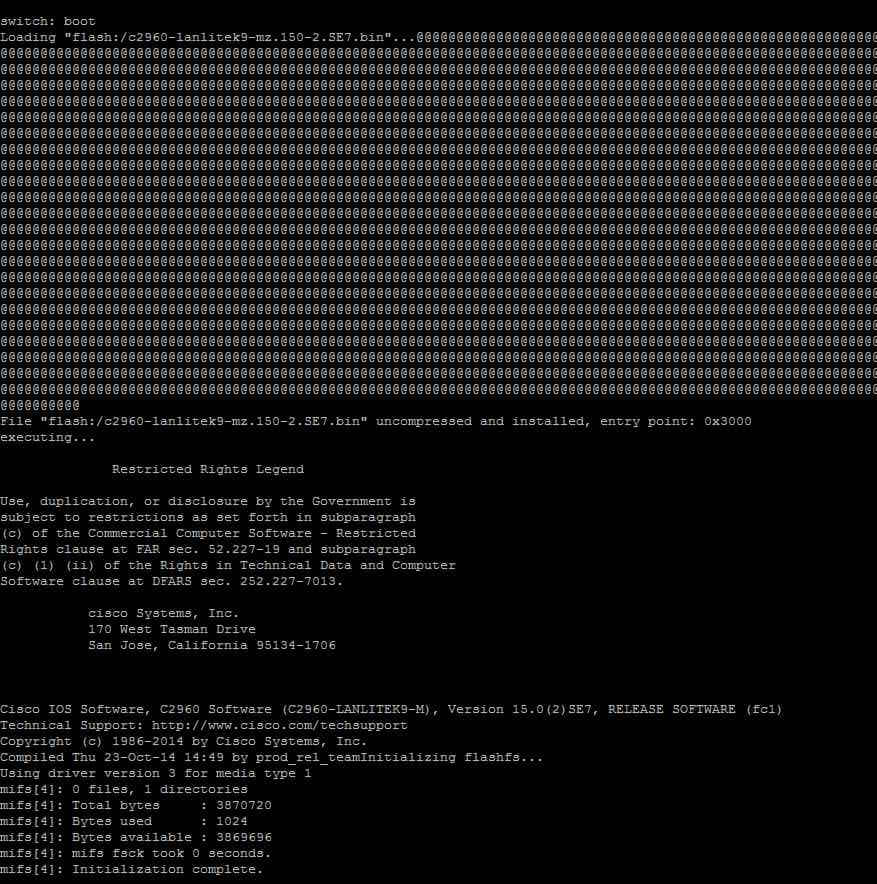
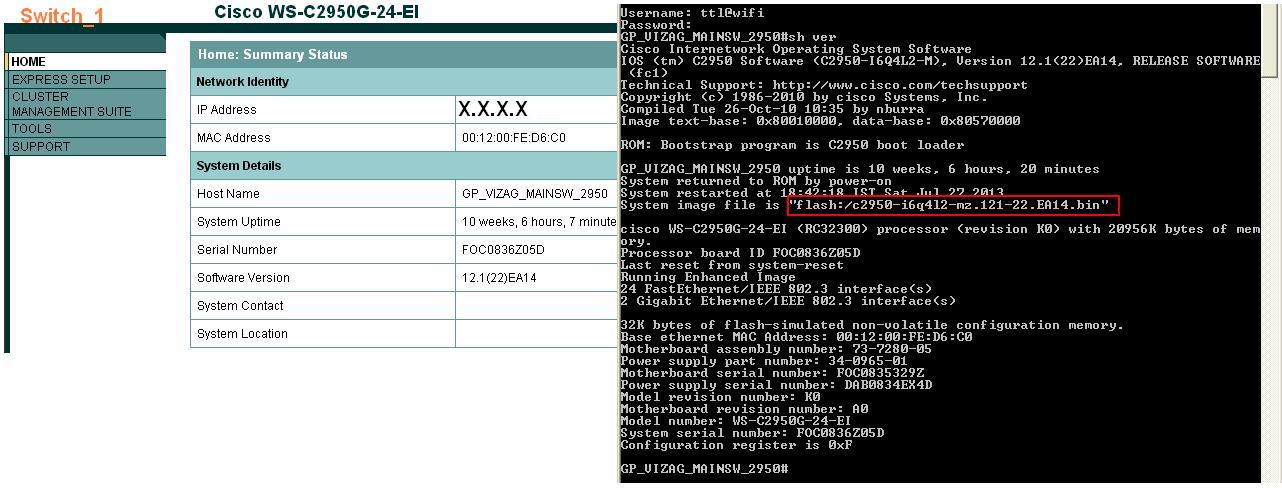
Здесь, html — это каталог, в котором находится web интерфейс. config.text — фийл, в котором хранятся все настройки коммутатора, в том числе и пароль. c2950-i6q412-mz.121-9.EA1.bin — операционная система коммутатора. Зависит от серии коммутатора. vlan.dat — здесь хранятся настройки vlan-ов. env_vars — файл с переменными окружения. Однажды, вам может понадобиться этот файл при установке операционной системы на отформатированную флэш-память коммутатора. Об этом читайте подробнее в пункте Установка ОС IOS. Далее, переименуйте конфигурационный файл, если он вам понадобится в будущем, или, если настройки коммутатора не нужны, просто удалите его. Для переименования, команда, соответственно, такая: rename flash:config.text flash:config.text.old. Для удаления delete flash:config.text. Далее загружаем операционную систему либо выключением и повторным включением питания, либо командой reset либо командой boot. Последнее предпочтительнее. После загрузки, операционная система задаст вам вопрос: «Continue with the configuration dialog? [yes/no]:». Если файл конфигурации вам не нужен, и на предыдущем шаге вы его удалили, то ответьте Y. И на этом можно закончить чтение этого пункта, поскольку в процессе предварительной настройки, коммутатор спросит вас, какой пароль установить. Если файл конфигурации содержит множество настроек, которые стабильно работали на производстве, и на предыдущем шаге вы его переименовали, ответьте N. Далее, войдите в привилегированный режим командой enable. Пароль коммутатор спрашивать не будет. Затем переименуйте файл конфигурации обратно, командой rename flash:config.text.old flash:config.text. Теперь примените настройки из этого файла к текущей настройке коммутатора и установите новый пароль:
- http://datanets.ru/parol-enable-i-sekretnyj-parol-enable.html
- https://m.habr.com/ru/post/326584/
Manually Reset the Switch
Step 2
Using a pin, press and hold the Reset button on the switch for 15 to 20 seconds.

Note: In this example, SG350X-24 24-Port Gigabit Stackable Managed Switch is used.
Step 5
Open a web browser on your computer and enter the IP address of the switch in the address bar. The default IP address of the switch is 192.168.1.254.
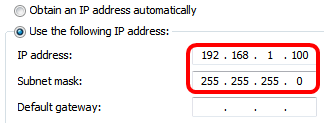
Note: In order to connect properly, make sure that your computer has an IP address in the same subnet as the switch. In this example, the IP address of the computer is 192.168.1.100 and the subnet mask is 255.255.255.0.
Step 6
Once connected, the switch will prompt for a username and password. The default username and password is: cisco/cisco.
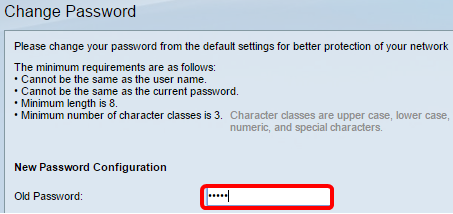
Note: You will be required to configure new password for better protection of your network.
Enter cisco in the Old Password field.
Enter the new password in the New Password and Confirm Password fields.
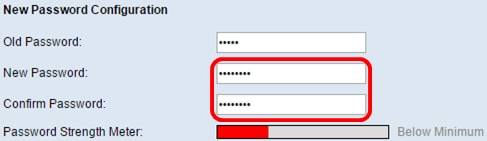
Step 9
Check the Disable Password Complexity Enforcement check box to bypass the password strength requirements.

Note: To learn how to configure the Password Strength security feature of the switch, click here for instructions.
Click Apply to apply the configuration.

Once prompted by the popup message below, click OK.

(Optional) Click Save to save settings to the startup configuration file.
You have now successfully reset the switch manually.
Introduction
In certain situations, it is desirable to restore the Catalyst switch configuration to the original default factory settings. This is useful when you want to remove an undesirable configuration that is present in the switch. If you have configured a switch and the configuration has become very complex or if you want to move a switch from one network to other, you can reset the switch to factory defaults and configure it as a new switch. This document provides information and sample command logs to reset your switches.
![System management configuration guide, cisco ios xe fuji 16.9.x (catalyst 9200 switches) - factory reset [support] - cisco](https://wudgleyd.ru/wp-content/uploads/4/7/8/478ca334dc53e5071a92a1295f5459ca.jpeg)
![System management configuration guide, cisco ios xe fuji 16.9.x (catalyst 3650 switches) - performing factory reset [support] - cisco](https://wudgleyd.ru/wp-content/uploads/9/9/a/99aa0d21f57e9f9ffe2e5d6693321cc6.jpeg)


To reset the Catalyst switches to factory defaults, you need access to the switch console through either a physical console or a Telnet connection. You also need the console/enable passwords. If you forget the console and enable password of your switch, you cannot reset the switch configuration to factory default to reset the password. In this case, you need to follow the password recovery procedures for your switch. Refer to this document for steps to recover the passwords on your Catalyst switches:
Password Recovery Procedures
Note: If you reset the switch to factory defaults while you access the switch by Telnet connection, you lose connectivity to the switch.
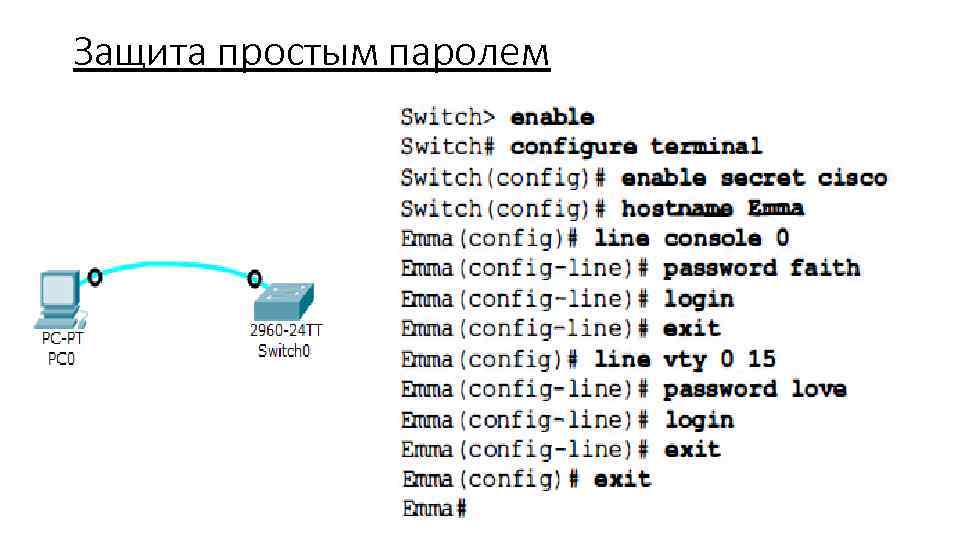
Пароль enable и Секретный Пароль enable
Рубрика: Конфигурация и тестирование сети
Чтобы обеспечить дополнительную безопасность, используйте команду enable password или . Любая из этих команд может использоваться, чтобы установить аутентификацию прежде, чем получить доступ к привилегированному режиму EXEC (режиму enable).
Всегда используйте команду , а не более старую команду по возможности. Команда обеспечивает большую безопасность, потому что пароль шифруется. Команда может использоваться только если еще не была установлена.
Команду можно использовать, если устройство использует более старую копию программного обеспечения Cisco IOS, которое не распознает команду .
Следующие команды используются, чтобы устанавливать пароли:
Отметьте: Если не установлен пароль или , IOS предотвращает привилегированный доступ EXEC из сеанса Telnet.
Без установки пароля посредством , сеанс Telnet произвел бы следующий вывод:
Пароль VTY
Линии vty предоставляют доступ к маршрутизатору через Telnet. По умолчанию многие устройства Cisco поддерживают пять линий VTY, которые нумеруются от 0 до 4. Пароль должен быть установлен для всех доступных линий vty. Один и тот же пароль может быть установлен для всех соединений. Однако, часто требуется, чтобы для одной из линий устанавливается уникальный пароль, чтобы обеспечить альтернативную запись при подключении администратора, если другие соединения используются.
Следующие команды применяются, чтобы установить пароль на линии vty:
По умолчанию IOS включает команду для линий VTY. Это предотвращает доступ Telnet к устройству без предварительной аутентификации. Если, по ошибке, устанавливается команда , которая удаляет требование аутентификации, неправомочные люди могут соединиться с линией, используя Telnet. Это является большой угрозой безопасности.
Шифрование Отображения Пароля
Другая полезная команда препятствует тому, чтобы пароль отображался простым текстом при просмотре конфигурационных файлов. Это команда .
Эта команда заставляет шифровать пароли при их конфигурации. Команда применяет слабое шифрование ко всем незашифрованным паролям. Это шифрование не применяется к паролям, когда они отправляются через носитель, а используется только в конфигурации. Цель этой команды состоит в том, чтобы воспрепятствовать неправомочным людям подсмотреть пароли в конфигурационном файле.
Если Вы выполняете команду или до выполнения команды , незашифрованные пароли будут видимы при выводе конфигурации. Если затем выполняется , то шифрование будет применено к паролям. Как только шифрование было применено, удаление службы шифрования не инвертирует шифрование.
Далее: Протоколы Канального уровня — Пример протокола уровня 2
Написать