
Suggested reading links
- How to Make Database Connection Using SQL Developer
- How to solve network adapter could not establish the connection SQL Developer Error.
- How to Connect to the Database Using SQL*Plus
If You Are A DBA then Oracle Enterprise Manager Should Be Your Best Friend. Check Out This Playlist Where I have Explained The Configuration Of Oracle Enterprise Manager Database Express.Oracle Enterprise Manager Configuration
That’s all for this tutorial on how to install SQL Developer on Windows 10 x64 bit version. Hope you enjoyed reading. Please share this blog on your social. Also, connect with me on my Facebook page. Thanks & have a great day!
System Requirements for Oracle 19c installation on windows 10
Let us check out the system requirements for installing Oracle 19c installation on Windows 10.
Here are the important components (software & hardware) required to install the oracle database in your system. In case your system didn’t meet these requirements please then please go with the minimum configuration setting.
Also, check: How to Install Oracle on Docker
Software Requirement for Installing Oracle Database on Windows
The following windows operating system can be used to install the oracle database on it. Windows 11 is still in the beta version we tried installing it on it & it worked for us but we do not guarantee that it will work for you as well. Once support is officially released we will update this section.
- Windows 8.1 x64- Pro and Enterprise editions
- Windows 10 x64- Pro, Education, and Enterprise editions.
- Windows Server 2012 R2 x64- Standard, Datacenter, Essential, and Foundation centers.
- Windows Server 2016 x64- Standard, Datacenter, and Essentials centers.
- Windows Server 2019 x64- Standard, DataCenter, and Essentials centers.
Read: Connect to oracle database
Hardware Requirement for Installing Oracle Database on Windows
In this section, we have mentioned the hardware required to install and run the oracle database on the windows operating system.
| System Architecture | Processor: AMD64 and Intel EM64T |
| RAM (random access memory) | 2 GB minimum |
| Virtual Memory | – If physical memory is between 2 GB and 16 GB, then set virtual memory to 1 times the size of the RAM– If physical memory is more than 16 GB, then set virtual memory to 16 GB |
| colors | 256 colors |
| Resolution | 1024 X 768 minimum |
| Disk space | 10 GB |
Read How to Check Oracle Database Version
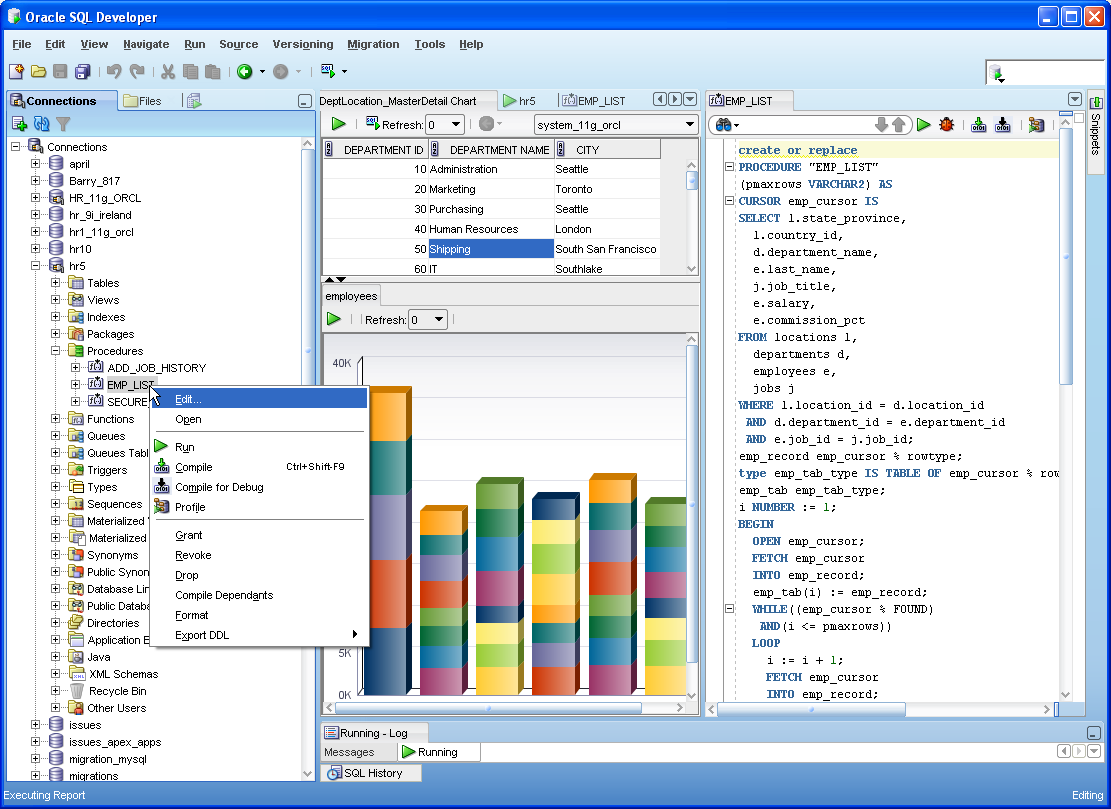
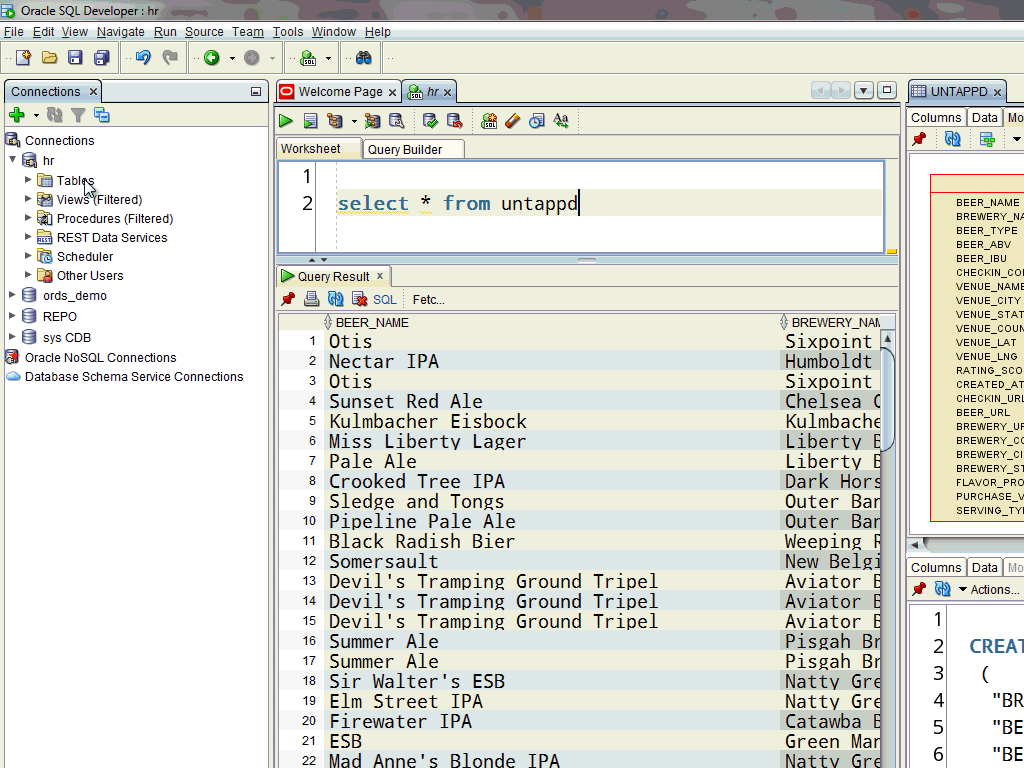
Creating and Executing PL/SQL
Oracle SQL Developer contains extensive PL/SQL editing capabilities. In this topic, you create a Package Spec and Package Body that adjusts an employee’s salary. Perform the following steps:
Select File > Open using the main menu.
Browse to the directory where you unzipped the files from the Prerequisites, select createHRpack.sql Click Open.
Select the HR_ORCL database connection from the the drop list on the right.
Click the Run Script icon.
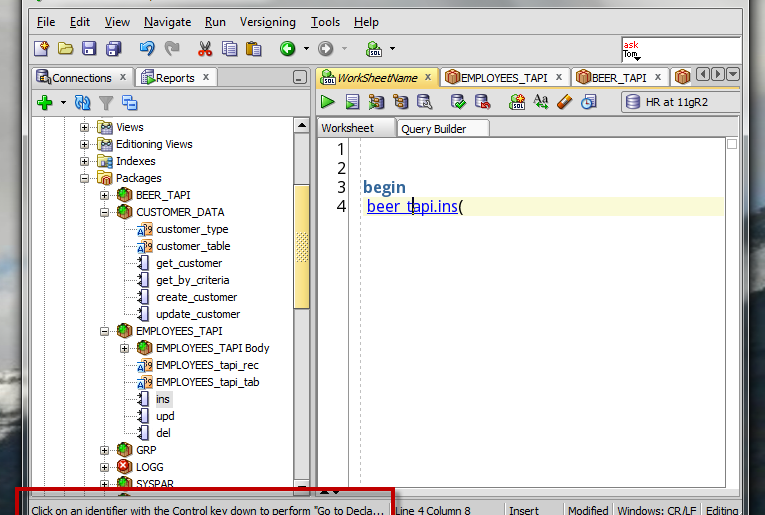
The package and package body compiled successfully. Click the Connections navigator.
Expand HR_ORCL > Packages > HR_PACK and select HR_PACK to view the package definition.
Double-click HR_PACK BODY to view the package body definition.
Click on any one of the — to collapse the code or press + to expand the code.
If your line numbers do not appear, you can right-click in the line number area and click Toggle Line Numbers to turn them on. This is useful for debugging purposes.
In the Connections Navigator, select Packages > HR_PACK, right-click and select Run.
A parameter window appears. Make sure that the GET_SAL target is selected. You need to set the input parameters here for P_ID and P_INCREMENT .
Set the P_ID to 102 and P_INCREMENT to 1.2 . What this means is that the Employee who has the ID 102, their salary is increased by 20%. The current SALARY for EMPLOYEE_ID 102 is 17000. Click OK.
The value returned is 20400.
To test the Exception Handling, right-click on HR_PACK in the navigator and select Run.
This time, change the P_INCREMENT value to 5 and click OK.
In this case, an exception was raised with «Invalid increment amount» because the P_INCREMENT value was greater than 1.5.
Adding a New Table Using the Create Table Dialog Box
You create a new table called DEPENDENTS which has a foreign key to the EMPLOYEES table. Perform the following steps:
Right-click Tables and select New TABLE.
Enter DEPENDENTS for the Table Name and click the Advanced check box.
Enter ID for the Name, select NUMBER for the Data type and enter 6 for the Precision. Select the Cannot be NULL check box. Then click the Add Column icon.
Enter FIRST_NAME for the Name, leave type as VARCHAR2 and 20 for the Size. Then click the Add Column icon.
Enter LAST_NAME for the Name, leave type as VARCHAR2 and enter 25 for the Size. Select the Cannot be NULL check box. Then click the Add Column icon.
Enter BIRTHDATE for the Name, select DATE for the Data type. Then click the Add Column icon.


Enter RELATION for the Name, leave type as VARCHAR2 and enter 25 for the Size. Click OK to create the table.
Your new table appears in the list of tables.
Установка подключения к Oracle
При подключении к базе данных SSMA считывает метаданные базы данных, а затем добавляет эти метаданные в файл проекта. Эти метаданные используются SSMA при преобразовании объектов в SQL Server синтаксисе и при переносе данных в SQL Server. Эти метаданные можно просмотреть в области обозревателя метаданных Oracle и просмотреть свойства отдельных объектов базы данных.
Важно!
Прежде чем пытаться подключиться, убедитесь, что сервер базы данных запущен и может принимать подключения.
Подключение к Oracle
-
В меню «Файл» выберите «Подключиться к Oracle».
Если вы ранее подключились к Oracle, имя команды будет повторно подключено к Oracle. -
В поле «Поставщик» выберите «Поставщик клиентов Oracle » или «Поставщик OLE DB» в зависимости от того, какой поставщик установлен. По умолчанию используется клиент Oracle.
-
В поле «Режим » выберите режим «Стандартный», «TNSNAME» или «Строка подключения».
Используйте стандартный режим, чтобы указать имя сервера и порт. Используйте режим имени службы, чтобы вручную указать имя службы Oracle. Используйте режим строки подключения для предоставления полной строки подключения. -
При выборе стандартного режима укажите следующие значения:
- В поле «Имя сервера » введите или выберите имя или IP-адрес сервера базы данных.
- Если сервер базы данных не настроен на прием подключений к порту по умолчанию (1521), введите номер порта, используемый для подключений Oracle в поле «Порт сервера «.
- В поле безопасности Oracle введите системный идентификатор.
- В поле «Имя пользователя» введите учетную запись Oracle с необходимыми разрешениями.
- В поле «Пароль» введите пароль для указанного имени пользователя.
-
Если выбран режим TNSNAME, укажите следующие значения:
- В поле идентификатора Connect введите идентификатор подключения (псевдоним TNS) базы данных.
- В поле «Имя пользователя» введите учетную запись Oracle с необходимыми разрешениями.
- В поле «Пароль» введите пароль для указанного имени пользователя.
-
Если выбран режим строки подключения, укажите строку подключения в поле «Строка подключения «.
В следующем примере показана строка подключения OLE DB:В следующем примере показана строка подключения клиента Oracle, использующая встроенную безопасность:
Дополнительные сведения см. в разделе Connect To Oracle (OracleToSQL).
Необходимые разрешения Oracle
Как минимум, учетная запись, используемая для подключения к базе данных Oracle, должна иметь следующие разрешения:
-
Требуется для подключения (создания сеанса) к базе данных.
-
Требуется для запроса системных таблиц словаря (например, для обнаружения всех объектов).
Это позволит SSMA загружать все объекты в схеме, принадлежащей подключаемого пользователя. В большинстве реальных сценариев между хранимыми процедурами и SSMA существуют ссылки между хранимыми процедурами и SSMA должны иметь возможность обнаруживать все объекты, на которые ссылается ссылка, для успешного преобразования. Чтобы получить метаданные для объектов, определенных в других схемах, учетная запись должна иметь следующие дополнительные разрешения:
-
Требуется для обнаружения таблиц, представлений, материализованных представлений и синонимов в других схемах.
-
Требуется для обнаружения последовательностей в других схемах.
-
Требуется для обнаружения PL/SQL для процедур, функций и пакетов в других схемах.
-
Требуется для обнаружения определений триггеров в других схемах.
-
Требуется для обнаружения типов, определенных в других схемах.
Для некоторых функций SSMA требуются дополнительные разрешения. Например, если вы хотите использовать функцию тестирования и управления резервными копиями , необходимо предоставить подключающегося пользователя следующим образом:
-
Требуется для выполнения процедур и функций, которые вы хотите протестировать во всех схемах.
-
и
Требуется для создания и изменения временных таблиц для отслеживания изменений и резервного копирования. -
и
Требуется для вставки данных отслеживания изменений и резервного копирования во временные таблицы. -
Требуется для удаления временных таблиц, используемых для отслеживания изменений и резервного копирования.
-
и
Требуется для создания и изменения индексов временных таблиц, используемых для отслеживания изменений и резервного копирования. -
Требуется для удаления индексов временных таблиц, используемых для отслеживания изменений и резервного копирования.
-
и
Требуется для создания и изменения временных триггеров, используемых для отслеживания изменений. -
Требуется для удаления временных триггеров, используемых для отслеживания изменений.
Примечание
Это универсальный набор разрешений, необходимых для правильной работы SSMA. Если вы хотите сузить область миграции до подмножества схем, это можно сделать, предоставив указанные выше разрешения ограниченному набору объектов, а не . Хотя это возможно, может быть очень трудно правильно определить все зависимости, тем самым предотвращая правильное функционирование SSMA. Настоятельно рекомендуется придерживаться универсального набора, как определено выше, чтобы устранить потенциальные проблемы с разрешениями во время миграции.
Oracle 19c installation on Windows 10
In this section, we will walk you through the steps to download and install the oracle database 19c on your windows operating system (Windows 10).
We highly encourage you to download the Oracle database from the official website. Click on the below button to navigate to the exact download page. Please note that you will need an Oracle account to download the file.
- Once downloaded, extract the file in the location of your choice. We have extracted the file in our download folder but we advise you to create a new folder ‘Oracle’ inside windows and then extract the zip file there
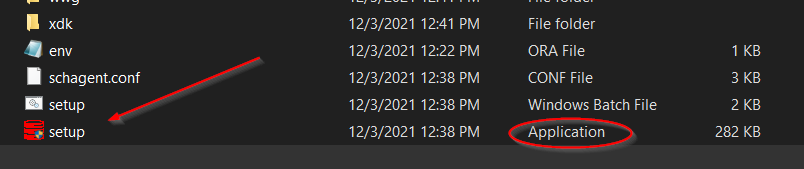
- Navigate inside the WINDOWS.X64_193000_db_home folder and run the setup file as Administrator.
Oracle Database Setup
‘Select configuration Option’ wizard will open, choose the first option which says ‘create and configure a single instance database’ and click on Next button.
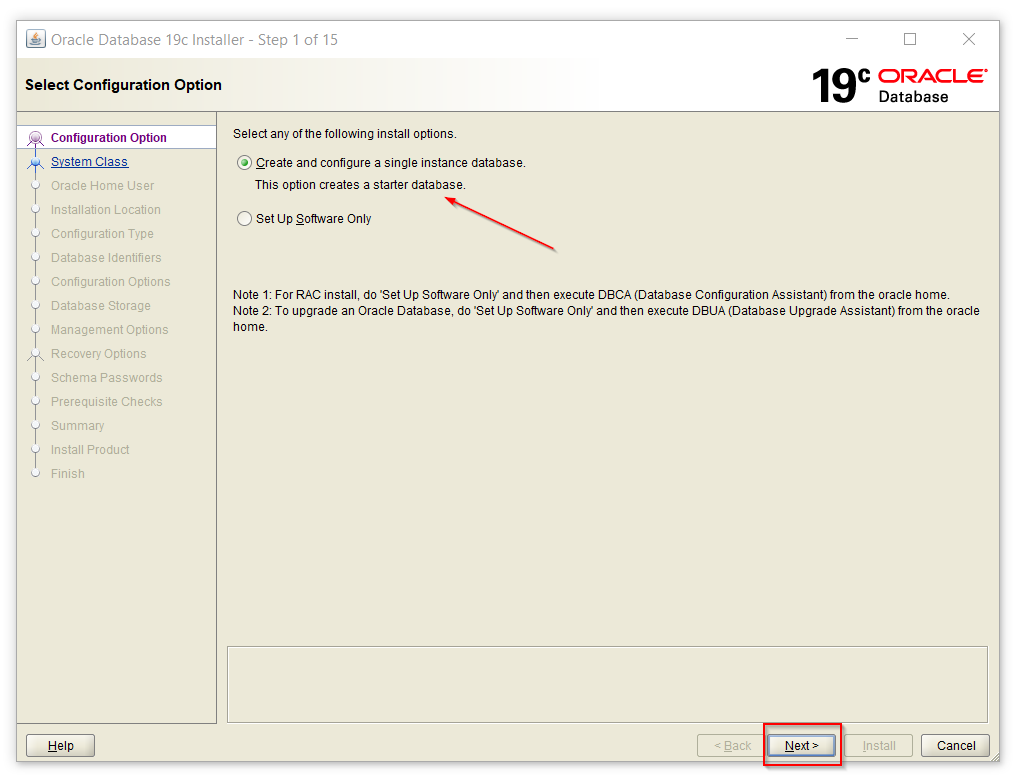
Step 1: Select Configuration Option
- Once configuration is selected then ‘System Class’ wizard will open. In this wizard, you can select between desktop class and server class.
- Desktop class povides starter database and allows minimal configuration.
- Server class provides all the tools & configurations to facilitate production data center work.
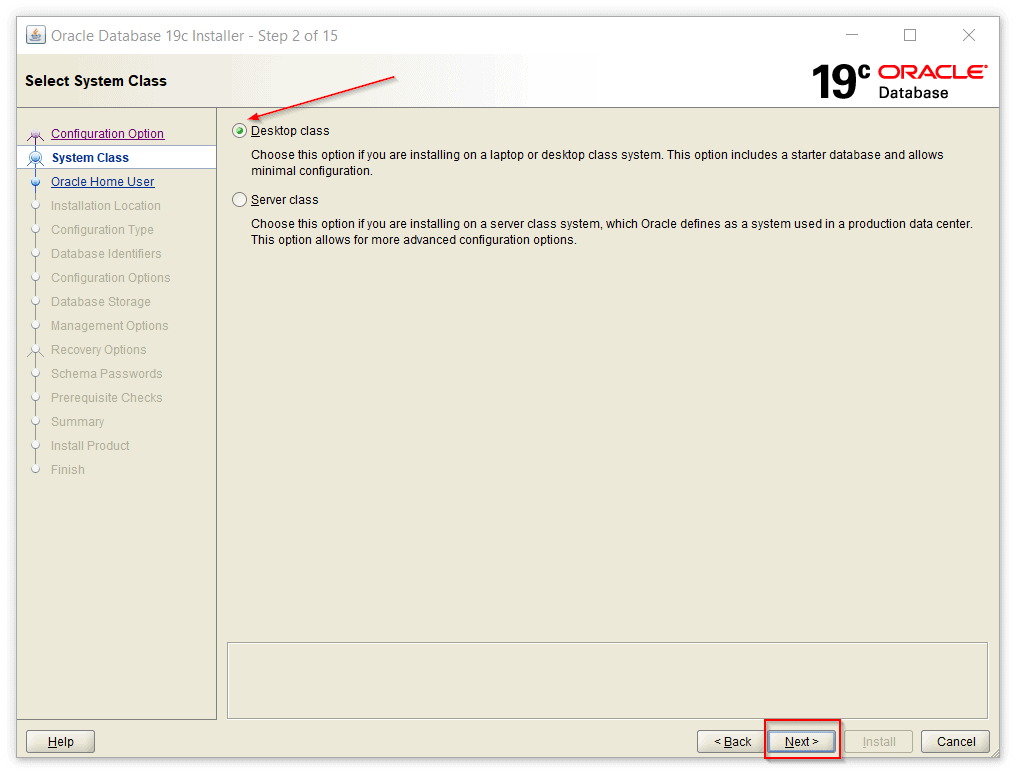
Step 2: Select System-Class
‘Specify Oracle Home User’ wizard will open, here you can choose any option as per your preferences. In our case, we have selected ‘create new windows user‘ and providednew user name & password. Once completed this step click on the next button.
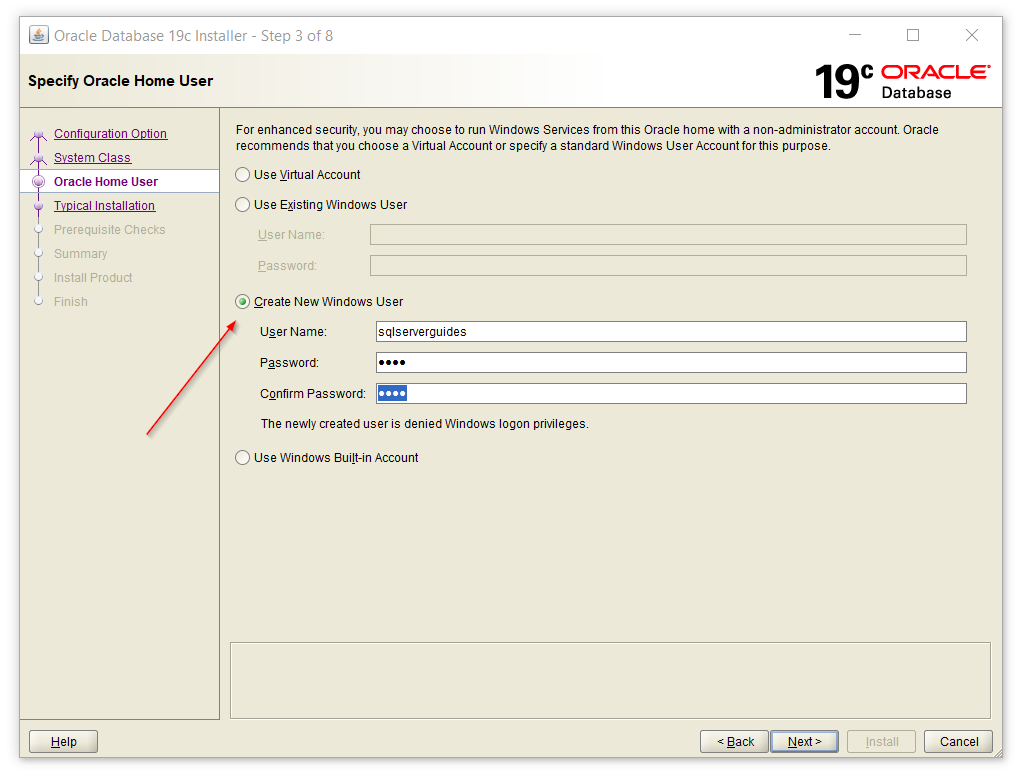
Step 3: Oracle Home User
- ‘Typical Install Configuration’ wizard contains the most important configurations please makea note of the credentials.
- Oracle base holds the path of extracted zip file. In our case, zip file is extracted in the downloads folder that is why downloads path is displayed.
- Database file location is the path where database is stored. New folder with the name oradata is created.
- Select Enterprise Edition in data base edition dropdown.
- Global database name is the important here please remember whatever name you are going to provide it.
- This password will be used to access orcl global database. The password must have uppercase, lowercase, number and special character to meet the oracle standard.
- Plugged database name is also important please keep a record of it to avoid trouble in future. Click on next button.
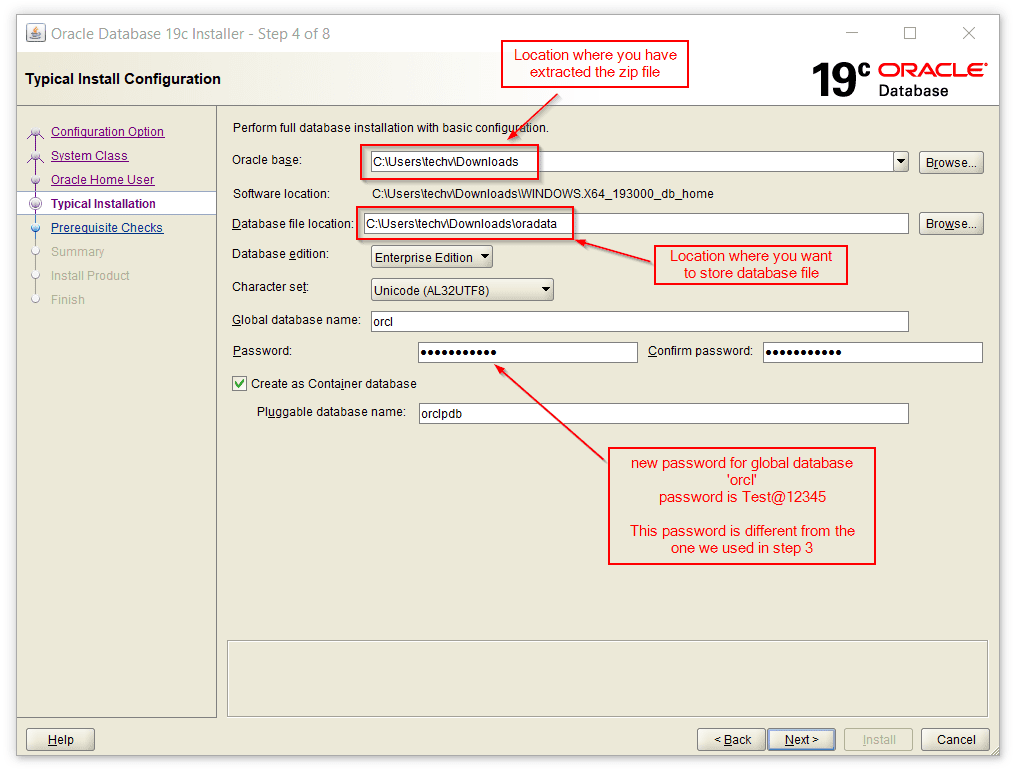
Step 4: Typical Install Configuration
Once the Typical install configuration is completed the system will perform prerequisite checks where it will check for various parameters and that will be step 5. Once all the checks are passed it will redirect you to the Summary wizard.
In the ‘Summary’ wizard all the setting you have selected so far will be displayed and from here we will move to install the orace database 19c software, click on the install button to proceed.
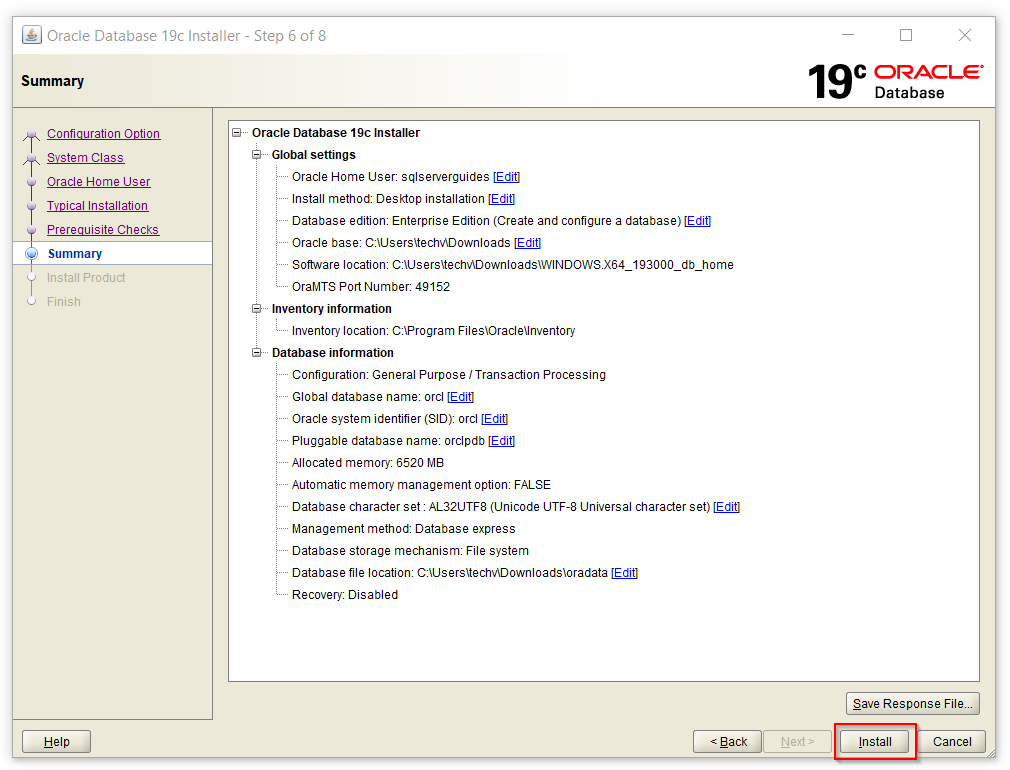
oracle database installation step 6: summary
Next wizard is ‘Install Product’, Here the product will be installed on the device, this may take some time. You will see green ticks for all the completed steps. Also, there will be a ‘windows security alert’ prompt. click on the allow access.
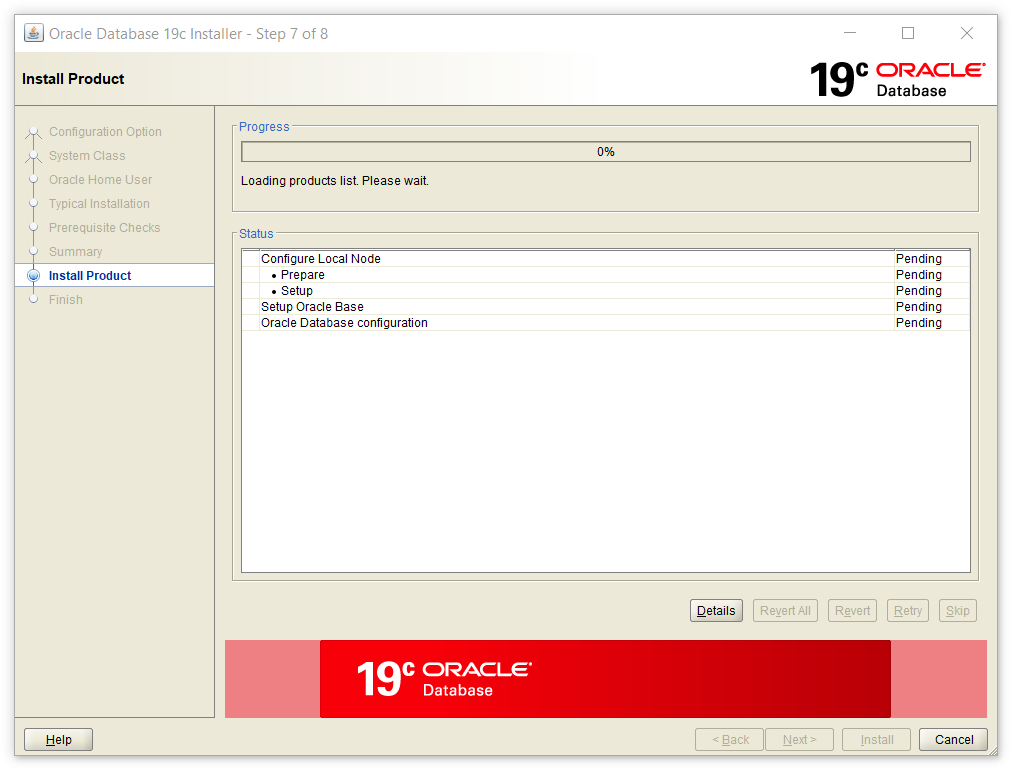
step 7: Install product
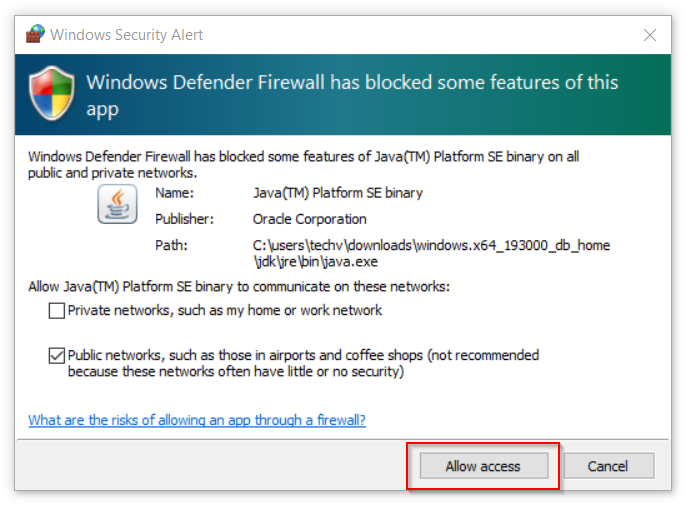
Allow Access to Windows Defender Firewall
Once the installation is complete ‘finish’ window will appear. The oracle database 19c is successfully installed in your system now.


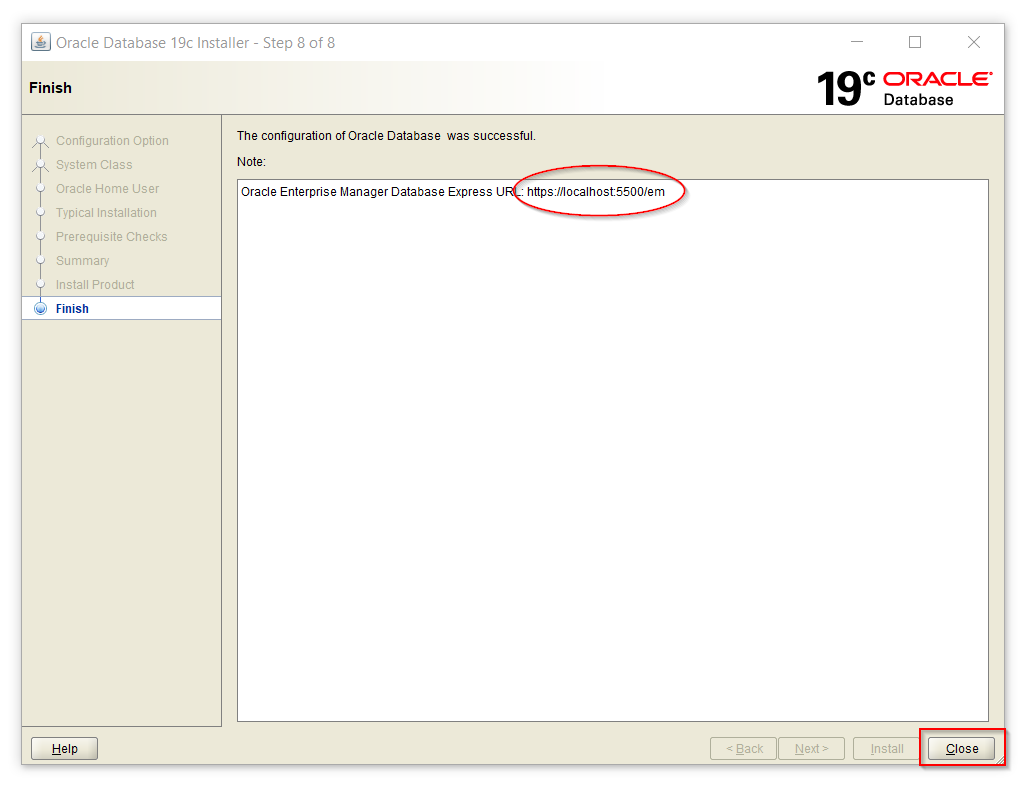
Step 8: finish
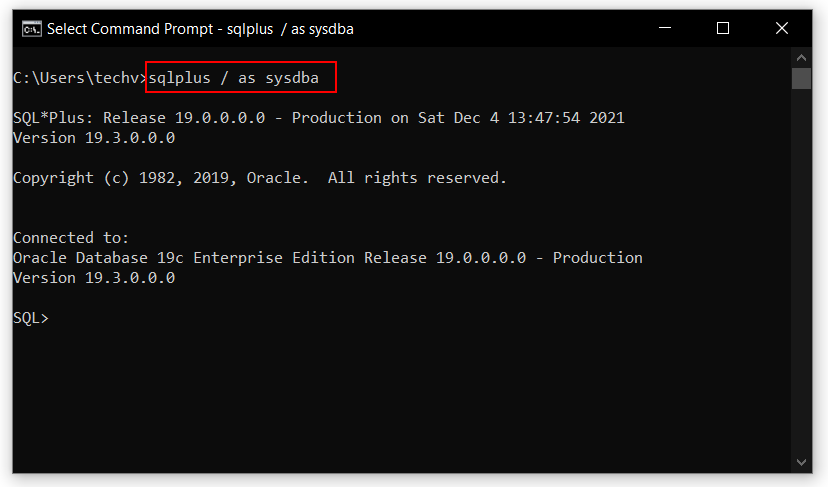
Once the installation is complete its time to use oracle database 19c. Open command prompt and type sqlplus / as sysdba to connect with the system predefined database.
Oracle Database 19c overview
Read How to create a database in Oracle 19c
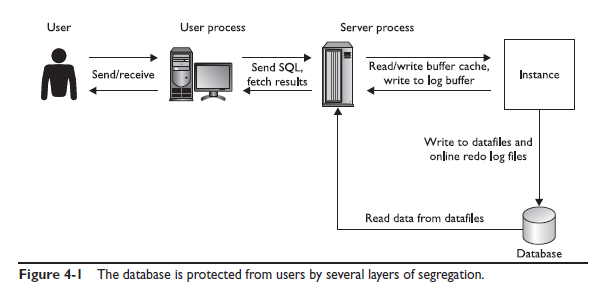
Oracle Net и клиент-серверная парадигма
Пользователя и базу данных разделяет множество уровней. В окружении Oracle ни пользователи не имеют прямого доступа к базе данных, ни пользовательские процессы. Клиент-серверная архитектура гарантирует что любой доступ к БД контролируется сервером.
Пользователь взаимодействует с пользовательским процесс: это приложение которое запущено на локальной машине. Например Microsoft Acces и ODBC Driver, либо приложение написанное на C и использующее OCI библиотеки или SQL *Plus. Какое бы это ни были приложение, назначение пользовательского процесса одинаковое – позволить пользователю вводить информацию, которую приложение может использовать для генерации SQL запросов. В случае SQL *Plus пользовательский процесс будет просто ждать ввода запроса — более продвинутые инструменты могут отображать свойства объектов БД, генерировать и валидировать SQL команды, в любом случае будет сформирован SQL запрос, который передаётся серверному процессу.
Серверный процесс работает на сервере базы данных и выполняет запросы, полученные от пользовательского процесса. Это базовое клиент-серверное разделение: пользовательский процесс создаёт SQL, серверный процесс выполняет. Выполнение SQL запроса происходит в четыре этапа: разбор (parse), связывание (bind), выполнение (execute) и выборка(fetch). На этапе разбора сервер определяет валиден ли запрос, какие объекты используются и как выполнить запрос максимально быстро. Разбор использует shared pool: стурктуры памями используются для преобразования SQL в исполняемый код. На этапе связсывания – все переменные преобразуются в литералы. Этап выполнения будет использовать SGA и возможно саму базы данных. Во время выполнения данные в буфере кэша будет считываться или обновляться, изменения записываться в буфер логов, и если необходимых блоков нету в буфере серверный процесс считает их из файлов данных. Это единственный момент времени при выполнении запроса когда используется сама база данных. И, наконец, на этапе выборки серверный процесс отправит результирующий набор данных полученный в результате выполнения запроса назад пользовательскому процессу, и пользовательский процесс преобразует результат для отображения.
Oracle net предоставляет механизм для запуска серверного процесса, который будет выполнять код от имени пользовательского процесса. Этот механизм называют установкой сессии. Также Oracle Net используется для поддержки сессий: передачу SQL запросов от пользовательского процесса к серверному, и получение результатов выполнения запросов от сервеного процесса к пользовательскому.
На рисунке 4-1 отображены компоненты сессии. Пользователь взаимодействует с пользовательским процессом, пользовательский процесс в свою очередь взаимодействует с серверным процессом используя Oracle Net; серверный процесс работает с экземпляром БД и экземпляр при помощи фоновых процессов работает с базой данных. Клиен-серверное разделение осуществляется между пользовательским процессом создающим SQL запросы и серверным процессом выполняющим их. Это разделение обычно будет и физическим, так же как логическим: обычно серверные и клиентские машины соединены с помощью локальной сети, так же они могут соединяться с помощью сети интернет или вообще работать на одной физической машине. Oracle Net отвечает за установку соединения (создание сессии) и все взаимодействие между серверным и пользовательским процессом.
Creating Reports
As the SQL you just ran in the previous topic needs to be executed frequently, you can create a custom report based on the SQL. In addition, you can run a report of your database data dictionary using bind variables. Perform the following steps:
Select the SQL in the HR_ORCL SQL Worksheet that you executed, right-click and select Create Report.
Enter a Name for the report and click Apply.
Select the Reports tab, expand User Defined Reports and select the report you just created.
Select HR_ORCL from the drop list and click OK to connect to your database.
The results of your report are shown.
You can also run a Data Dictionary report. Expand Data Dictionary Reports > Data Dictionary. Then select Dictionary Views..
Deselect the NULL check box, enter col for the Value and click Apply.
All the Data Dictionary views that contain ‘col’ in its name are displayed.
Brief History of Oracle database & its versions
Oracle database is a powerful and safe relational database software created by Oracle corporation. It was developed in 1977 by three friends Larry Ellison, Bob Miner, and Ed Oates at SDL (Consultancy Software Development Lab).
| Year | Description |
|---|---|
| 1977 | the first version was released in the name RSI (Relational Software Inc.) |
| 1979 | Oracle version 2 was released as the first commercially based RDBMS |
| 1982 | A portable version of the oracle database was released as Oracle version 3. Company name changed from RSI to Oracle Systems Corporation |
| 1985 | Oracle V4, V5, V6 were released with Enhancements to concurrency control, data distribution, and scalability. |
| 1992 | Oracle V7 released with PL/SQL store program unit. |
| 1997 | Oracle V8 released with objects and partitioning |
| 1999 | Oracle V8i released with Internet computing |
| 2001 | Oracle V9i released with Oracle Real Application Clusters (Oracle RAC) |
| 2003 | Oracle V10g released with Grid Computing |
| 2007 | Oracle database 11g released with the following features: Manageability, diagnosability, and availability. |
| 2009 | Oracle database 11g release 2 with Edition Based Redefinition, Hybrid Columnar Compression, Replication, Database Appliance, Cluster File System, Golden Gate, Data Redaction. |
| 2013 | Oracle Database 12c Release 1 with features like Database Cloud Service, In-Memory Column Store, JSON, Native, SQL Pattern Matching, Multitenant architecture |
| 2017 | Oracle Database 12c Release 2 with features like Zero Data Loss Recovery Appliance, Native Sharding, etc. |
| 2018 | Oracle Database 18c released with features like Online Merging of Partitions and Subpartitions, Active Directory Integration, etc. |
| 2019 | Oracle Database 19c was released which is the latest stable version so far. It has Automated PDB Relocation, Automatic SQL Plan Management, , Zero-Downtime Grid Infrastructure Patching, etc. |
| 2021 | Oracle Database 21c is in innovation mode and it supports advanced features related to blockchain, machine learning, SQL Macros, etc. |
Read How to Get List all Tables in Oracle Database
Oracle 19c Installation on Windows 10 Step by Step
Installing Oracle Database 18c XE with a different character set
Oracle 18c XE ships again with all character sets, unlike 11g XE, which only shipped with . Oracle did this to help users to migrate from their country or region specific character set to the recommended UTF-8 one. You can (now again) install an 18c XE with your country/region specific character set but also with UTF-8 and see whether your applications still run the same, or fix them. On that note, I urge everybody to adopt the UTF-8 character set as soon as possible. UTF-8 is a superset of all regional characters and there should be no reason from the database side of things as to why you cannot adopt it. And if there is, please let me know so that we can overcome it. You may find that in the future it will get harder and harder to use other character sets than UTF-8.
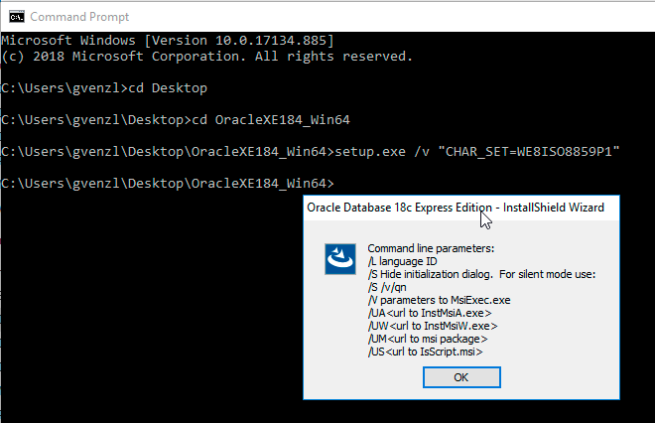
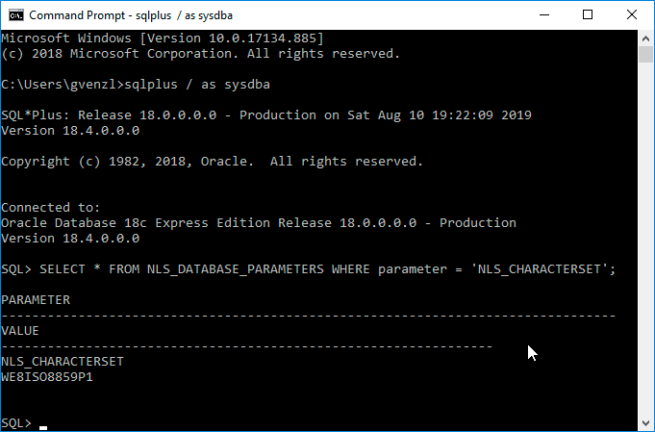
The default character set for 18c XE is, just like in 11g XE, . So if your application already happily runs on 11g XE or 18c XE today, you are all set! If you want to install 18c XE with a different character set, the installer wizard unfortunately doesn’t provide you the option to choose one. Instead you will have to call the from the command line and pass on the parameter, as . You can do this by opening a command prompt, change into the extracted Oracle Database 18c XE installer directory and call . Let’s say you want to install Oracle Database 18c XE with the character set. You will have to call like this: .
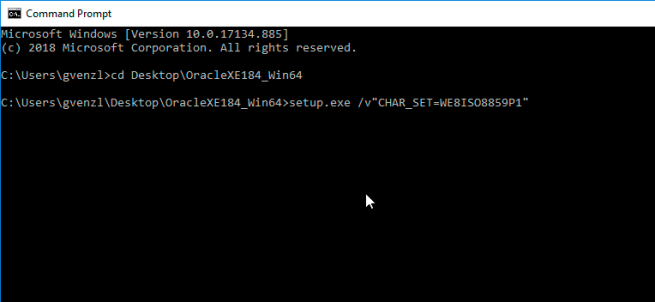
Note: It is very important that you pass on the and quotes with no space in between, just like above! Otherwise you will get the following window as error:
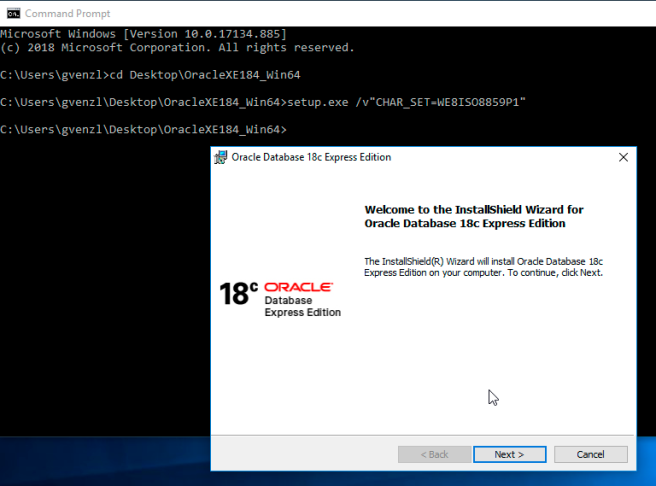
Once you hit you will once again be prompted by Windows as to whether you want to allow this app to make changes to your machine. Click “Yes” to proceed.

Now you are back again at the same installer wizard as shown above. All steps from here on remain the same. The only difference is that the database will be created with the character set.
Once your installation is completed you can verify that by executing the following query:
How to Install SQL Developer on Windows?
SQL Developer is a free, integrated development environment that simplifies development and management. SQL Developer offers complete end-to-end development of your PL/SQL applications, a worksheet for running queries and scripts.
Installing SQL Developer on Windows:
Follow the below steps to install SQL Developer on Windows:
Step 1: Browse to this link.

Step 2: Click on download.
Step 3: Login in Oracle account or create a new account. It is free
Step 4: Extract the downloaded zip file.

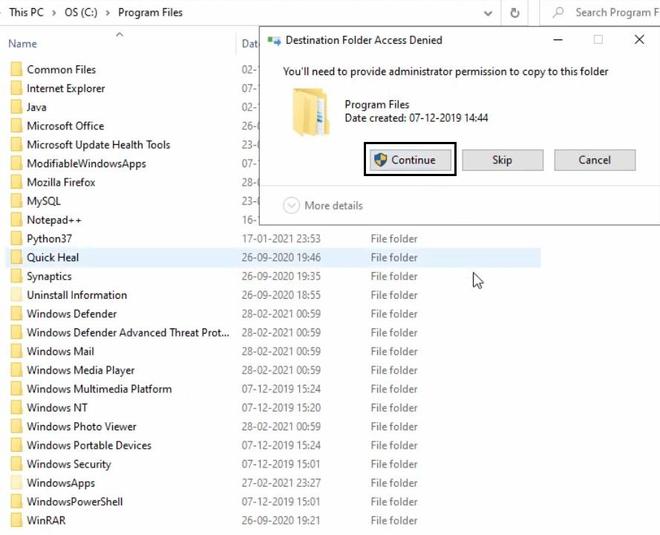
Step 5: Open your computer C drive & program files. Cut & Paste the extracted file there.
Step 6: Open the folder.
Step 7: Then open sqldeveloper folder.
Step 8: Find the sqldeveloper exe file there. Create a shortcut on desktop.


How to Install SQL Developer on Windows 10
Installing SQL Developer is a 2 step process.
Step 1: Install latest version of Java Development Tool Kit (JDK) Step 2. Install SQL Developer.
Step
1: Install Java Development Kit (JDK) on Windows 10
SQL Developer require latest version of
Java Development Kit (JDK) installed on your windows 10. Thus before installing
and start working with SQL Developer we need to properly install JDK.
If you already have latest version of JDK installed
on your system then you can directly jump onto the step 2 and install SQL
Developer.
Download
Java Development Tool Kit (JDK)
To install Java Development kit on windows 10 first we need to download it. You can do so by visiting Oracle website or you can also click here for the direct link.
JDK installation is fairly simple. Once you have downloaded the JDK according to the Operating system then right click the .exe file and select “run as administrator” option that will start the installation.
Install
Java Development Tool Kit (JDK) on Windows 10.
Screen1:
On welcome screen of JDK installer simply press “Next”
Screen
2:
From screen 2 copy the “JDK home” path.You need to specify the location of your JDK home to the SQL Developer thus make sure to note it down somewhere. Click “Next” – that will start the installation.
Screen
3:
Java Development Tool kit (JDK) installer will also install the Java Run time Environment (JRE) on your system. On screen3 you can change the JRE installation location if you want otherwise hit next.
Screen
4:
JDK installer screen 4 is the last step. Here you simply have to click close.
Step
2: Install SQL Developer on Windows 10.
SQL Developer does not require any installation on your system. You simply have to extract the files and execute the SQL Developer and start working.
Download
the SQL Developer Software
You can either download the SQL Developer software from oracle website or click here for the direct SQL developer download page link.
To download the SQL Developer first you need to accept the “License agreement” and then choose the SQL Developer version according to your operating system architecture. You will also need to sign-in into your free oracle account to download the desired files.
All the SQL Developer software contents are downloaded as zipped files. To start working with SQL Developer you need to first un-zip the content of your download.
After that go to the folder SQL Developer which you just un-zipped and find the executable file with the name“SQLDeveloper.exe” then double click and execute it. This will launch the SQL Developer software.
Sometimes execution might give a“publisher security warning”. There is no need to panic SQL Developer is designed, developed and maintained by oracle and it is completely secure. Just simply hit “Run” and proceed ahead.
Though it happens rarely yet SQL Developer might ask you to specify the “JDK home” path. In such case supply the JDK home location in the pop-up box which you noted down in the 2nd step of the JDK installation.
All the steps shown above can be used for installing SQL Developer on Windows 10 x64 as well as x32 bit version.


