Сериализация примитивных типов и коллекций в JSON
Вторая группа средств работы с JSON хороша тем, что избавляет вас от рутинной работы по чтению/записи каждого отдельного значения или свойства. При чтении документы JSON отображаются в фиксированный набор типов платформы: Строка, Число, Булево, Неопределено, Массив, ФиксированныйМассив, Структура, ФиксированнаяСтруктура, Соответствие, Дата. Соответственно, в обратную сторону, композиция объектов этих типов позволяет сформировать в памяти и быстро записать в файл структуру JSON. Таким образом, чтение и запись небольшого объема JSON заранее известной структуры можно производить немногими строчками кода.
Основное назначение этих средств мы видим в обмене информацией с внешними системами, чтении конфигурационных файлов в формате JSON.
Сериализацию вы можете выполнять с помощью методов глобального контекста ПрочитатьJSON() и ЗаписатьJSON(). Они работают в связке с объектами ЧтениеJSON и ЗаписьJSON.
В качестве примера десериализации JSON можно рассмотреть чтение массива из двух объектов:
Код 1С:Предприятия, выполняющий десериализацию, может выглядеть следующим образом:
А пример сериализации (записи) в JSON может выглядеть так:
Результат записи:
{
	"Фамилия": "Иванов",
	"Имя": "Иван",
	"Отчество": "Иванович",
	"Возраст": 40,
	"Женат": true,
	"Телефоны":
}
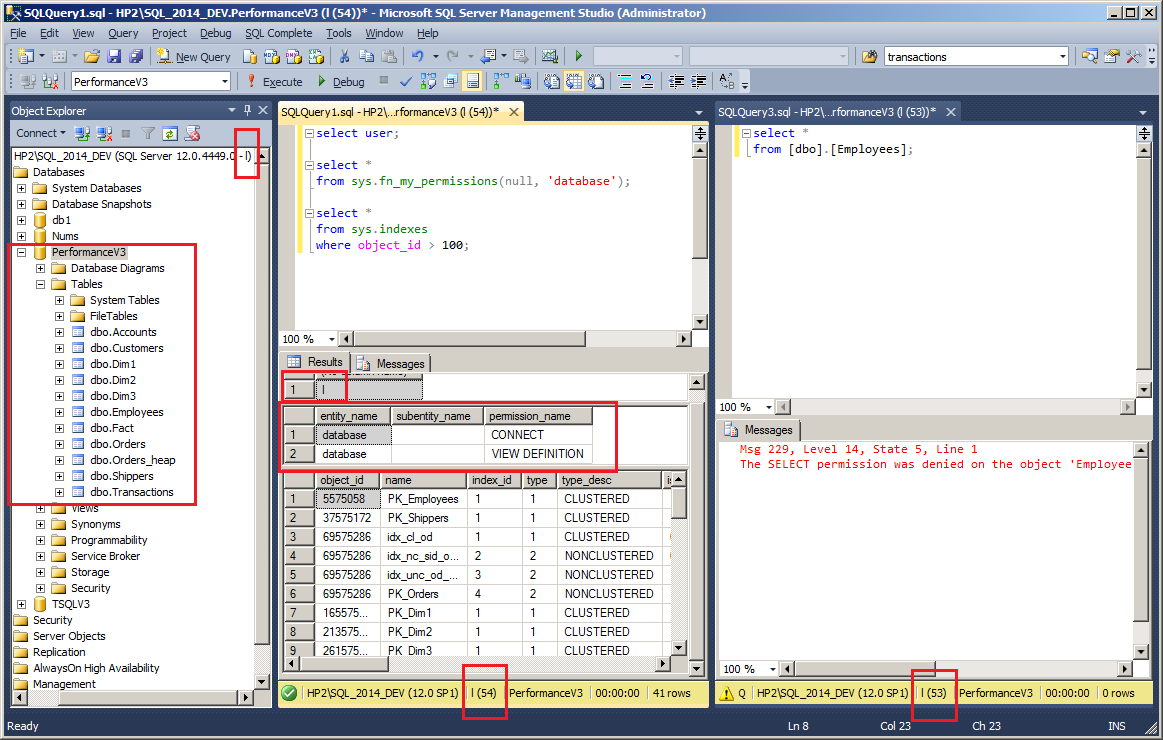
Знакомимся с MS SQL 2016
Новая версия разрабатывалась воистину ударными темпами. Не успели познакомиться с версией 2014 (вышла 1 апреля 2014 года), как буквально через год, в мае 2015-го, на конференции Ignite был представлен очередной релиз, а для загрузки выложили сразу Community Technology Preview 2. Финальная версия вышла 1 июня 2016 года. В новом релизе MS, очевидно, сделала шаг в направлении общей кодовой базы SQL Server и Azure SQL Database, что довольно логично. Функции, ранее появившиеся в Azure SQL DB (вроде Row-Level Security и Dynamic Data Masking), теперь доступны и для локального сервера.
Вместе с релизом SQL Server 2016 MS представила агрессивную программу перехода с СУБД лидера рынка Oracle (занимает примерно 40% против 21% у MS), включающую «бесплатную» лицензию (заплатить нужно будет за подписку на Software Assurance), инструменты для миграции и обучение персонала. При построении БД с нуля СУБД от Miсrosoft обойдется на порядок дешевле. Предлагаются две лицензии: одна основана на вычислительных мощностях (Core-based), вторая — на количестве пользователей или устройств (Server + Client Access License). Oracle работает под Linux, и здесь у MS тоже есть сюрприз: анонсировано, что новая версия также будет работать под управлением этой ОС. Хотя сам релиз под Linux выйдет примерно в середине 2017 года.
Реализовано пять версий: Enterprise, Standard, Express, Developer и Web. Версия Developer Edition доступна бесплатно и обладает всеми возможностями Enterprise, но предназначена исключительно для разработки и тестирования, ее нельзя использовать в рабочих средах. Числовые показатели по сравнению с 2014 практически не изменились. Максимальный размер баз данных 524 Пбайт, у Express — 10 Гбайт. Максимальный объем используемой памяти на экземпляр: Express — до 1 Гбайт, Standard — 128 Гбайт, остальные ограничены возможностями ОС. Максимальное количество ядер: Express — до четырех, Standard — 24 (в 2014 — 16).
Как принято, новый релиз поддерживает минус одно поколение ОС. Из списка выпали Win7 и Win2k8. Возможна установка SQL Server на все x64-редакции Windows от 8 и Win2012, в том числе и урезанные Core и Nano. Особо отмечается, что процессоры x86 больше не поддерживаются.
С нового релиза SQL Server Management Studio (SSMS) поставляется отдельно, а сам он теперь управляет всеми редакциями SQL Server от 2008 (включая будущую SQL 2016 под Linux). То есть теперь не придется держать несколько SSMS для работы с разными релизами СУБД. Установка SSMS возможна на Win7SP1+/Win2k8+.
Выбор компонентов при установке MS SQL 2016
Другие статьи в выпуске:
Xakep #210. Краткий экскурс в Ethereum
- Содержание выпуска
- Подписка на «Хакер»-60%
В SSMS появилось несколько полезных возможностей. Например, Live Query Statistics позволяет наблюдать за ходом выполнения запроса. Полученные сведения (время, количество данных, процент выполнения) можно использовать для оптимизации. Активируется функция при помощи кнопки Include Live Query Statistics, в сессии должен быть включен сбор статистики (, ). Модуль PowerShell для работы с MS SQL sqlps, идущий в комплекте SQL 2016, поддерживает управление всеми версиями от SQL2k (конечно, в более ранних версиях сервера будут недоступны некоторые функции). Также изменения коснулись набора дополнений к Visual Studio — SQL Server Data Tools для Visual Studio. Раньше были доступны две версии: собственно SSDT и SSDT-BI (Business Intelligence), теперь они объединены в один пакет.
В документе SQL Server 2016 and Windows Server 2016 Better Together разработчики приводят примеры, почему только сочетание MS Server 2016 и SQL Server 2016 обеспечит максимальную безопасность и производительность. Например, Win2016 поддерживает технологию энергонезависимой памяти Storage Class Memory (SCM), в том числе и NVDIMM — они заменяют обычные DIMM-модули памяти, но умеют хранить информацию при потере питания. Применяя их, можно добиться существенного прироста производительности. С помощью технологии Storage Spaces Direct на основе стандартных серверов с локальным хранилищем можно создать высокодоступное и масштабируемое хранилище данных.
Еще две технологии — Just-In-Time (JIT) и Just Enough Administration (JEA) — позволяют ограничить администратора в правах по времени или при помощи PowerShell делегировать пользователю ровно те права, которые ему нужны, чтобы выполнять работу.
В SSMS теперь можно следить за ходом запроса
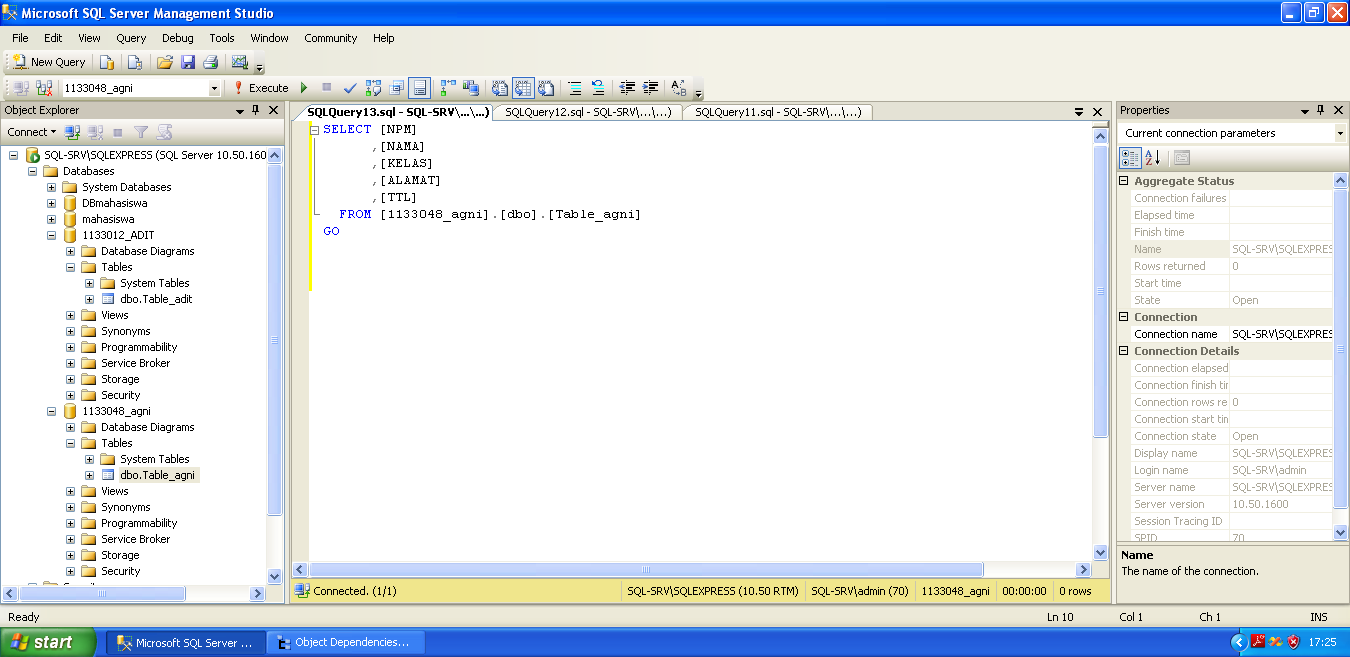
JSON data import in SQL Server
We require JSON data import into the SQL Server table from the .json file created earlier.
Step 1: Import file using OPENROWSET
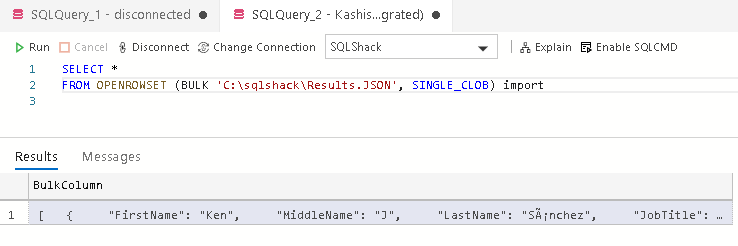
The first step is to load the JSON file content in a table. We can use the table value function OPENROWSET for reading data from a file and return a table in the output. This table contains a single column and loads entire file data into it.
Specify the complete file path in the OPENROWSET function:
|
1 |
SELECT* FROMOPENROWSET(BULK’C:\sqlshack\Results.JSON’,SINGLE_CLOB)asimport |
It returns the JSON file output and contains the column BulkColumn as shown below:
Starting from SQL Server 2016, we have a function ISJSON for validating the JSON format. It checks the JSON stored in the @JSON having data type Varchar(max).
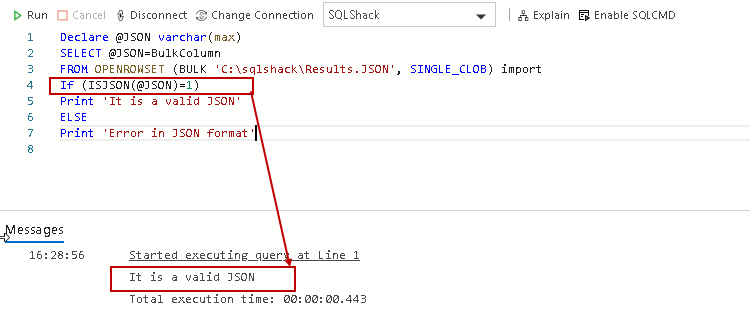
In the following query, the @JSON variable reads the BulkColumn from the imported file, and further, we pass this variable into the function ISJSON() for checking the syntax. It returns value 1 if JSON is a valid structure:
|
1 |
Declare@JSONvarchar(max) SELECT@JSON=BulkColumn FROMOPENROWSET(BULK’C:\sqlshack\Results.JSON’,SINGLE_CLOB)import If(ISJSON(@JSON)=1) Print’It is a valid JSON’ ELSE Print’Error in JSON format’ |
In the following screenshot, verify that the JSON structure is valid:
Step 2: Convert JSON output from the variable into SQL Server tables
We use OPENJSON() function for converting the JSON output from a variable into a tabular format. We get the output in different rows and columns, and later, it can be inserted into SQL Server tables.
Let’s run the following command without specifying any additional parameter. By default, it returns all key-value pairs at the first level in the output:
|
1 |
Declare@JSONvarchar(max) SELECT@JSON=BulkColumn FROMOPENROWSET(BULK’C:\sqlshack\Results.JSON’,SINGLE_CLOB)import SELECT* FROMOPENJSON (@JSON) |
In this output, we can see the following columns:
- Key: We can consider it as a row number in a table. In JSON format, it is a combination of key-value pair enclosed in the curly brackets {}
- Value: It is the property value. In this case, we can see it is a combination of the column name and its value
- Type: It is the type of object such as String, Boolean, number, array or object
We want the output like a query output in a tabular format. We can use the WITH clause in the above query along with the column definition. It is like defining a table with appropriate column names and their data types. Once we use a WITH clause, OPENJSON reads the JSON object array and converts the individual value as per specified data type and prints in the output.
In the following query, we specified all output columns with appropriate data types:
|
1 |
Declare@JSONvarchar(max) SELECT@JSON=BulkColumn FROMOPENROWSET(BULK’C:\sqlshack\Results.JSON’,SINGLE_CLOB)import SELECT* FROMOPENJSON (@JSON) WITH ( FirstNamevarchar(20), MiddleNamevarchar(20), LastNamevarchar(20), JobTitlevarchar(20), PhoneNumbernvarchar(20), PhoneNumberTypevarchar(10), EmailAddressnvarchar(100), EmailPromotionbit |
In this output, we get the results similar to query output we get earlier in this article:
Ideally, we should specify the similar data type that we use in the table else it might cause issues due to data type conversion errors:
|
1 |
Declare@JSONvarchar(max) SELECT@JSON=BulkColumn FROMOPENROWSET(BULK’C:\sqlshack\Results.JSON’,SINGLE_CLOB)import SELECT* FROMOPENJSON (@JSON) WITH ( FirstNamevarchar(20), MiddleNamevarchar(20), LastNamevarchar(20), JobTitlevarchar(20), PhoneNumbernvarchar(20), PhoneNumberTypevarchar(10), EmailAddressnvarchar(100) ) |
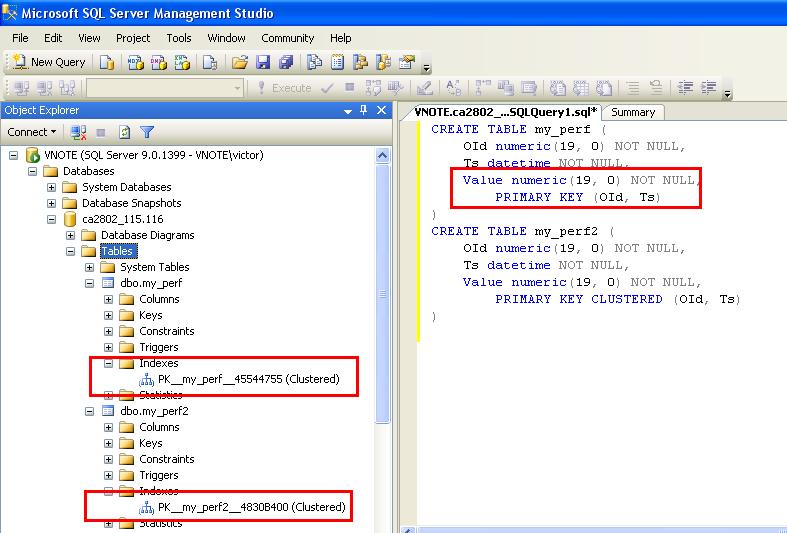
Improve the Performance of JSON Queries
The JSON support and features in SQL Server are pretty good, and each version includes more features.
So, given that you can add JSON columns to tables, extract fields, and get all the flexibility of JSON fields with validation, wouldn’t it be better to just store all of your data in JSON fields rather than normalised tables?
Well, sometimes that might be a good idea. But then you may be better off using a NoSQL database rather than SQL Server.
Another reason why using primarily JSON fields to store your data is not a good idea is that it can struggle with performance.
Select Performance
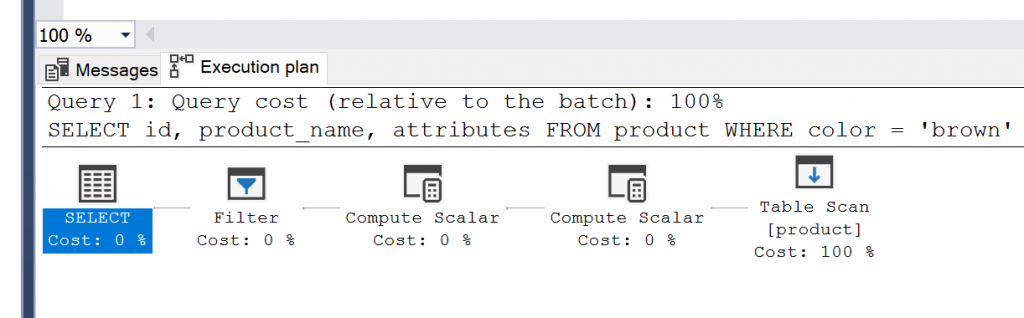
For example, let’s say we want to select all products where the color is brown. We can use the JSON_VALUE function in the WHERE clause that we saw earlier in this guide:
Let’s see the execution plan for this:

The execution plan shows a Full Table Scan step, which is a slow type of access. This might be OK for our table, which only has a few records, but once you start working with larger tables it can be quite slow.
So, using the JSON_VALUE function in the WHERE clause will mean a full table scan is used.
What can we do?
One Solution to Selecting Data
Fortunately, SQL Server allows you to define a virtual column on the table, and create an index on that virtual column. This should make our query faster.
A virtual column is a column that is a calculation based on another column in the table.
Let’s see how we can do that.
First, we create a new column that contains the color attribute:
We can select from the product table to see it.
| id | product_name | color | attributes |
| 1 | Chair | brown | {“color”:”brown”, “material”:”wood”, “height”:”60cm”} |
| 3 | Desk | black | {“color”: “black”, “drawers”: , “material”: “metal”} |
| 4 | Side Table | brown | {“color”: “brown”, “material”: } |
Now, we can create an index on this new column.
Now, let’s select from the table again, filtering on the virtual column instead of the JSON field.
The results are:
| id | product_name | color | attributes |
| 1 | Chair | brown | {“color”:”brown”, “material”:”wood”, “height”:”60cm”} |
| 3 | Desk | black | {“color”: “black”, “drawers”: , “material”: “metal”} |
| 4 | Side Table | brown | {“color”: “brown”, “material”: } |
We can check the execution plan to see how it was run.
We can see that the step is still called “Table Scan”. It looks like nothing has changed.

This could be because of the size of the table (only 3 rows) or the fact that “brown” exists in more than half of the rows.
But, this demonstrates the concept of creating a virtual column and an index (also that an index is not the right solution every time!).
Having said all of that, if you’re creating virtual columns to be able to access data in SQL Server JSON fields more efficiently just to make your application and database work, then perhaps the JSON field is not right for your database. But only you would know that – each case is different.
What is JSON and Why Should I Use It?
JSON stands for JavaScript Object Notation, and it’s a way to format and store data.
Data can be represented in a JSON format in SQL Server so it can be read and understood by other applications or parts of an application.
It’s similar to HTML or XML – it represents your data in a certain format that is readable by people but designed to be readable by applications.
Why Use JSON In Your Database?
So why would you use JSON data in your database?
If you need a structure that’s flexible.
A normalised database structure, one with tables and columns and relationships, works well for most cases. Recent improvements in development practices also mean that altering a table is not as major as it was in the past, so adjusting your database once it’s in production is possible.
However, if your requirements mean that your data structure needs to be flexible, then a JSON field may be good for your database.
One example may be where a user can add custom attributes. If it was done using a normalised database, this may involve altering tables, or creating an Entity Attribute Value design, or some other method.
If a JSON field was used for this, it would be much easier to add and maintain these custom attributes.
The JSON data can also be stored in your database and processed by an ORM (Object Relational Mapper) or your application code, so your database may not need to do any extra work.
What Does JSON Data Look Like?
Here’s a simple example of JSON data:
{
  "id": "1",
  "username": "sstorm",
  "location": "United States"
}
It uses a combination of different brackets, colons, and quotes to represent your data.
Let’s take a look at some more examples.
Name/Value Pair
JSON data is written as name/value pairs. A name/value pair is two values enclosed in quotes.
This is an example of a name/value pair:
"username": "sstorm"
The name is “username” and the value is “sstorm”. They are separated by a colon “:”.
This means for the attribute of username, the value is sstorm. Names in JSON need to be enclosed in double quotes.
Objects
JSON data can be enclosed in curly brackets which indicate it’s an object.
{"username": "sstorm"}
This is the same data as the earlier example, but it’s now an object. This means it can be treated as a single unit by other areas of the application.
How does this help? It’s good for when there are multiple attributes:
{
  "username": "sstorm",
  "location": "United States"
}
Additional attributes, or name/value pairs, can be added by using a comma to separate them.
You’ll also notice in this example the curly brackets are on their own lines and the data is indentented. This is optional: it’s just done to make it more readable.
Arrays
JSON also supports arrays, which is a collection of records within an object. Arrays in JSON are included in square brackets and have a name:
{
  "username": "sstorm",
  "location": "United States",
  "posts":
}
In this example, this object has an attribute called “posts”. The value of posts is an array, which we can see by the opening square bracket “[“.
Inside the square bracket, we have a set of curly brackets, indicating an object, and inside those, we have an id of 1 and a title of Welcome. We have another set of curly brackets indicating another object.
These two objects are posts and they are contained in an array.
And that covers the basics of what JSON is.
If JSON is new to you, don’t worry, it gets easier as you work with it more.
If you’re experienced with JSON, you’ll find the rest of the guide more useful as we go into the details of working with JSON in SQL Server.
Conclusion
We’ve considered the new JSON functionality in SQL Server and how it can be used in SSIS. Let’s form our preliminary conclusion based on the tests we performed in this part and we’ll consider one more approach in the 2nd part. So far, we’ve seen that it’s much simpler to use the SQL’s native functionality in SSIS packages rather than to create Script Components and reference the Json.NET library (+add the library to GAC). Json.NET would be beneficial to process files with minified JSON. Also, it performs well on the same type of data stored in the database. When dealing with indented JSON, it degrades. The SQL method was incredibly quick with the indented JSON stored in the database but was slower than Json.NET in all the other tests. However, the execution time difference wasn’t too significant and if we are okay with the extra seconds of processing, the SQL method is something to consider and simpler to use in SSIS. Personally, I’d choose Json.NET for files and the native SQL for processing JSON stored in the database.
Please don’t consider this article as a final guide on how to choose a specific approach. Every day, we face different circumstances that can easily affect performance and our ultimate decisions as well.
View actual execution plan for JSON data import
In SSMS, click on Actual Execution Plan and execute the previous SQL statement. It gives the following plan:
In this plan, we can note that it uses a table-valued function for OPENJSON. Let’s hover the cursor over it and view the details:
In the above execution plan, note the following:
- It uses object for fetching the columns and their values
- We see a difference between the estimated number of rows (50) and an actual number of rows (10) as query optimizer unable to estimates the correct number of rows for JSON input
Let’s import another JSON file having 290 records and view the actual execution plan. In this execution plan also, it estimates the number of rows 50 in comparison with the actual 290 rows. It seems SQL Server uses a fixed estimate of 50 rows for JSON data import:
Функции преобразования и восстановления при сериализации
Не всегда сериализация может быть выполнена полностью автоматически. В жизни встречаются самые разные ситуации. Поэтому мы добавили возможность использовать «самописную» функцию обработки значений при записи в JSON и при чтении из JSON.
В методе ЗаписатьJSON() она называется Функция преобразования и описывается с помощью трёх параметров:
- ИмяФункцииПреобразования;
- МодульФункцииПреобразования;
- ДополнительныеПараметрыФункцииПреобразования.
В методе ПрочитатьJSON() она называется Функция восстановления и для неё есть аналогичные параметры:
- ИмяФункцииВосстановления;
- МодульФункцииВосстановления;
- ДополнительныеПараметрыФункцииВосстановления.
При записи в JSON эта функция полезна потому, что позволяет самостоятельно преобразовать в JSON те типы, которые не подлежат автоматическому преобразованию. Или даже совсем отказаться от их сериализации.
Например, так оказалось, что в записываемой структуре одно из значений — это ссылка на элемент справочника ПодразделенияОрганизаций. Такое значение (ссылка на объект 1С:Предприятия) не может быть автоматически сериализовано средствами платформы. Тогда, используя функцию преобразования, мы можем получить для этого значения его строковое представление в удобном виде. Например, в виде строки «ИП Петров: Отдел рекламы».
Результат выполнения примера:
{
	"Фамилия": "Иванов",
	"Имя": "Иван",
	"Отчество": "Иванович",
	"Подразделение": "ИП Петров: Отдел рекламы",
	"Телефоны":
}
При чтении из JSON функция восстановления может использоваться для того, чтобы преобразовать данные JSON в типы 1С, которые не могут являться результатом автоматического преобразования, или для того, чтобы самостоятельно (не автоматически) преобразовать даты JSON в даты 1С:Предприятия.
Использование JSON в HTTP интерфейсах приложений
Автоматически генерируемый REST интерфейс прикладных решений
При обращении к REST интерфейсу прикладного решения вы можете получать ответ в формате JSON. Для этого в адресной строке вам нужно указать параметр $format=json. Либо указать MIME тип «application/json» в заголовке Accept HTTP запроса. Например:
Запрос:
GET /TestInfobase/odata/standard.odata/СправочникДляТестов?$format=json HTTP/1.1
MaxDataServiceVersion: 3.0;NetFx
Accept: application/json
Accept-Charset: UTF-8
User-Agent: Microsoft ADO.NET Data Services
Ответ:
HTTP/1.1 200 OK
Content-Length: 9429
Content-Type: application/json;charset=utf-8
Server: Microsoft-IIS/7.5
DataServiceVersion: 3.0
X-Powered-By: ASP.NET
Date: Mon, 12 Aug 2013 09:44:07 GMT

{
"odata.metadata":"http://host/svc/$metadata#СправочникДляТестов",
"value":[
{
	"Ref_Key":guid'cc6a7df3-8cfe-11dc-8ca0-000d8843cd1b',
	"DataVersion":"AAAAAQAAAAE",
	"DeletionMark":false,
	"Parent_Key":guid'bbb079ae-8c51-11db-a9b0-00055d49b45e',
	"IsFolder":false,
	"Code":000000025,
	"Description":"Пинетки",
	"Поставщик_Key":guid'd1cb82a7-8e8b-11db-a9b0-00055d49b45e',
	"Поставщик@navigationLinkUrl":"СправочникДляТестов(guid'cc6a7df3-8cfe-11dc-8ca0-000d8843cd1b')/Поставщик",
	"РеквизитХранилище_Type": "image/jpeg",
	"РеквизитХранилище_Base64Data@mediaReadLink": "Catalog_ДемоСправочник(guid'cf2b1a24-1b96-11e3-8f11-5404a6a68c42')/РеквизитХранилище_Base64Data",
	"РеквизитХранилище_Base64Data": <строка с закодированными данными>
	…
},
{…},
{…}
]
}
Вы можете управлять объёмом передаваемой информации за счёт изменения детальности представления метаданных в выгрузке. Существуют три уровня: Nometadata, Minimalmetadata и Fullmetadata. По-умолчанию (на примере вверху) используется средний уровень — Minimalmetadata. На уровне Nometadata объём передаваемой информации минимальный, а на уровне Fullmetadata — максимальный. Однако при этом нужно понимать, что сокращение объёма передаваемой информации приводит к более интенсивным вычислениям на клиенте. И наоборот, когда вся информация включается в выгрузку, объём вычислений на клиенте будет минимальным.


Детальность представления метаданных вы можете указать, например, в адресной строке.
Сведения о метаданных не передаются:
GET /TestInfobase/odata/standard.odata/СправочникДляТестов/?$format=application/json;odata= minimalmetadata
Вся информация о метаданных включается в выгрузку:
GET /TestInfobase/odata/standard.odata/СправочникДляТестов/?$format=application/json;odata=fullmetadata
HTTP-сервисы прикладного решения
HTTP-сервисы, реализованные в прикладном решении, также могут возвращать ответ в формате JSON. Для этого вам проще всего сформировать тело ответа в JSON, получить его как строку, а затем установить из этой строки тело HTTP ответа сервиса. При этом желательно указать, что BOM (Byte Order Mark, метка порядка байтов) использоваться не должна.
Последний параметр (ИспользованиеByteOrderMark.НеИспользовать) вы можете и не указывать, если режим совместимости конфигурации не установлен, или он больше чем Версия8_3_5. Потому что в этом случае BOM автоматически будет использоваться только для кодировок UTF-16 и UTF-32, а для UTF-8, UTF-16LE/UTF-16BE, UTF-32LE/UTF-32BE и других она использоваться не будет.
Взаимодействие со сторонними HTTP сервисами
При взаимодействии со сторонними HTTP интерфейсами у вас также может возникнуть необходимость формирования запросов к ним в формате JSON. В этом случае алгоритм ваших действий будет аналогичным. Формируете тело запроса в JSON. Получаете тело в виде строки. Из этой строки устанавливаете тело HTTP запроса. BOM не используете.
Дальнейшее развитие
Мы думаем над тем, чтобы предоставить вам возможность сериализации в JSON прикладных типов 1С:Предприятия: ссылок, объектов, наборов записей и т.д. Поэтому есть вероятность появления ещё одного, третьего уровня средств работы с JSON. Этот уровень позволит вам преобразовывать в JSON любые типы 1С:Предприятия, для которых поддерживается XDTO-сериализация в XML.
Validating JSON Data
We’ve seen in the examples so far in this guide that using an NVARCHAR with a check constraint in SQL Server automatically validates data for you. It ensures you can only insert valid JSON data into the field.
The function that SQL Server uses can also be used in regular SQL, not just in the check constraint. This function is called ISJSON. You provide it with a value, and it returns 1 if it’s a valid JSON string and 0 if it is not.
The syntax is:
ISJSON (value)
Here are some examples.
Example of Valid JSON String
Let’s say we have this JSON string:
'{"color": "black", "depth": "100cm", "material": "wood"}'
We can test if this is valid by looking at it for quotes and other symbols in the right places. Or we can just pass it to the ISJSON function.
| valid_test |
| 1 |
The result is 1 so it’s a valid JSON value.
Example of an Invalid JSON String
What if the value is not valid?
We can see this sample JSON string:
'{"color": "black", "depth" "100cm", "material": "wood"}'
At first glance it may seem valid. Let’s use the JSON_VALID function to check.
| valid_test |
The result is 0 so it’s not a valid JSON value. The result does not say where the issue is in the provided string, but it tells you it’s invalid so you can look closer at it.
Сериализация типа Дата
Данные типа Дата сериализуются в JSON автоматически, а вот обратное преобразование (десериализация) может быть выполнено не всегда. JSON не содержит типа Дата, значения даты представляются в нём строкой. Конечно, существуют некоторые форматы представления дат, но вообще говоря, внешний вид такой строки может быть самым разнообразным.
Для сериализации типа Дата в JSON у метода ЗаписатьJSON() вы можете использовать параметр НастройкиСериализации. Это объект встроенного языка, который позволяет указать, в каком варианте будет записана дата (UTC, локальная дата или локальная дата со смещением) и в каком формате (ISO, JavaScript или Microsoft).
Код 1С:Предприятия:
Текст JSON:
При чтении даты из JSON всё обстоит сложнее. В параметре ИменаСвойствСоЗначениямиДата вы можете перечислить те свойства JSON, значения которых нужно преобразовать в дату 1С:Предприятия (тип Дата). А в параметре ОжидаемыйФорматДаты вам нужно указать, в каком формате эти данные содержатся в JSON (ISO, JavaScript или Microsoft).
Текст JSON:
Код 1С:Предприятия:
Однако если окажется, что в какой-то момент формат данных JSON не совпадает с ожидаемым форматом, будет вызвано исключение.
В такой ситуации, для большей универсальности, вы можете включить те же самые свойства JSON в массив, подлежащий обработке функцией восстановления — ИменаСвойствДляОбработкиВосстановления. И уже в функции восстановления вы самостоятельно десериализуете даты JSON, в каком бы формате они ни были представлены.
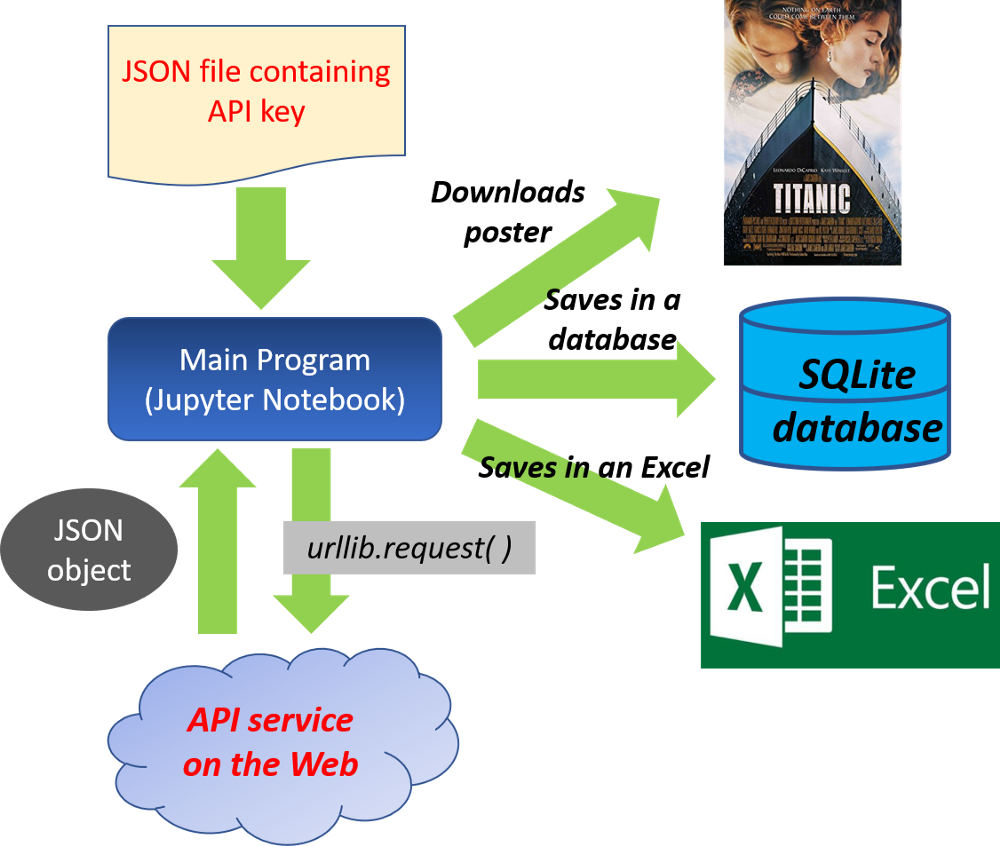
Introduction
Java Script Object Notation is an accessible data exchange format. Many applications support JSON format data nowadays. We can use JSON data for unstructured data such as log files and NoSQL databases. SQL Server also supports JSON format data import and export for exchanging data with different data sources and applications.
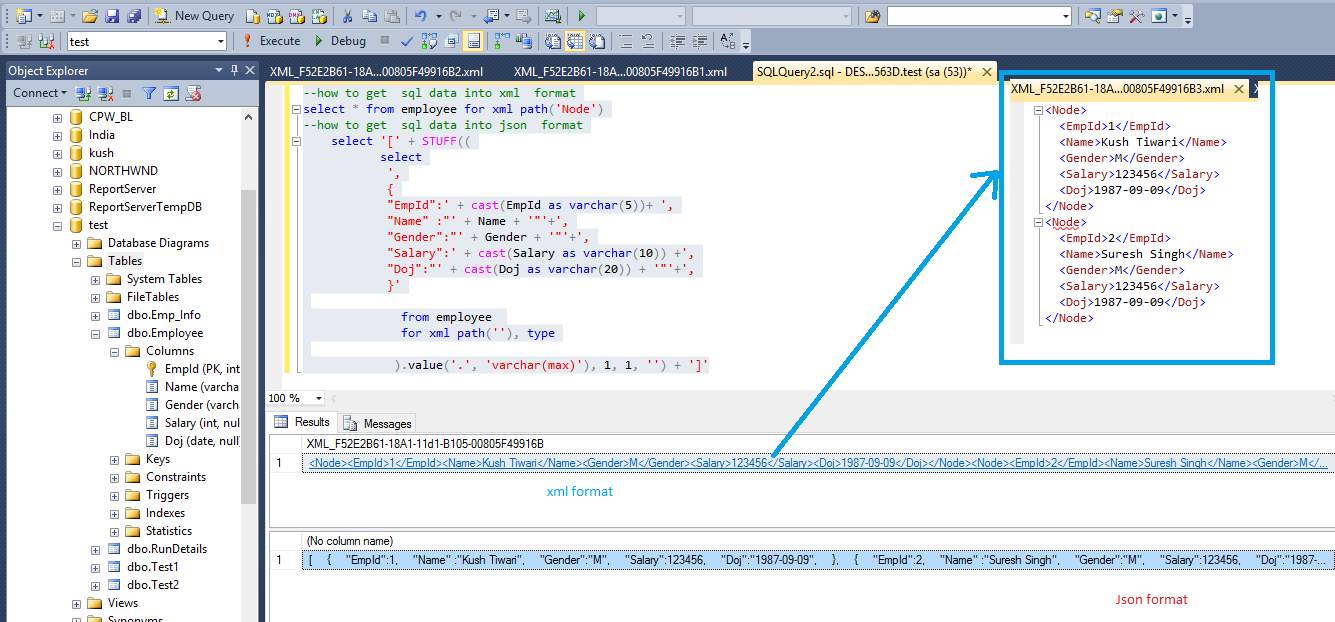
We can use SQL Server FOR XML PATH or FOR XML Auto clause in the SQL Server query, and it retrieves the results into the JSON format. We have explored this in the article How to import/export JSON data using SQL Server 2016.
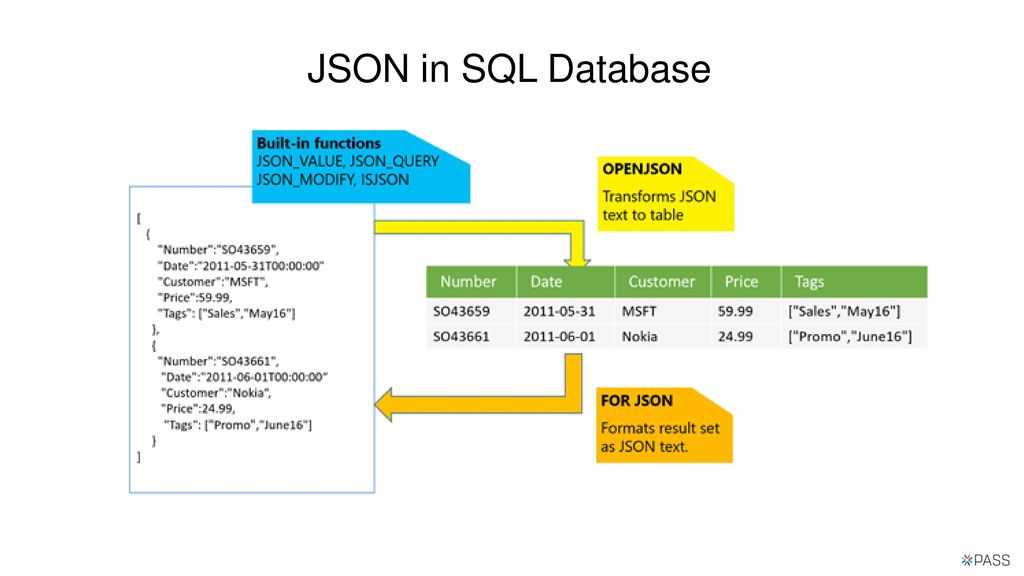
In the following image, we can see built-in functions for converting text into JSON and vice-versa:

How to Create and Populate JSON Field in SQL Server
So you’ve learned a bit about JSON data and why you might want to use it.
How do we create a field in SQL Server?
Creating a JSON Field
We create a new field to store our JSON data. Unlike other databases, SQL Server does not have a JSON-specific data type. However, we can use an NVARCHAR field. We can also add a constraint to ensure it is valid JSON.
Here’s an example.
We have created a table called product. It has an id and a product name. There’s also an attributes column, which has the data type of NVARCHAR. The length of MAX allows up to 2GB of data.
Adding a JSON column is as easy as that.
What about validation? How do we know the text we add to this field is valid JSON and not just a text string?
We can add a Check Constraint to the table to ensure the data is valid. Check Constraints are inspected whenever data is added or updated in the table.
Here’s what a check constraint would look like:
Or, we could add the constraint at the time we create the table:
The ISJSON field returns 1 if the specified field is JSON-compliant. In this case, whenever we make changes to the attributes field, it must be a valid JSON document so that this check constraint passes.
With this JSON validation, the data is automatically validated for us. We won’t be able to store invalid data in the table.
Also, we get to use the various SQL Server JSON functions on the JSON data to make working with it easier.
Adding Data to a JSON Field
Now we’ve got our field for storing JSON data, how do we add data to it?
We simply insert a record into our table as though it’s a text value.
With the check constraint that uses the ISJSON function, the data will be validated before it is inserted, and only valid data will be inserted.
We can add our first product like this:
We can run this statement and the record is inserted. If we select the data from the table, this is what we see:
Here are our results:
| id | product_name | attributes |
| 1 | Chair | {“color”: “brown”, “material”:”wood”, “height”:”60cm”} |
The JSON data is shown exactly as we entered it.
If we try to insert an invalid JSON field, we’ll get an error.
Here’s the INSERT statement:
This is what we’ll see:
The INSERT statement conflicted with the CHECK constraint "ck_product_json".
The conflict occurred in database "main", table "dbo.product", column 'attributes'.
Using the method above, we needed to enter the data in exactly the right format.
Inserting Arrays
If you want to insert JSON data that contains arrays, you can enter it using text in a JSON format.
Here’s how to insert an array by just specifying it in a JSON format.
This will insert a new product that has an array of drawers. As you can probably see by this statement, reading it (and writing it) is a bit tricky.


You can insert simpler arrays using this method too.
The INSERT statements will work, and the data will look like this:
Here are the results:
| id | product_name | attributes |
| 1 | Chair | {“color”: “brown”, “material”:”wood”, “height”:”60cm”} |
| 2 | Desk | {“color”: “black”, “drawers”: , “material”: “metal”} |
| 3 | Side Table | {“color”: “brown”, “material”: } |
How to Delete from a JSON Field in SQL Server
There are two DELETE operations you can do when working with JSON fields:
- delete an attribute from a JSON field
- delete a row from your table
Deleting a Row using JSON_VALUE
Deleting a row from your table is done in the same way as regular SQL. You can write an SQL statement to delete the row that matches your ID, or using JSON_VALUE.
For example, to delete all rows where the color attribute is brown:
This will remove the matching records from the table.
Removing an Attribute from a JSON Field
The other way to delete JSON data is to remove an attribute from a JSON field.
This is different from updating, as you’re removing the attribute entirely rather than just updating its value to something else.
We can do this with an UPDATE statement and the JSON_MODIFY function. We specify a new_value of NULL.
The JSON_MODIFY function used in this way will remove data from a JSON field.
Let’s see an example by removing an attribute from product ID 2.
| id | product_name | attributes |
| 1 | Chair | {“color”:”brown”, “material”:”wood”, “height”:”60cm”} |
We can run an UPDATE statement with JSON_MODIFY to remove the “height” attribute.
We can then select the data from the table again to see that it has been removed:
| id | product_name | attributes |
| 1 | Chair | {“color”:”brown”, “material”:”wood”} |
The attribute of height is no longer in the JSON field.
Новое в T-SQL
Язык T-SQL также получил несколько новых функций, как больших, так и мелких. Рассмотрим лишь некоторые из них.
JSON — популярный формат текстовых данных для хранения неструктурированных данных и для обмена информацией в REST веб-службах. Некоторые сервисы Azure также используют JSON. До версии 2016 все задачи обработки JSON ложились на плечи разработчика, теперь разбор и хранение, импорт и экспорт данных, преобразование и форматирование запросов обеспечивает сам движок. Приложения и инструменты не видят разницы между значениями, взятыми из скалярных столбцов таблицы, и значениями, взятыми из столбцов в формате JSON.
Можно использовать значения из JSON-текста в любой части T-SQL-запроса (включая пункты WHERE, ORDER BY, GROUP BY). Отдельного типа данных не предусмотрено, для хранения используются стандартные varchar или nvarchar. Для работы с JSON реализовано несколько новых функций:
- ISJSON — проверка, является ли строка JSON;
- JSON_VALUE — извлечение скалярного значения;
- JSON_QUERY — извлечение объекта или массива;
- JSON_MODIFY — изменение части JSON-текста.
Функция OPENJSON преобразует массив JSON-объектов в таблицу, пригодную для импорта JSON-данных в SQL Server, в которой каждый объект представлен в виде одной строки, а пара ключ/значение возвращается в виде ячеек. Чтобы из реляционных данных сгенерировать JSON, следует использовать функцию , поддерживающую два варианта форматирования и . Дополнительная опция создает JSON без квадратных скобок. По умолчанию параметры, имеющие значение NULL, не будут включены в вывод. Если они нужны, следует в вызове FOR JSON использовать параметр .
При тестировании, да и в работе очень часто приходится многократно удалять и создавать объекты в базе данных. Чтобы скрипт отработал нормально, приходится проверять наличие/отсутствие объекта. До SQL 2016 эта процедура была полностью на разработчике:
Новая функция теперь позволяет очень просто проверить наличие объекта и упрощает написание кода:
поддерживается практически для всех объектов (баз данных, процедур, таблиц, индексов).
Две функции и обеспечивают встроенную поддержку Gzip. На входе они могут принимать несколько типов данных, на выходе .
В добавили возможность работы с отдельными секциями, а не только над всей таблицей. В можно использовать произвольную маску. Новая опция для позволит добавлять и удалять столбцы в режиме онлайн. При этом данные останутся доступны для чтения, а блокировка будет в конце операции. Процедура позволяет выполнять сценарии в SQL Server на другом языке. В настоящее время поддерживается только R.