
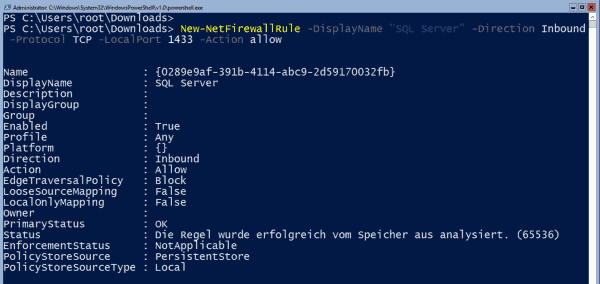
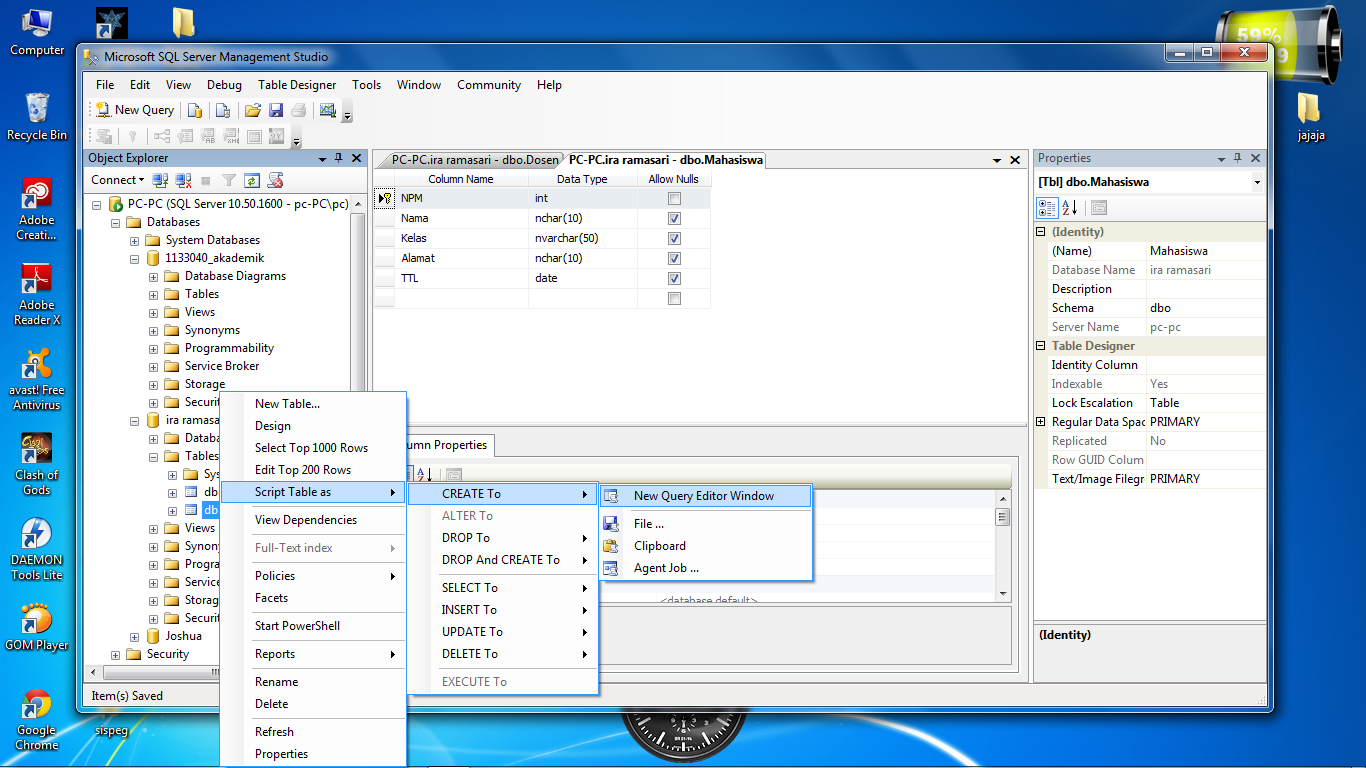
Configuring the firewall
Finally, it is necessary to open the firewall for managing SQL Server remotely. You can do this via PowerShell:
New-NetFirewallRule -DisplayName "SQL Server" -Direction Inbound -Protocol TCP -LocalPort 1433 -Action allow
If you have installed other services in addition to the SQL engine, you can configure the firewall for them using this script by Ryan Mangan.
Opening a firewall port for SQL Server management
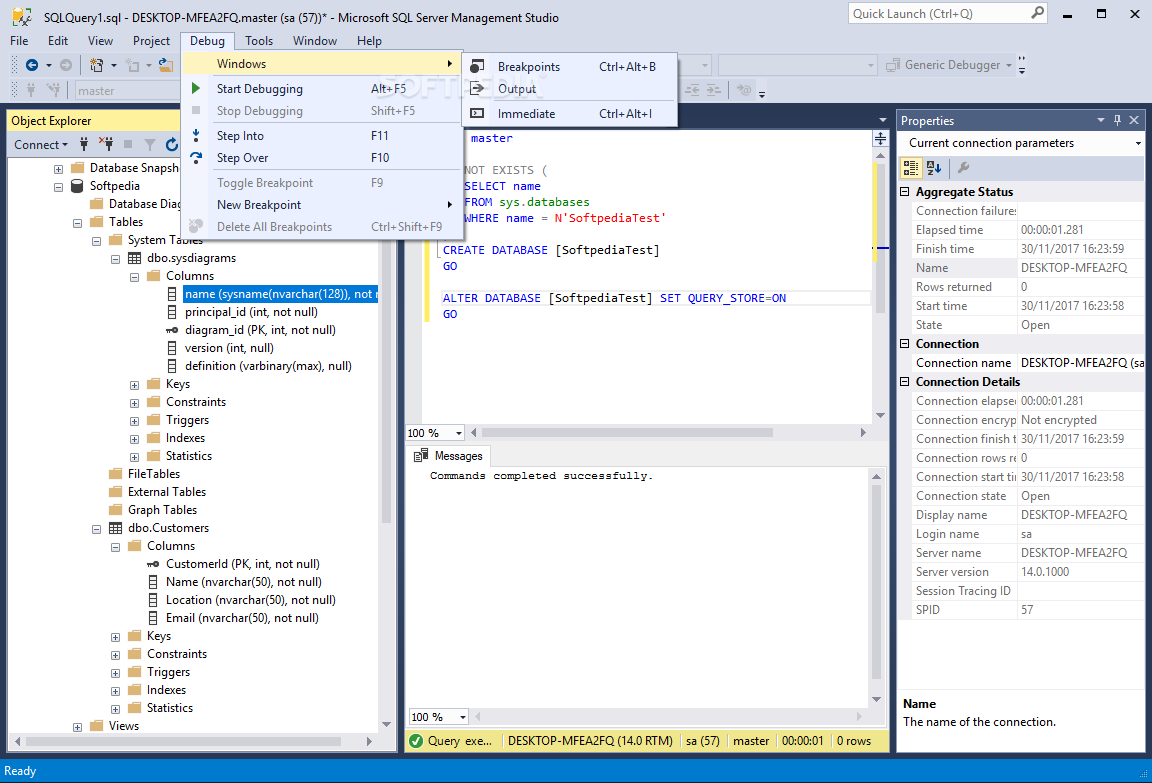
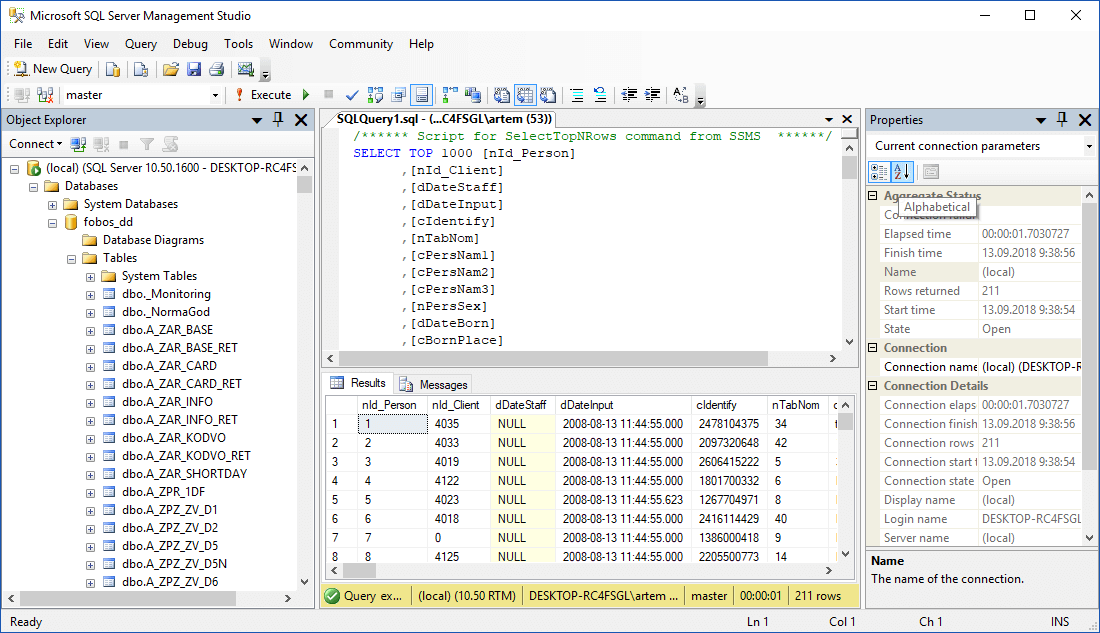
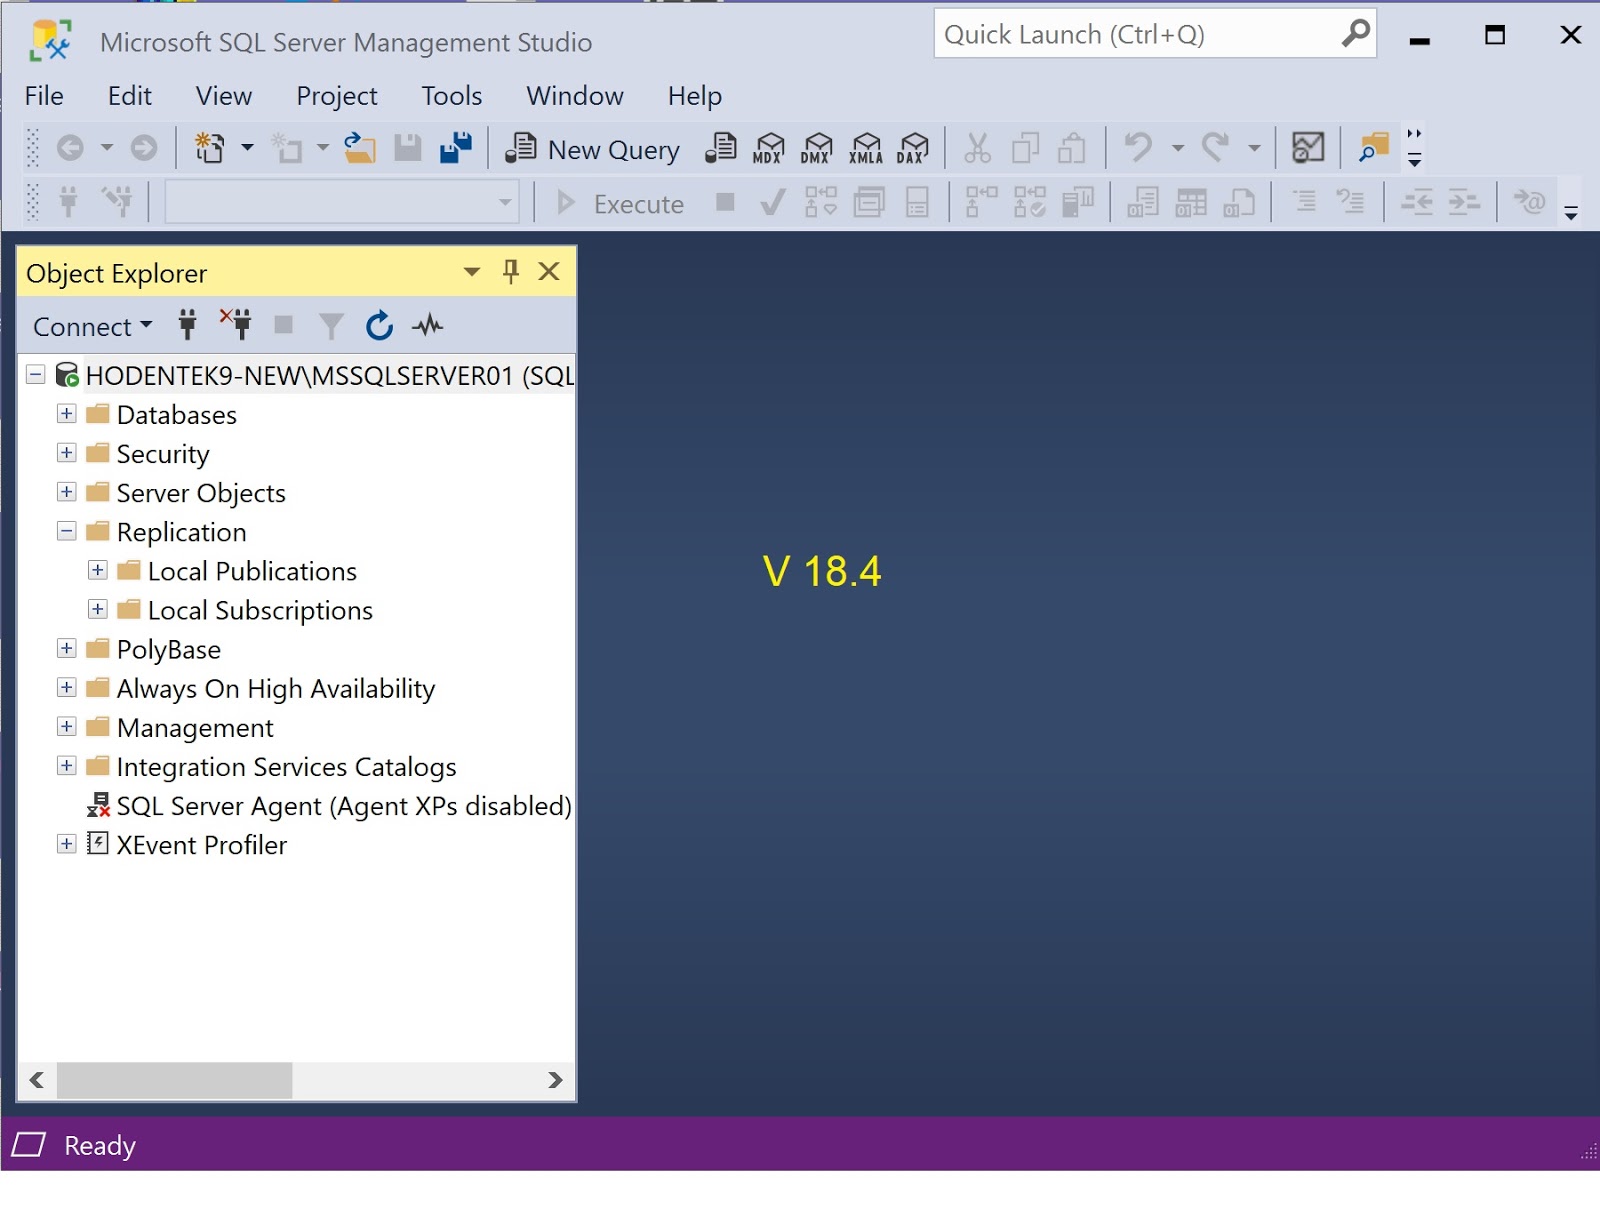
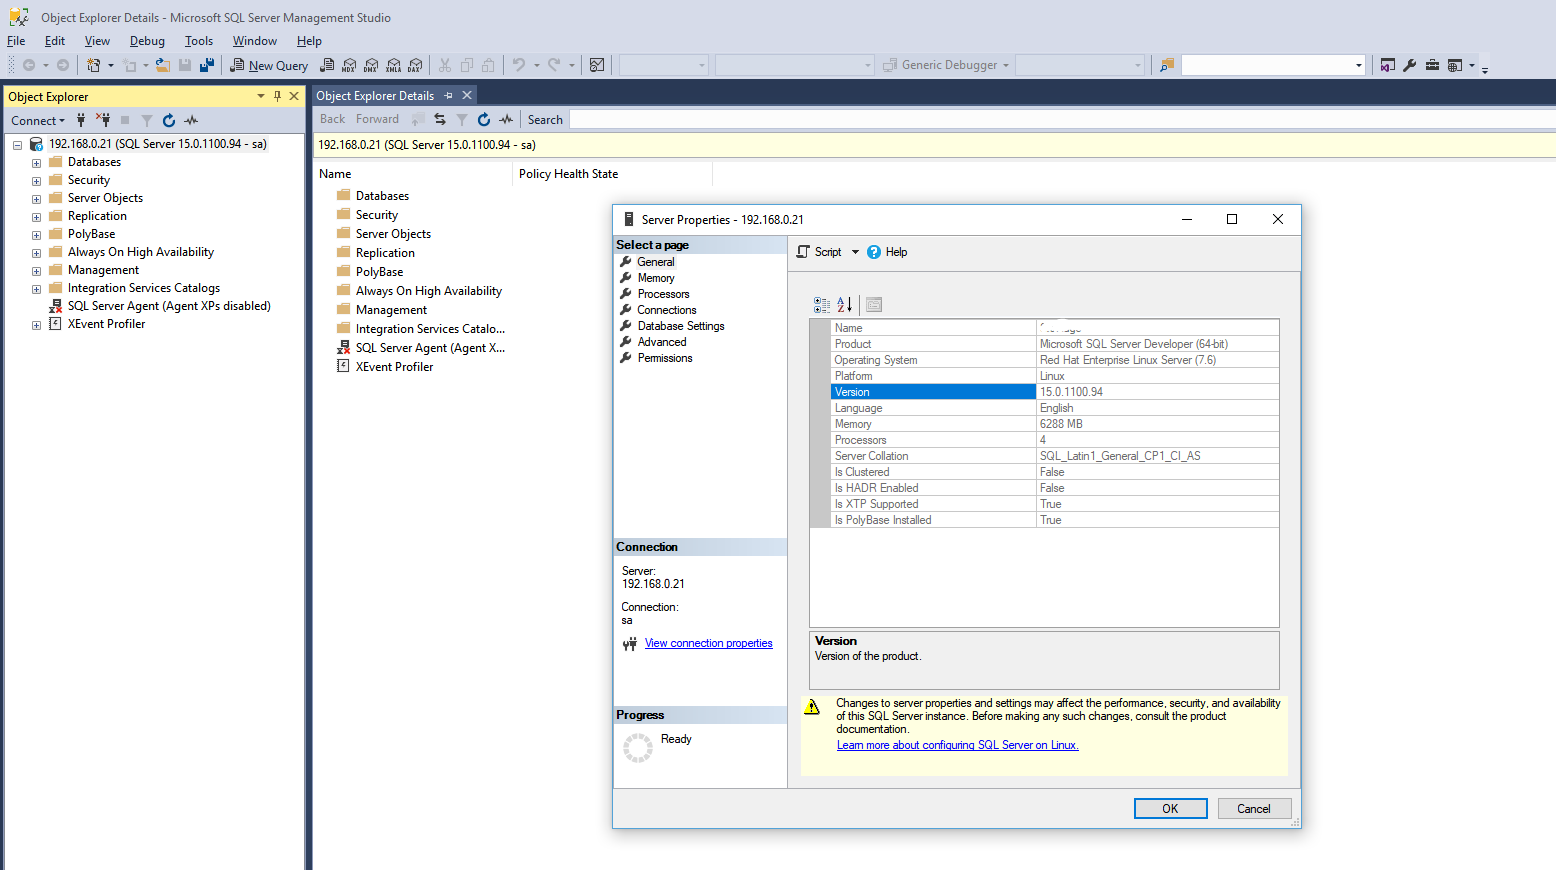
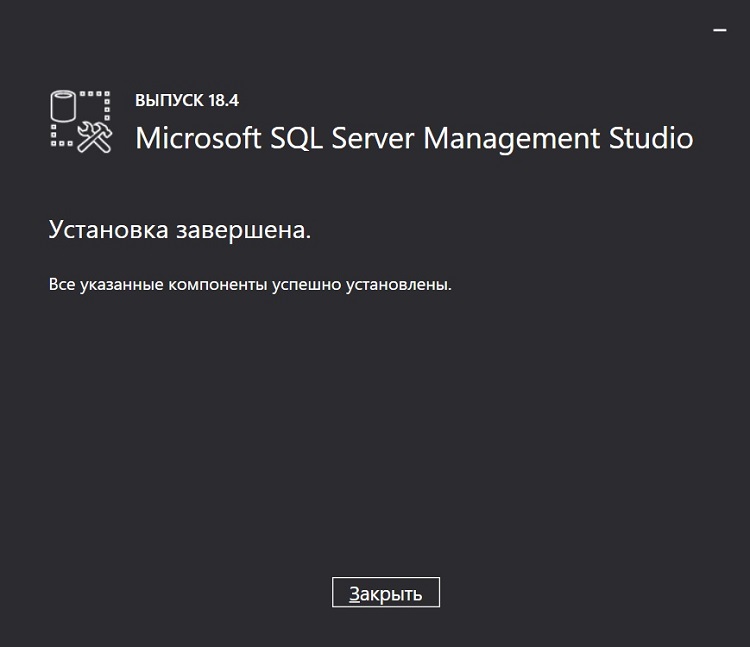
Now the path should be clear for the remote management of SQL Server. With SQL Management Studio, Microsoft offers a powerful tool for this purpose. It is currently available in version 18.4 and can also manage SQL Server 2019.
How to Update SQL Server Express
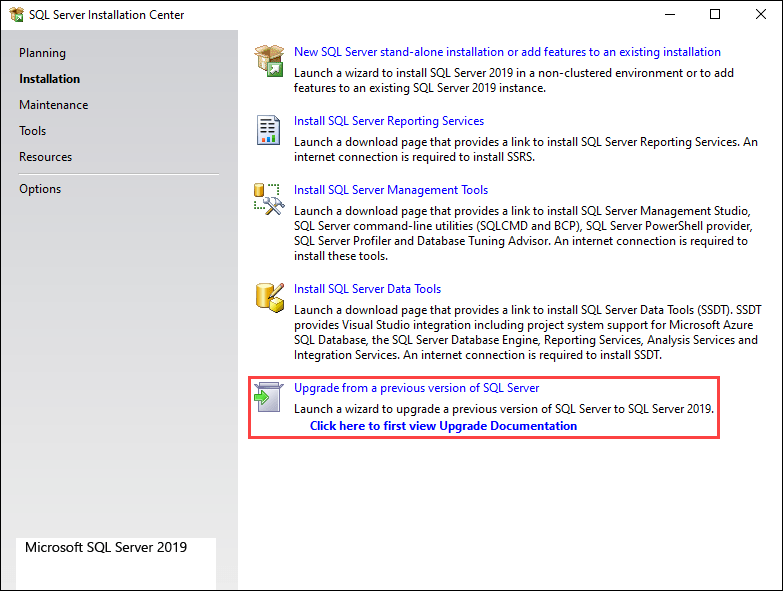
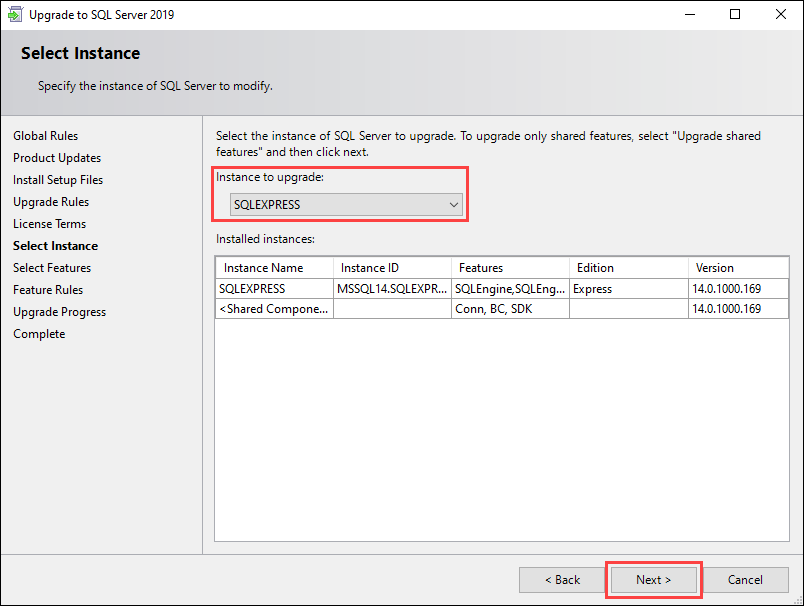
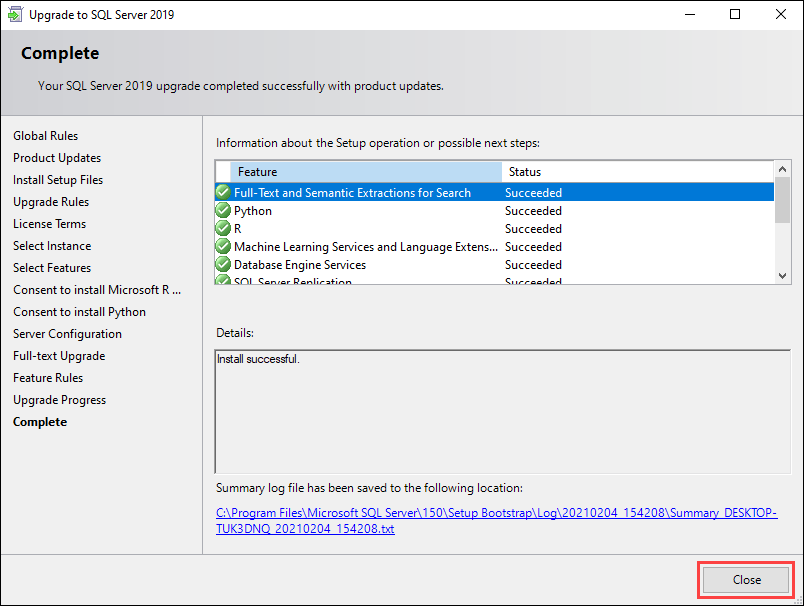
The update process for SQL Server Express is similar to installing the application from scratch. In this example, we are upgrading from SQL Server 2017 to SQL Server 2019:
1. In the SQL Server Installation Center window, select the Upgrade from a previous version of SQL Server option.
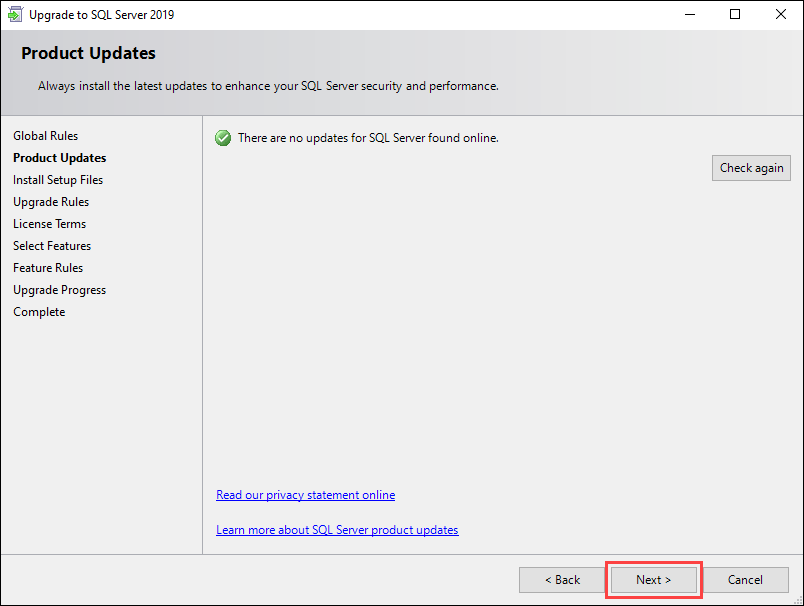
2. After the installation searches for online updates, click Next to continue.
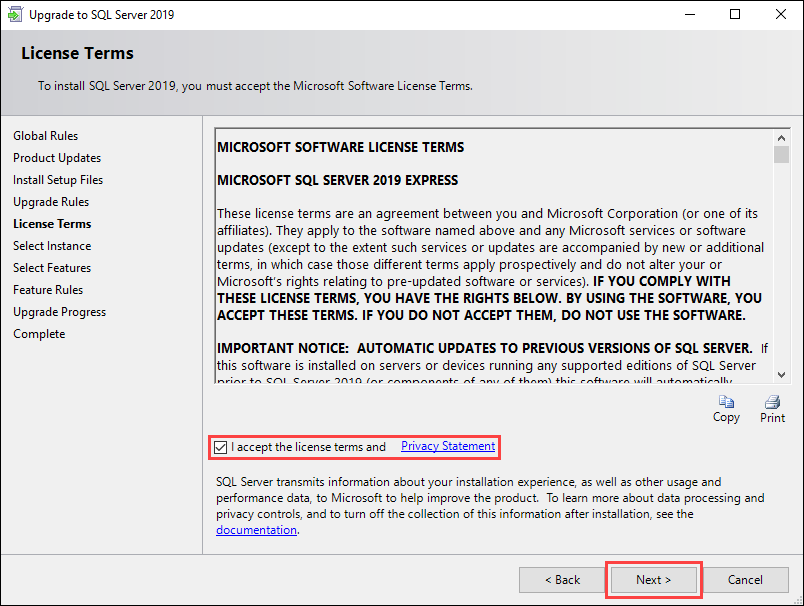
3. Check the box next to I accept the license terms and Privacy Statement and click Next to continue.
4. Select the SQL Server instance you want to update from the drop-down menu and click Next to continue.
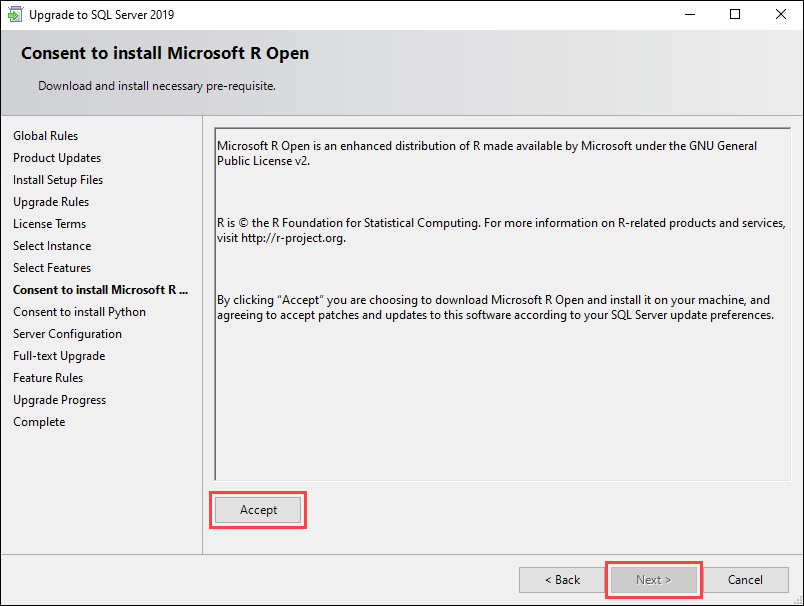
5. Give consent to install Microsoft R Open and Python by clicking Accept and then Next on the following two screens.
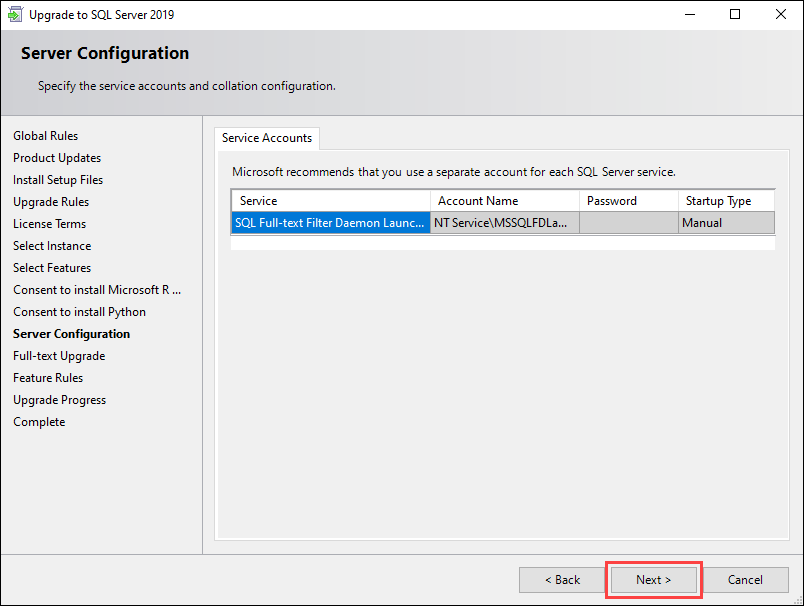
6. On the Server Configuration screen, click Next to continue with the update.
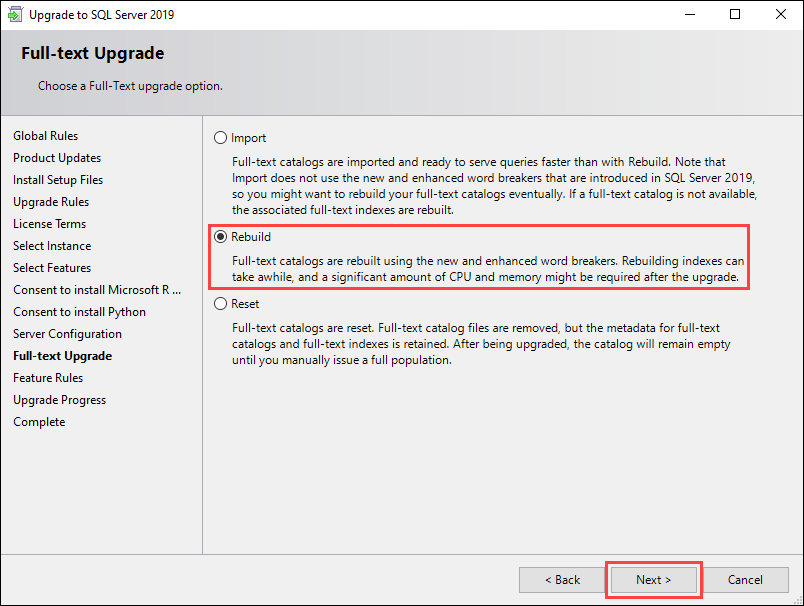
7. The Full-text Upgrade screen offers different options for upgrading your full-text catalogs. Select the Rebuild option and click Next.
8. Once the update is complete, click Close to exit the update window.
Hardware & Software Requirements
Before downloading, you should know the software/hardware/OS requirement of the SQL Server 2019
Hardware
Hard disk space: Minimum 6 GB of available hard-disk space.Monitor: Super-VGA 800X600 ResolutionMemory: 1 GBProcessor Speed: x64 Processor: 2.0 GHzProcessor Type: x64 Processor, AMD Athlon 64, Intel Xeon EM64TT, Pentium 4 with EM64T
OS Supported
Developer/Express/Standard Edition: Windows 10 Home/Professional/Enterprise, Windows Server 2016 / 2019 DataCenter, Standard & EssentialsEnterprise/Web Edition: Windows Server 2016 / 2019 DataCenter, Standard & Essentials
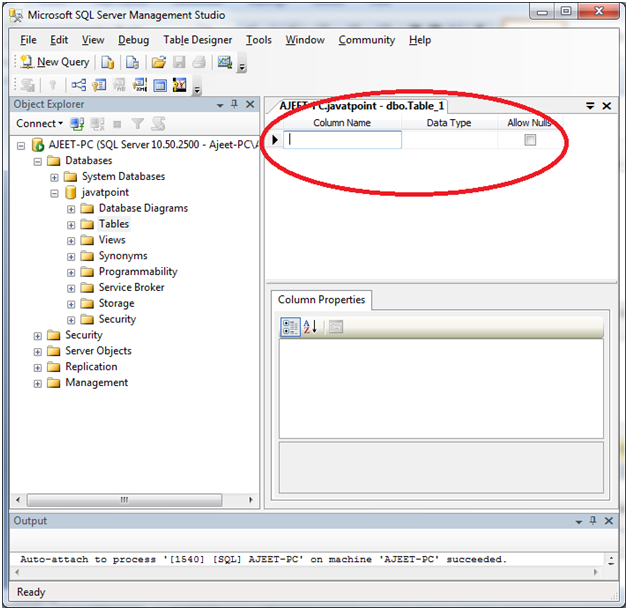
Installing SQL Server 2019 Components
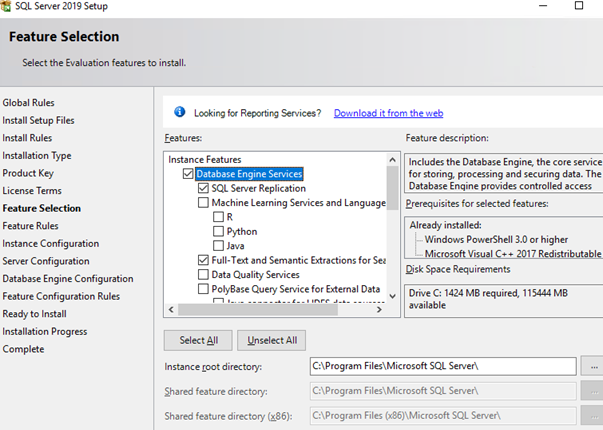
In this step, you are prompted to install different SQL Server components. Let’s see what they are and which of them to install:
- Database Engine Services is a basic SQL Server engine that must be installed.
- SQL Server Replication is the replication services. This feature is used quite often, so if you are not sure whether you need it, it is better to check it for the installation.
- Machine Learning Services and Language Extensions are the services that run an R/Python/Java code in the SQL Server context. It is necessary if you are going to use Machine Learning.
- Full-Text and Semantic Extractions for Search – you will need this feature if you need a full-text search technology or semantic search in the documents (for example, in .docx). In case of semantic search, you will also need FILESTREAM. We will tell about this feature later.
- Data Quality Services are the services to correct or validate data. If you are not sure if you need DQS, it is better not to install it.
- PolyBase Query Service For External Data allows access to external data, for example located on another SQL Server or in Oracle Database. Java connector for HDFS data sources is related to the PolyBase technology and if you want to use HDFS technology, install it.
- Analysis Services is also known as SSAS. The technology is used for business reporting (BI) and OLAP in large companies.
Then move on to the list of Shared Features (functions that apply to the entire server, and not to a specific instance).
- Machine Learning Server (Standalone) is the same as Machine Learning Services and Language Extensions, but it can be installed without the SQL Server engine.
- Data Quality Client is a standalone DQS version.
- Client Tools Connectivity includes ODBC, OLE DB and some other libraries. It is recommended to install them.
- Integration Services are data integration services, also known as SSIS. It is used in data ETL (Extract, Transform, Load). SSIS are necessary if you want to import data automatically and change them while importing. Scale Out Master/Worker are used to scale SSIS operation. If you are not sure if you need them, don’t check the feature.
- Client Tools Backwards Compatibility are legacy DMVs and system procedures. These are recommended for installation.
- Client Tools SDK is a developer tool kit. If you are not sure you need it, don’t install the SDK.
- Distributed Replay Controller/Client duplicates and improves SQL Server Profiler features. Distributed Replay services simulate load for different performance tests.
- SQL Client Connectivity SDK is as ODBC/OLE DB SDK for developers.
- Master Data Services is a Microsoft Power BI component. It is used to analyze, validate, integrate or correct data.
Some of the features (like Java connector for HDFS data sources) may not be available in previous SQL Server versions.
In the same step, you can specify a directory for SQL Server files. Unless you have a compelling reason to change it, leave the default (C:\Program Files\Microsoft SQL Server\).
After you have selected MSSQL features you need, the installation wizard will check their compatibility with your system, and if there are no problems, this step will be completed automatically.
Configuring SQL Server Service Settings
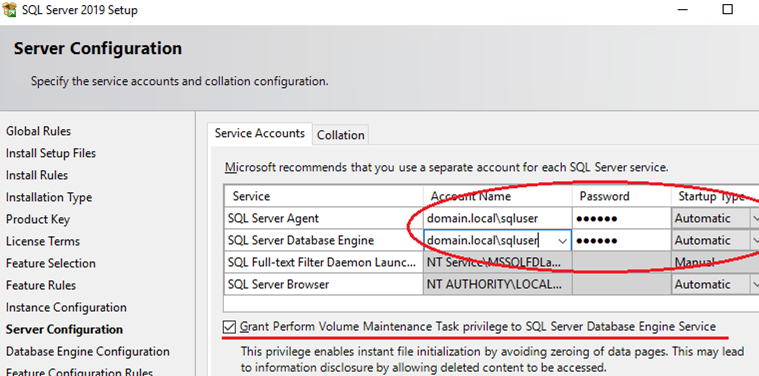
On the Service Accounts tab, specify the accounts under which SQL Server services will run on the host. The best practice is to use MSA (Managed Service Accounts) or gMSA (Group Managed Service Accounts) as they are the most secure ones. I will use a regular domain user account.
Set the Startup Type to Automatic for the SQL Server Agent or you will have to run the agent manually.
Also, you can set IFI (Instant File Initialization) during the server installation starting from SQL Server 2016. It is called “Grant Perform Volume Maintenance Task privilege to SQL Server Database Engine” in the installation wizard. If you enable it, old data won’t overwritten with zeroes if you:
- Create a database;
- Add data to data or log files;
- Expand the size of existing files (including auto-growth operations);
- Recover a database or file group.
It will speed up file initialization, but affects security since old data are not zeroed (old information in the files may be partially available).
I recommend to enable the setting if the data leak threat is low.
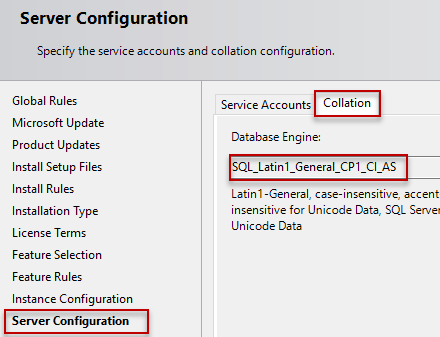
In the next step, you must select the Collation.
Collation is the SQL Server encoding. This parameter sets page encoding, sorting rules, char/varchar encoding and other language-related settings.
During server installation, you select Collation for the whole SQL Server. After the installation, you will be able to edit the setting, but it is rather hard to do it, so it is better to select a suitable Collation at once.
If you have data in English only, you may select SQL_Latin1_General_CP1_CI_AS.
If you are going to use SQL Server in productive tasks, see the Collation section of the documentation, since it is an important setting though it can be set for each database separately.
Introduction to SQL server 2019 express
Before installing SQL Server Express, we will discuss what is SQL Server 2019 express edition and why should we use it.
- SQL server 2019 express is a free edition of SQL server mainly designed to run on small-scaled web servers and desktop applications.
- Express edition is suitable for people who do not have robust hardware and want to learn and experience SQL server environments.
- SQL server 2019 express is a great choice for small vendors and developers. It has limited features as it is a free edition but it can be upgraded according to the requirements.
Want to learn PostgreSQL? Check out, What is PostgreSQL.
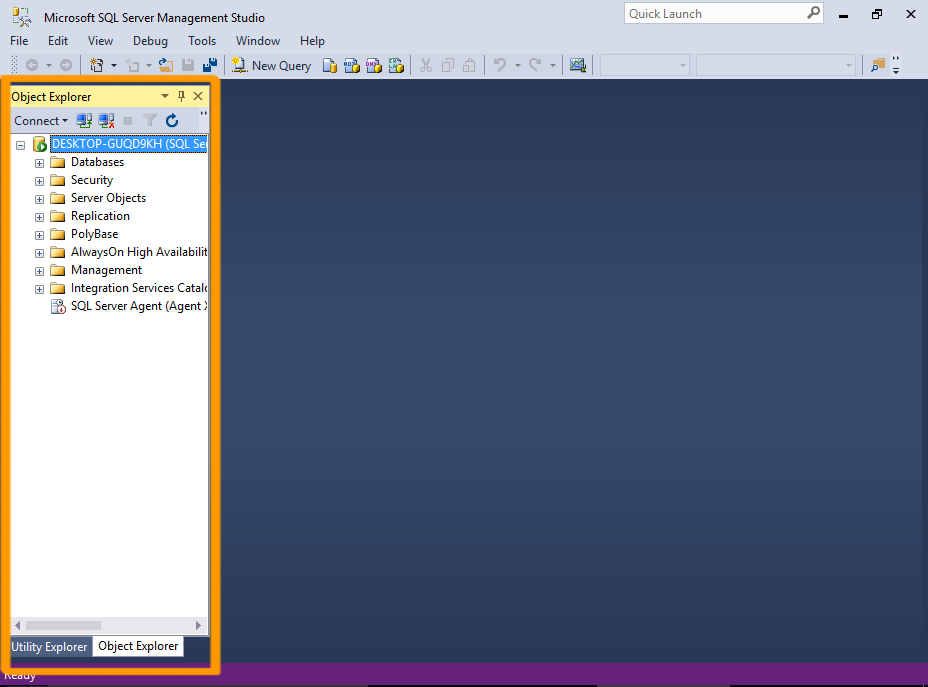
How to install sql server management studio 2019 on Windows 10
Let us see, how to install sql server management studio 2019 on windows 10?
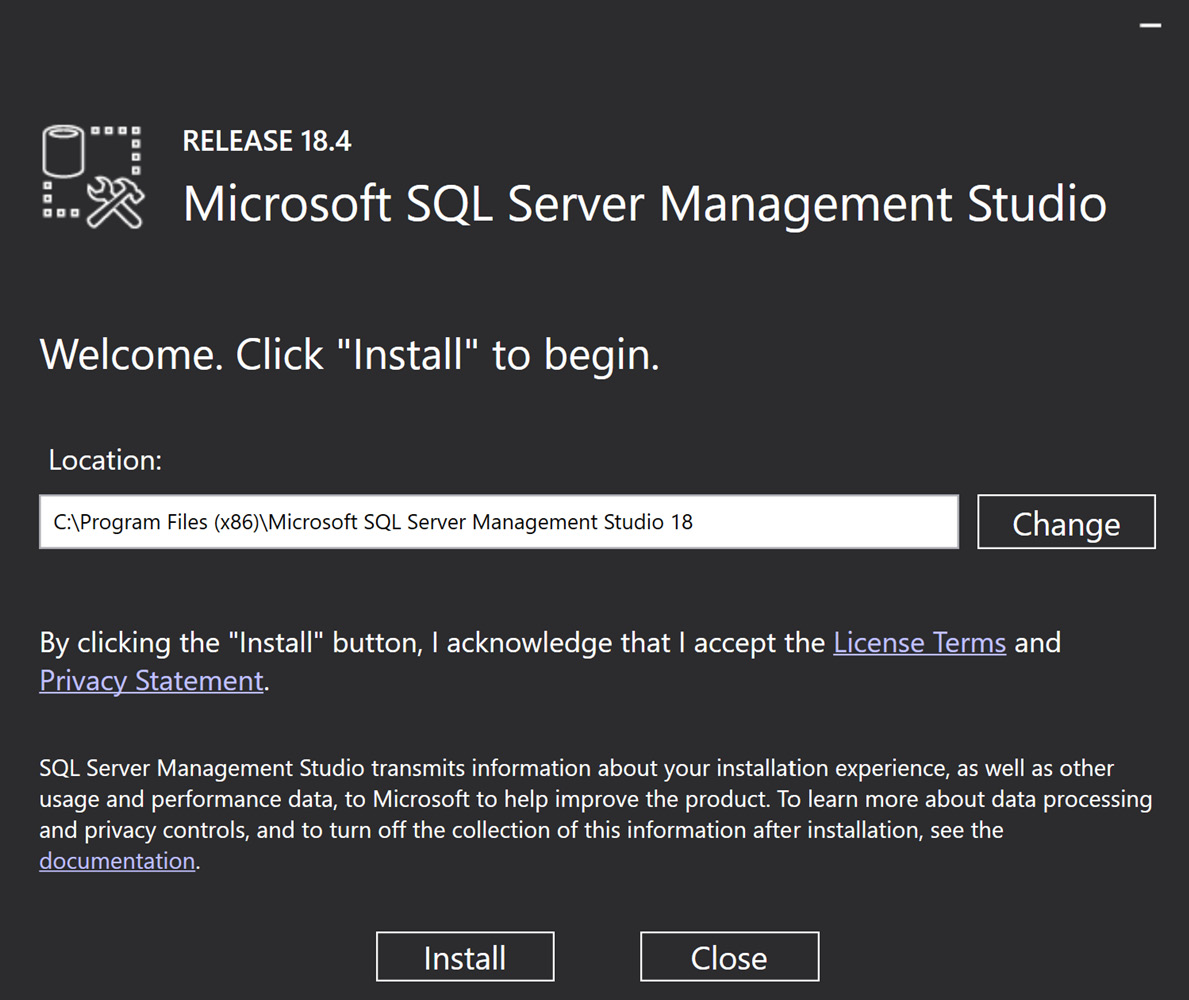
- Download the SQL Server Management Studio 2019 from the official Microsoft website.
- Once you run the executable file, the following window will appear. Select the path where you want to install the SQL Server management studio and then click Install.
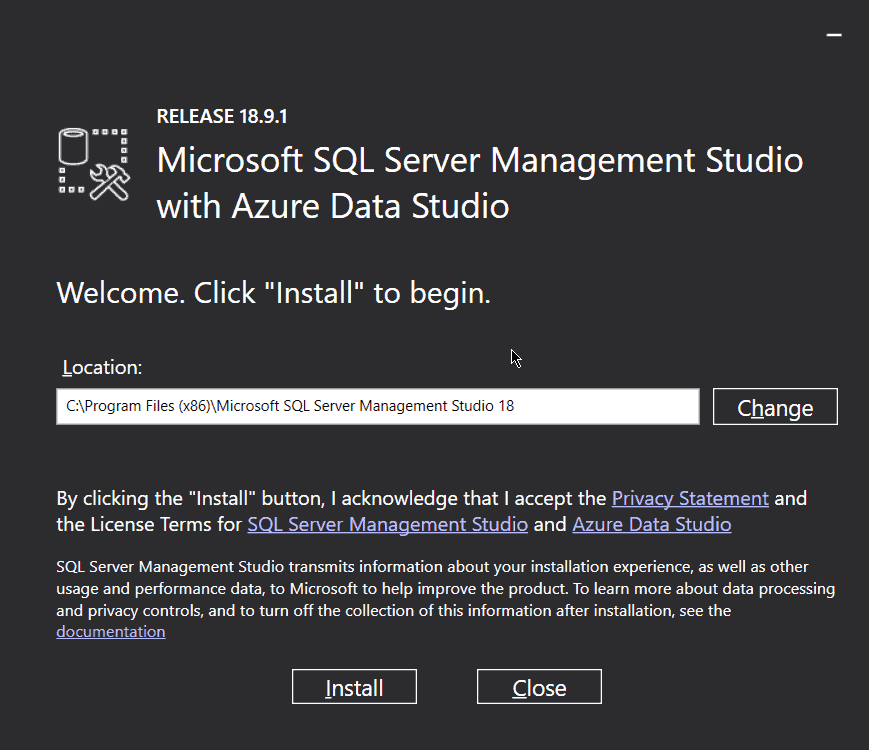
Choosing the installation directory
Once installed, open the SQL Server Management Studio from the Start menu under Microsoft SQL Server Tools 18 folder.
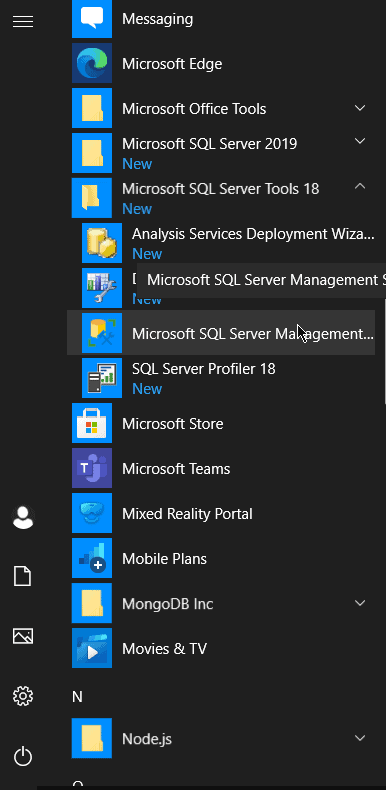
SQL SMS in Start Menu
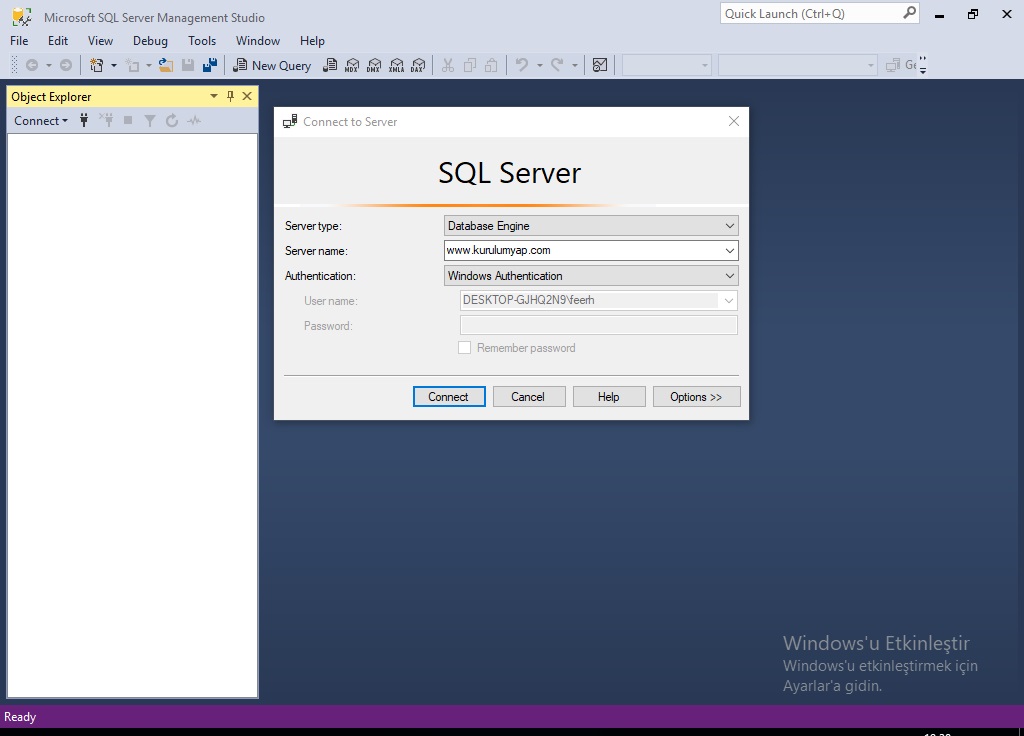
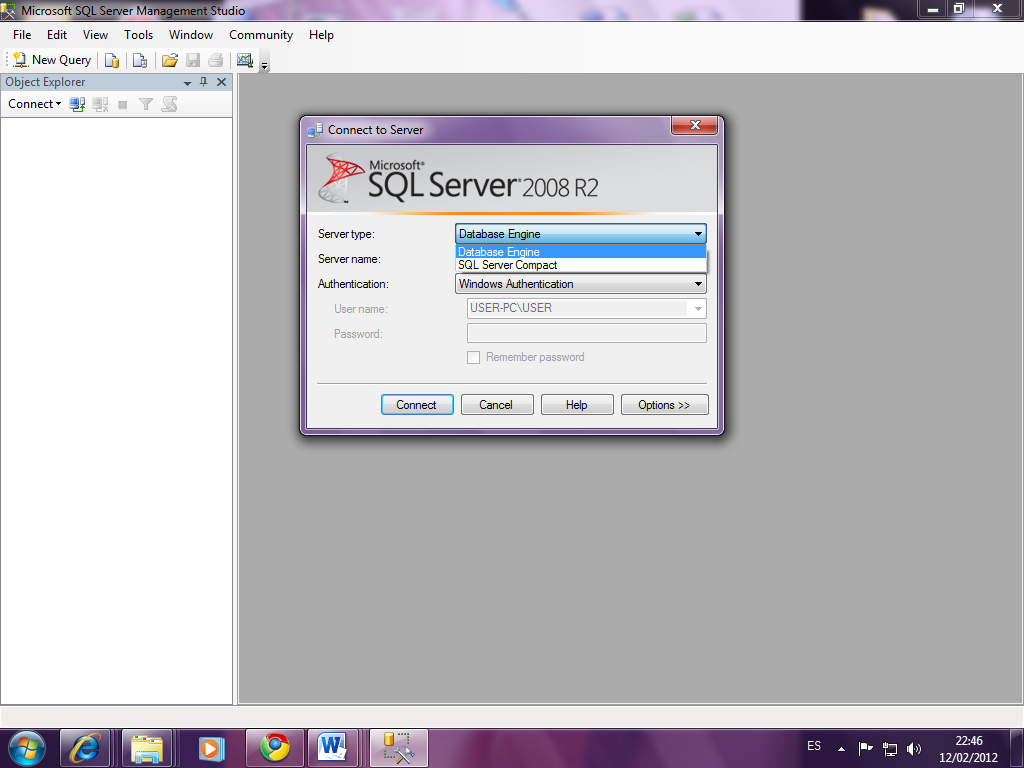
Now you can enter the database access credentials and connect to the database.
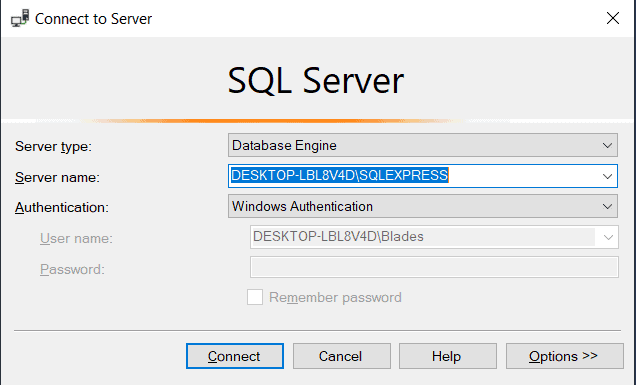
Connect to sql server from sql server management studio 2019
This is how to install sql server management studio 2019 on windows 10.
You may like the SQL Server articles:
- How to export data from SQL Server to Excel
- View line numbers in SQL Server Management Studio
In this tutorial, we have learned about how to install SQL Server 2019 Express Edition and SQL Server Management Studio on Windows 10.
- Introduction to SQL server 2019 express
- Is SQL Server Express 2019 Free?
- SQL Server 2019 Express Edition vs Developer edition
- What are the advantages of SQL Server 2019 Express
- Limitations of SQL Server 2019 Express
- Installation requirements to install SQL server express 2019
- How to install SQL server 2019 express on windows 10 step by step
- Why we require SQL Server Management Studio?
- How to install SQL server management studio 2019 on windows 10
Что делать, если появляется ошибка при установке VS?
Вообще, если вы пользователь оригинальной версии Windows, а также ваш компьютер соответствует всем системным требованиям, то шанс на то, что у вас появится хоть одна ошибка, весьма мал. Но что, если все же произошла непредвиденная ситуация?
В этом случае выполните следующие инструкции:
Переустановите установщик. Этот шаг — истребление установщика и установка его сначала. Первым делом удаляем старый в этой директории:
- После этого скачиваем новый с официального сайта и устанавливаем заново. Таким образом можно установить Microsoft Visual Studio совершенно без проблем. Если же и это не помогло, то двигаемся дальше.
- Сообщите о проблеме. Последний способ припасен на крайний случай. Для этого вам необходимо нажать на значок рядом с закрытием программы и выбрать пункт «Сообщить о проблеме». После этого кратко опишите возникшую проблему. После чего это сообщение попадет в компанию и в следующих версиях она будет исправлена.
Starting SQL Server Installation
In this article, we will install MS SQL Server 2019 Enterprise Edition on Windows Server 2019.
Note. SQL Server 2019 has full Linux support, as well as Docker and Kubernetes.
- Download and mount the SQL Server 2019 installation image. Run setup.exe.
- Since in this article we will install a standalone instance, select New SQL Server stand-alone installation in the Installation tab.
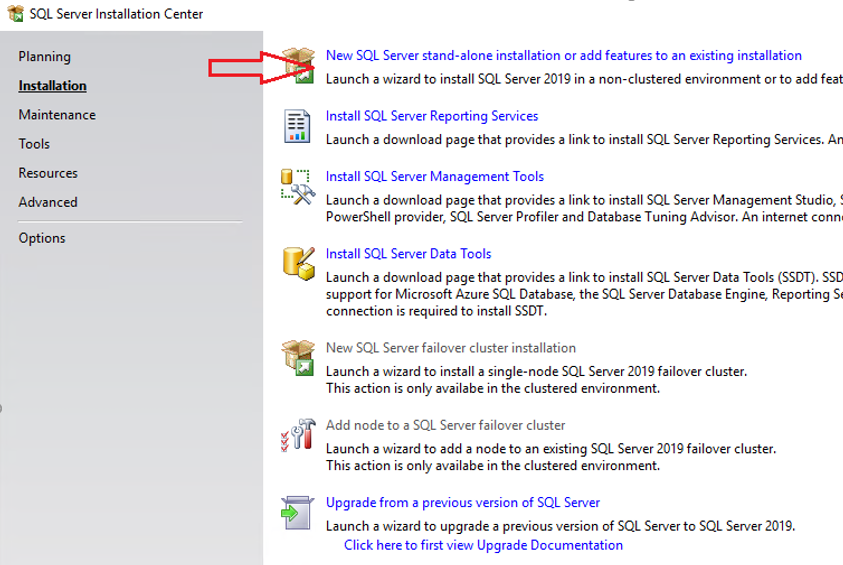
You can do many other things in the SQL Server installation wizard: upgrade a previous instance, fix any errors, etc.
SQL Server Update Settings
At this step, you can enable the search for updates via Windows Update. It’s up to you to decide whether to do it. If you don’t have a clear update plan for your servers, it is better to enable this setting.
You may come across the following error in this step:
Error 0x80244022: Exception from HRESULT: 0x80244022
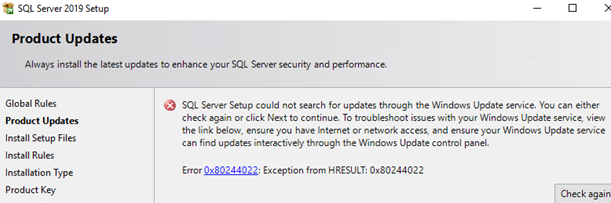
It is related to Windows Update issues. Here you can find how to solve them: https://woshub.com/windows-update-error-0x80244022-and-wsuspool-memory-limit/
Click Next.
The Install Setup Files step will be done automatically. It will prepare SQL Server files for the installation.
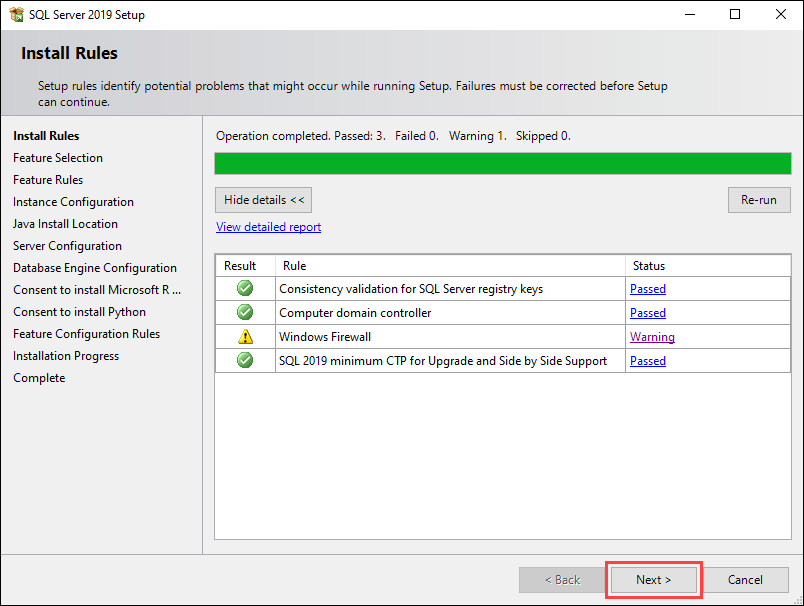
Install Rules will also be done automatically if the wizard doesn’t find any problems to be solved prior to MSSQL installation (like the prompt to restart your computer or incompatibility of your Windows edition with the SQL Server version).
SQL Server Installation Type
In this step, you can select whether to install a new instance of SQL server or add features to an installed instance. In our case, check “Perform a new installation of SQL Server 2019”.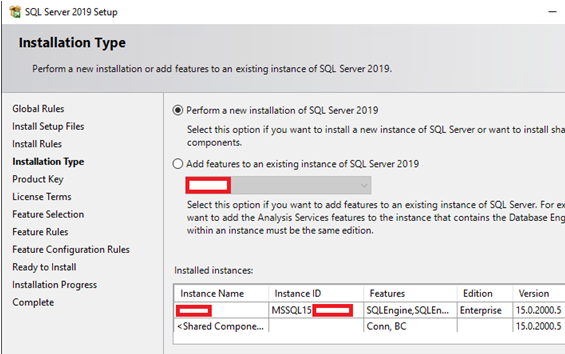
Then enter your SQL product key. If you don’t have it, select the free edition (like Developer), but remember that with the Developer edition you can only develop or test software (don’t use in production tasks).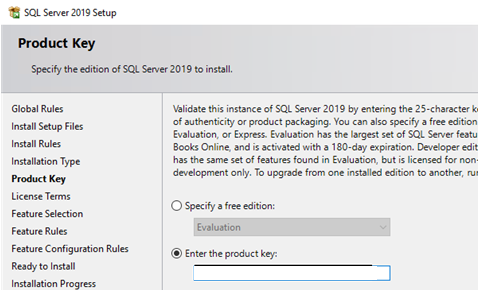
In the License Terms step, accept the license agreement.
SQL Express Installation Guide
The following guide describes the step-by-step process of installing and testing your SQL Server Express.
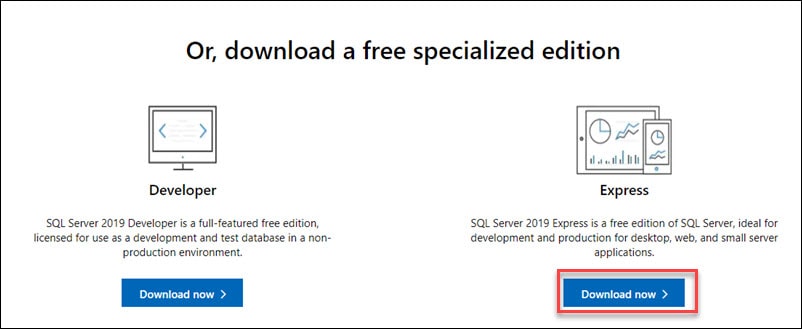
Step 1: Download SQL Server Express
1. Visit the download SQL Server Express page on the official Microsoft website.
2. Scroll down until you find the Express edition of SQL Server 2019.
3. Click Download now to start the download.
Step 2: Run the Installation
Once the download is complete, open the download folder and find the installation file. Run the file to start the installation process.
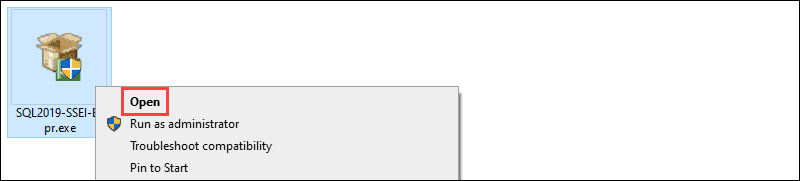
Note: The default name for the installation file is SQL2019-SSEI-Expr.exe.
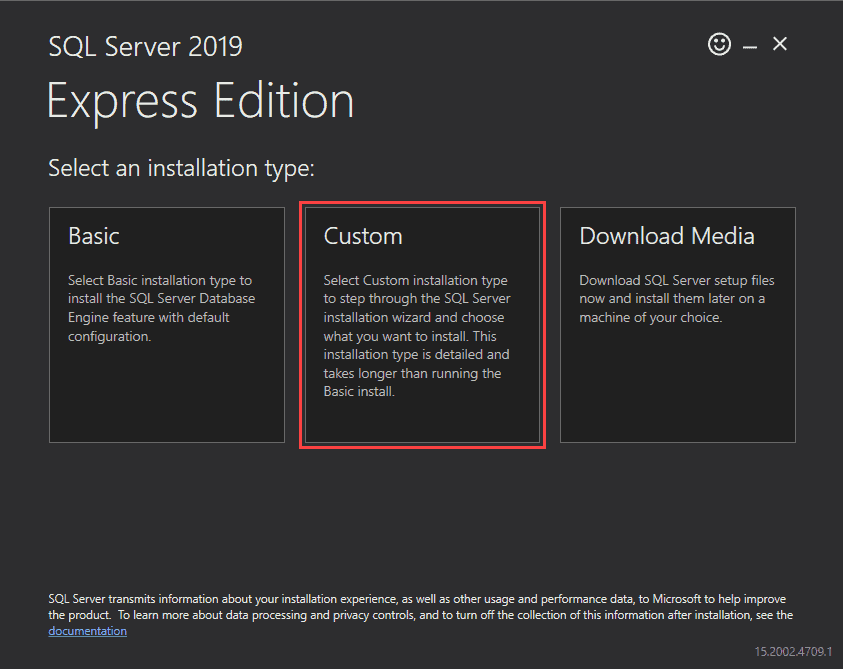
Step 3: Choose the Installation Type
1. After starting the install process, you can choose between three installation types.
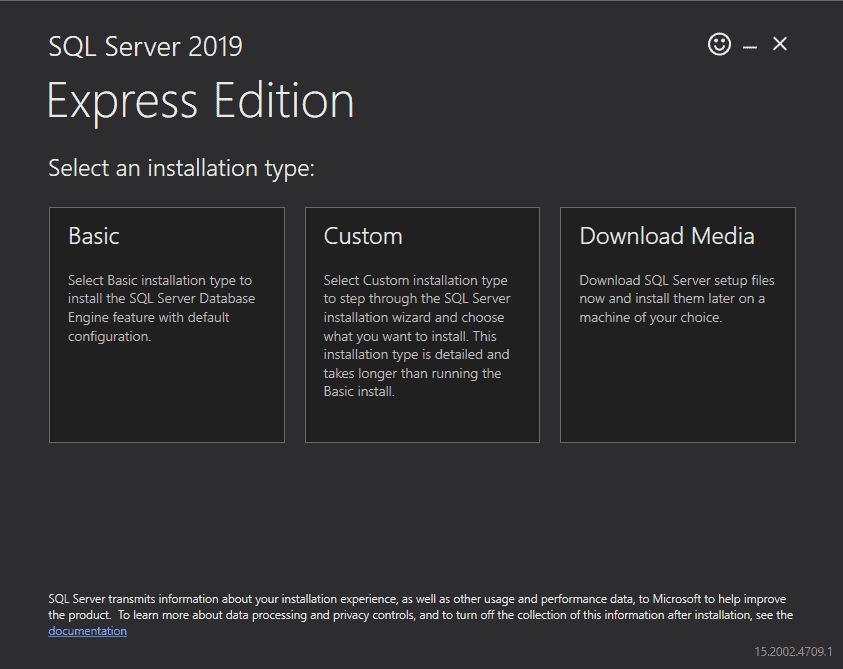
- The Basic installation is the quickest, and it installs the default configuration of SQL Server Database Engine.
- The Custom installation allows you to specify the install location. It also lets you customize which features are installed.
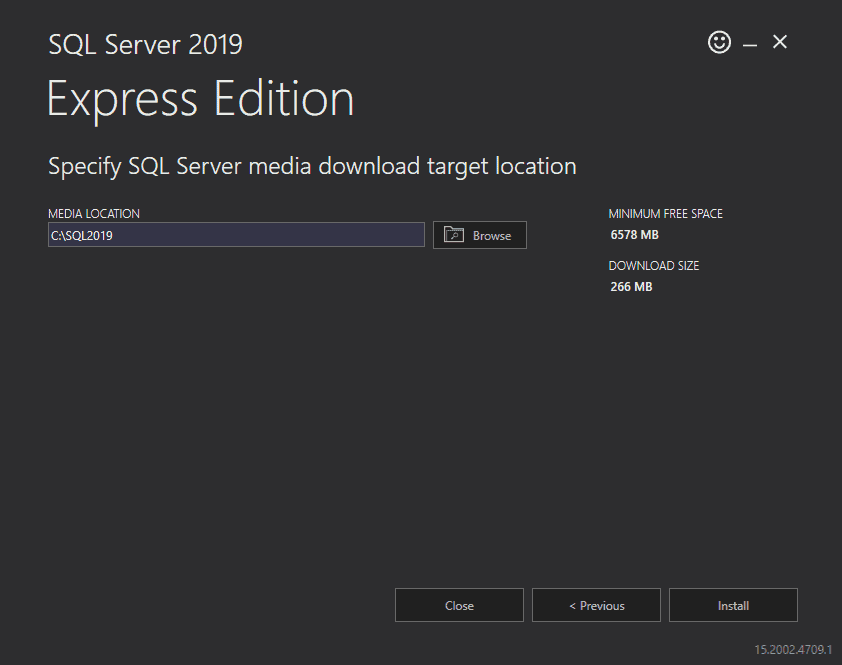
The Download Media installation lets you download the setup files for an offline installation. You can choose the version of SQL Server Engine you want to download.
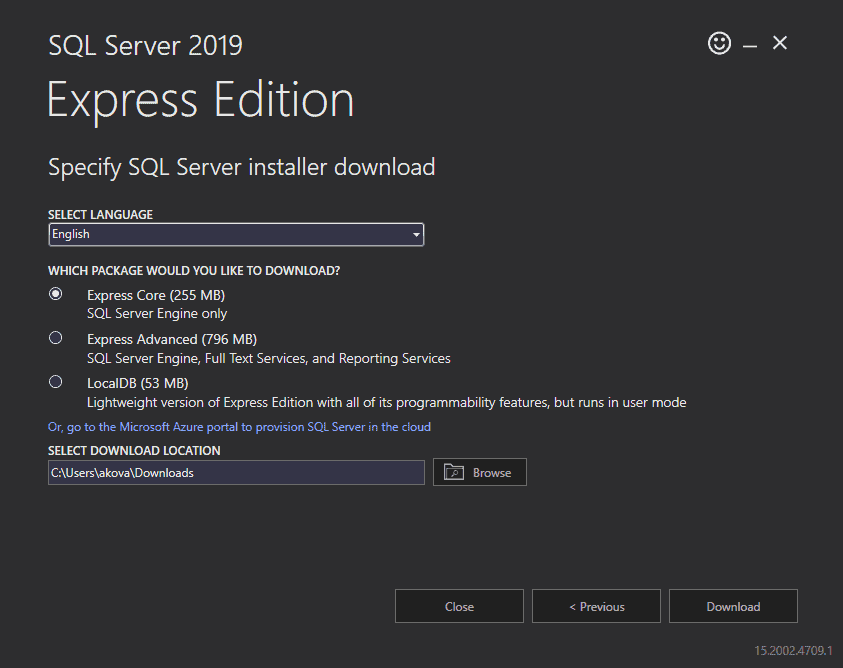
2. For this tutorial, we are using the Custom installation type. Click the center tile to choose this option.
3. Specify the install location and click Install to start downloading the setup files.
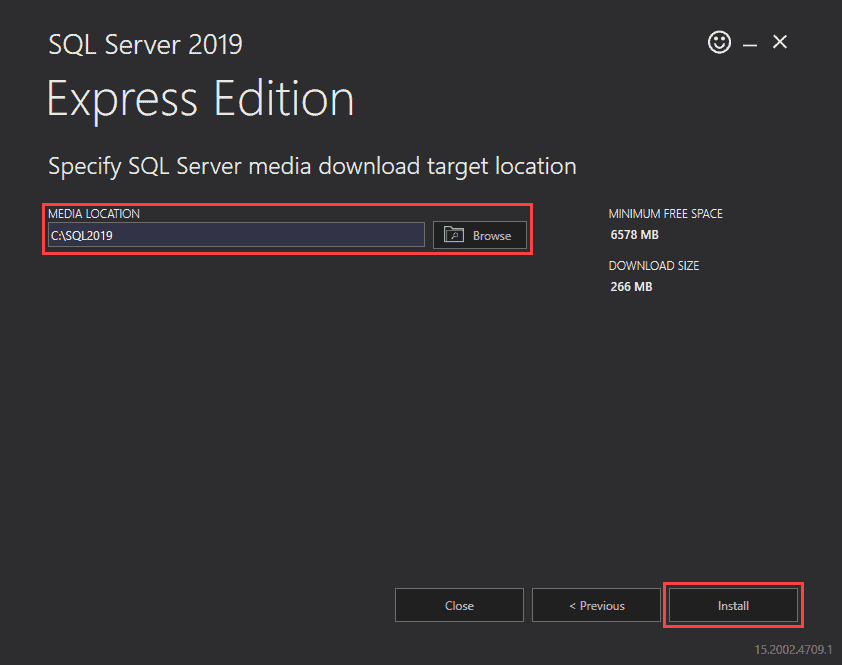
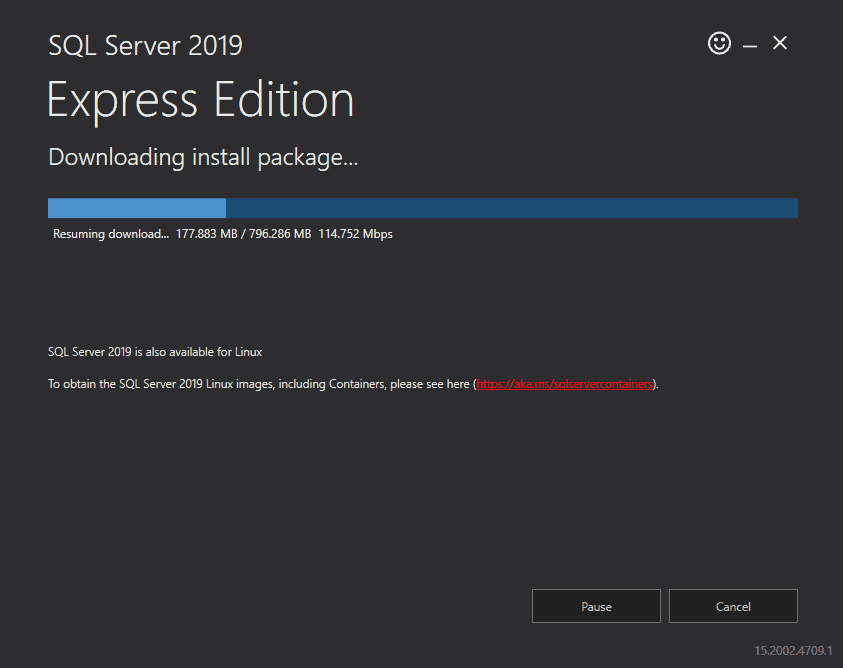
Depending on your download speed, this process might take some time.
Step 4: Follow the Screens to Install SQL Server Express
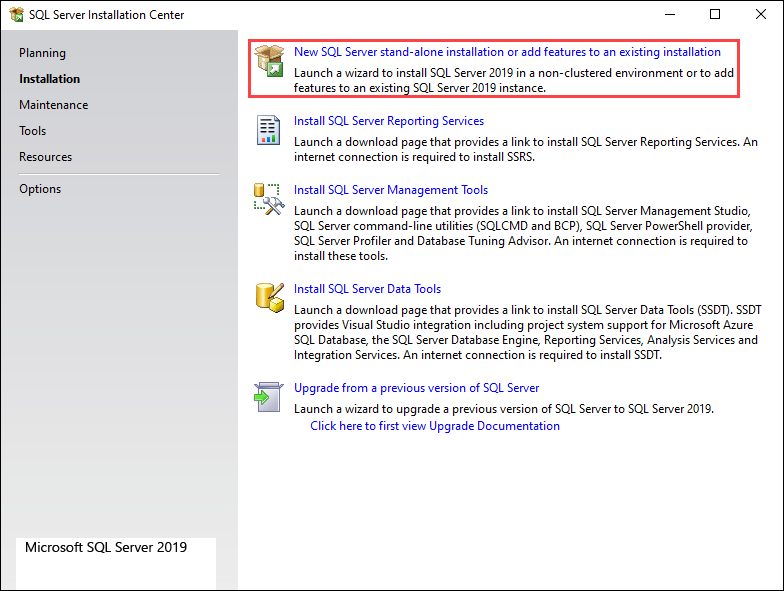
Once the wizard is done downloading the install package, it opens the SQL Server Installation Center. This window offers an array of different tools used to install and manage your SQL server.
1. Select the New SQL Server stand-alone installation or add features to an existing installation option to start the install process.
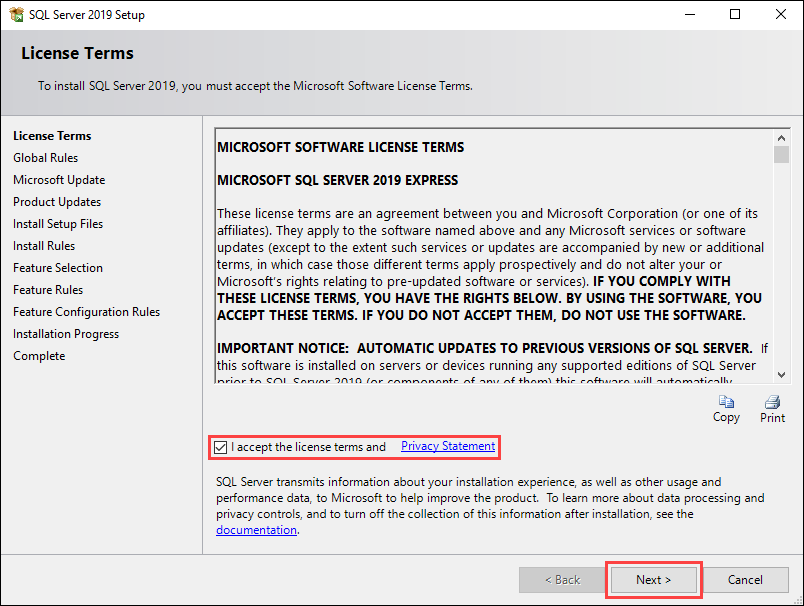
2. The following screen gives you an overview of the SQL Express Server license terms. Check the box next to I accept the license terms and Privacy Statement and click Next to continue.
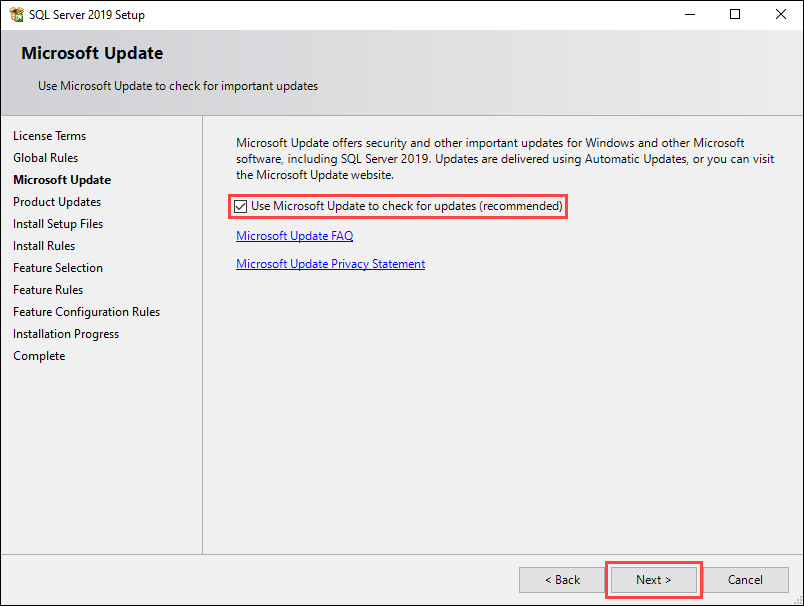
3. Check the box next to Use Microsoft Update to check for updates to include updates to SQL Server 2019 in the scheduled Windows updates. Click Next to continue.
4. The Install Rules screen helps identify potential problems with the installation. Any entries showing a Failed status must be resolved before you proceed with the installation. If there are no failed entries, click Next to continue.
5. On the Feature Selection screen, check the boxes in the Features section to choose which elements of SQL Server 2019 to install, and define the install directories. Click Next to continue.

6. The Instance Configuration screen lets you choose between the default and custom instance names. For this tutorial, we are using the Named instance option and keeping the default suggested names. Click Next to continue.

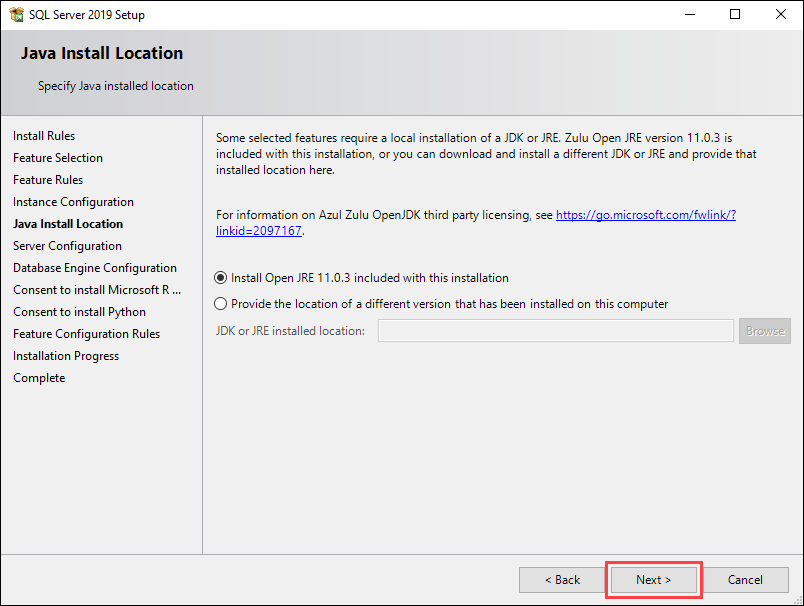
7. The following screen lets you install Java with the current installation or specify a path if you already have it installed. Click Next to continue.
8. The Database Engine Configuration screen lets you specify the authentication mode for your SQL server. For this tutorial, we are using the Mixed Mode option and adding the current user as an administrator. Click Next to continue.


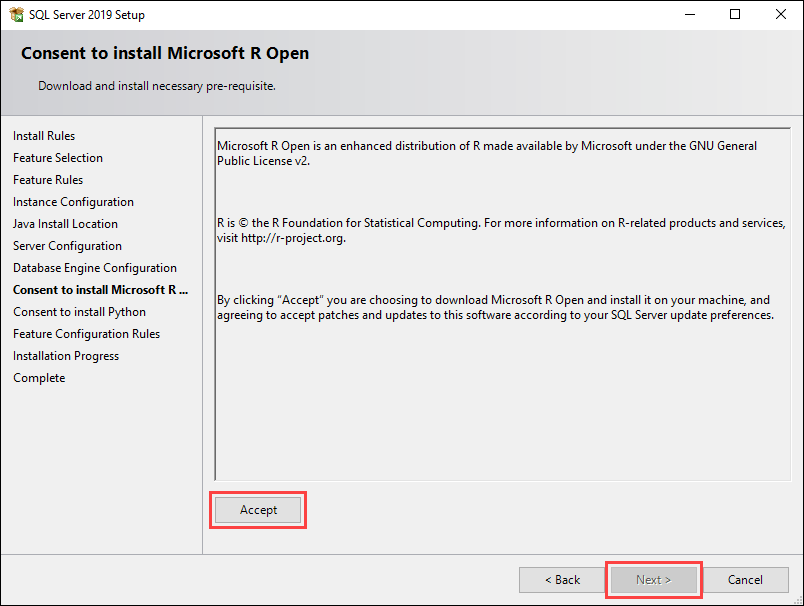
9. The next two screens require you to consent to installing Microsoft R Open and Python, respectively. Click Accept and Next on both to continue.
The following screen displays the current installation progress.

10. Once the installation is complete, the new screen displays an overview of the installed features. Click Close to finish the installation.
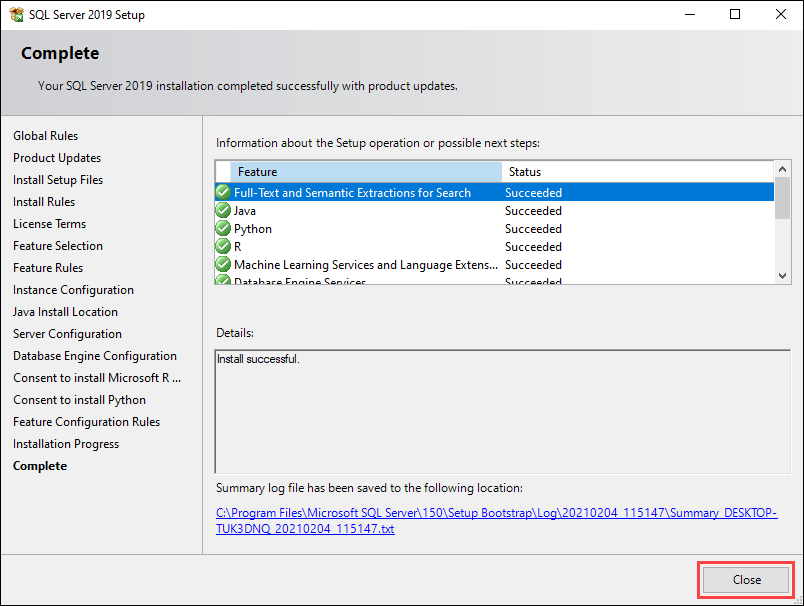
Note: Make sure to restart your computer for the changes to take effect.
Step 5: Test connection to SQL Server Express
There are two ways to test your connection to SQL Server Express:
- Using the SQL Server Management Studio.
- Using the command prompt.
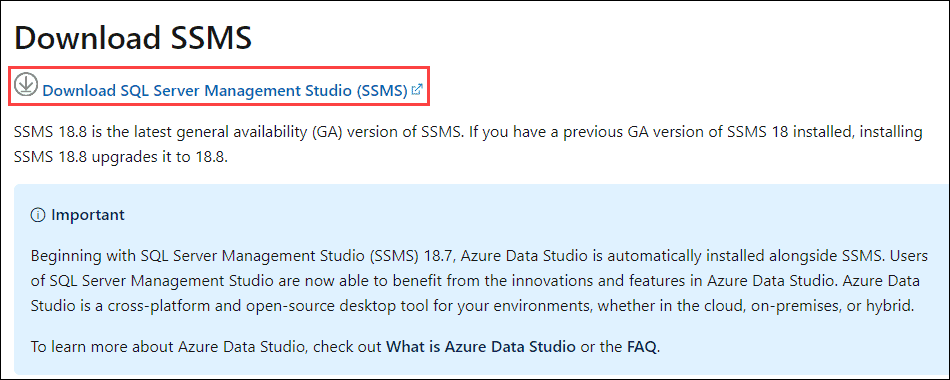
1. Start by downloading the SQL Server Management Studio. Scroll down to the Download SSMS section and use the provided link.
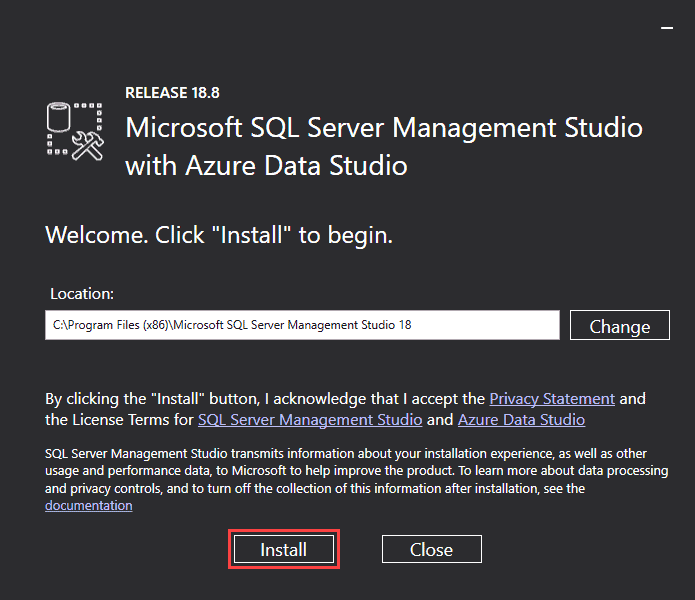
2. Open the installation file and click Install to start the setup.
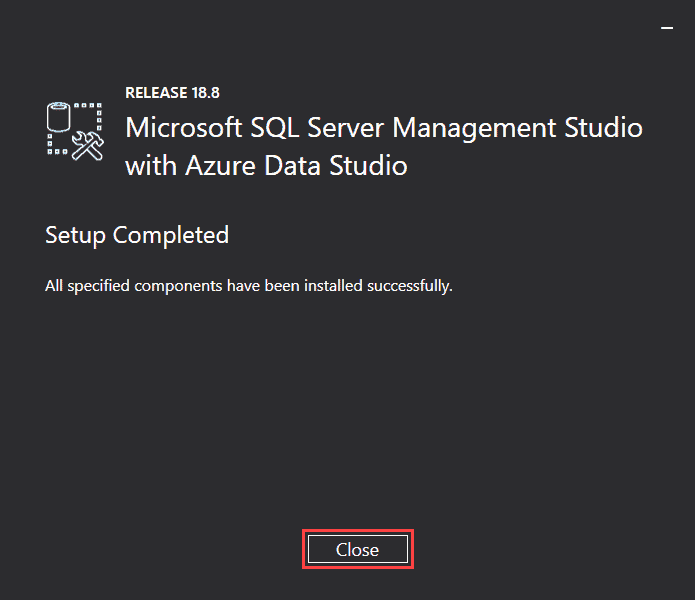
4. Once the setup is complete, click Close to exit.
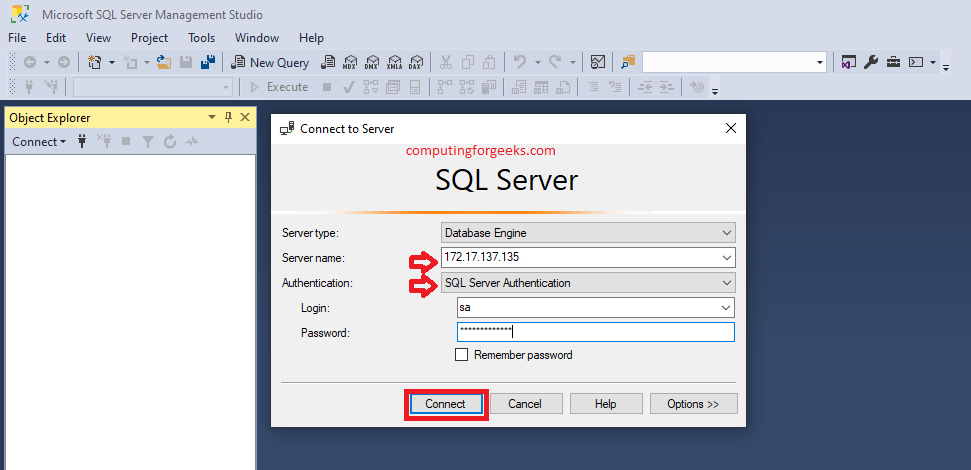
5. Run SQL Server Management Studio.
6. In the login window, choose the SQL Server Authentication option and use the default Login (sa) and the password you set up during the SQL Server 2019 setup.
7. Click Connect to try to connect to the server.
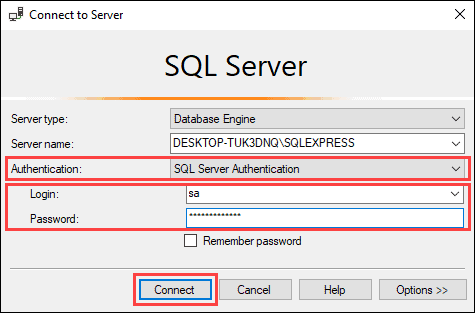
If the login window closes without any issues and you have access to the SQL Server Management Studio main window, this means the connection works properly.
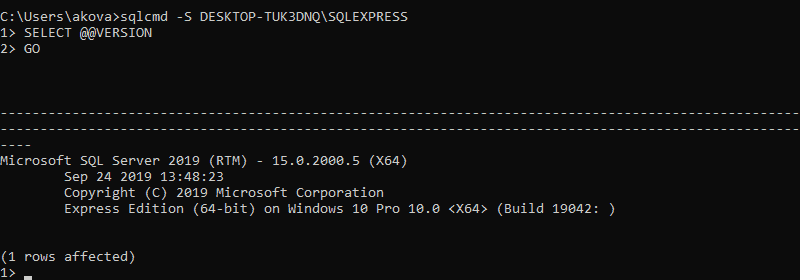
8. Another way to test the connection to the server is to use the following commands in the command prompt:
For this tutorial, the computer name we are using is DESKTOP-TUK3DNQ:
MS SQL Server 2019 Editions
There are 5 MSSQL 2019 editions:
- Express is a free edition. It has a limited number of features, the most important restriction is the maximum database size of 10 GB. This edition is suitable for small projects, like student works, or studying SQL/T-SQL;
- Standard is a full-featured commercial edition. However, it also has some restrictions. The maximum RAM size the SQL Server can use is 128 GB. AlwaysOn availability groups and some other components are not included. The Standard edition may be applied in small organizations;
- Enterprise includes all possible features and components without any restrictions. The Enterprise edition is typically used by large corporations or companies that require features offered in it;
- Developer edition, like the Enterprise one, doesn’t have any restrictions and is free, but you can use it only to develop and test apps;
- Web edition is similar to Standard, but it has more restrictions and, consequently, lower licensing cost.
Установка MS SQL Server
Для инициализации процесса установки запускаем setup.exe. Выбираем в левом меню центра установки SQL Server пункт Установка. Теперь в правой части запускаем начало установки выбрав Новая установка изолированного
экземпляра SQL Server. Конечно помимо самого сервера нужно будет установить дополнительно средств управления SSMS (SQL Server Management Studio). Но об этом расскажу отдельно.
Ключ продукта
На первом же этапе установки нас попросят ввести лицензионный ключ продукта. Для этого мы отмечаем радиокнопку Введите ключ продукта и указываем ключ под ней в поле для ввода (надеюсь он у вас есть ). В сети есть слитые ключи, ищутся на раз. Жмём Далее >
Условия лицензии
Тут нам дают почитать условия лицензионного соглашения на использование продукта, но кто его читает! Просто соглашаемся с условиями использования программы Microsoft SQL Server и переходим Далее >
Центр обновлений Майкрософт
Если мы собираемся получать обновления для ms sql вместе с обновлениями для операционной системы windows, то подтверждаем, что будем использовать Центр обновления Майкрософт для проверки обновлений отметив соответствующий
чекбокс и переходим Далее >
Проверка правил установки
На следующем этапе установщик проверяет нашу систему на наличие ошибок и выдаст статус Выполнено с зелёной галочкой если всё в порядке. В моём случае я получил предупреждение по поводу Брандмаура
Windows. Но это не ошибка установки sql server, давайте посмотрим в чём дело.
На скриншоте выше показано окно с пояснениями. Из него ясно что у нас в Брандмауре не открыты порты для SQL Сервера. Порты сервера SQL по умолчанию:
- TCP 1433 – SQL Server
- TCP 1434 – Порт обычно используется для администрирования MS SQL сервера через командную строку
Заодно, если вы уже перешли к настройки прав брандмаура windows, давайте припишем порты для входящих/исходящих подключений, которые использует 1С:
- 1540
- 1541
- 1560-1591
А вообще в брандмауре windows можно задать правило на разрешение трафика по всем портам TCP и UDP для SQL Server.
Выбор компонентов
На этапе выбора компонентов SQL сервера отмечаем чекбокс напротив Службы ядра СУБД. Также мы можем указать каталоги для установки компонентов SQL сервера Microsoft каждый по отдельности.
Настройка экземпляра
Если вы устанавливаете один сервер на систему, то можно оставить как есть: Экземпляр по умолчанию. В противном случае нужно индификатор задать другой, чтобы он отличался от уже существующего и не создавал конфликтов.
Конфигурация сервера
Во вкладке Учётные записи служб нам необходимо для службы Агент SQL Server выбрать тип запуска Авто для того чтобы служба стартовала вместе с запуском системы. При необходимости можно изменить имя
учётной записи под которой будет запускаться служба.
Настройка ядра СУБД
Дальше давайте настроим учётные записи для управления нашим сервером MS SQL. Выбирайте Смешанный режим. Будет активирована учётная запись SQL сервера под именем SA,
для которой ниже нам будет предложено установить пароль. Ещё чуть ниже назначаем администратора SQL Server. Для начала можно добавить текущего пользователя, если вы устанавливаете SQL сервер под подходящей учётной записью. Остальные учётные записи можно добавить нажав кнопку Добавить…
Во вкладке Каталоги данных можно поменять стандартные пути до места создания новых баз данных SQL, журналов и каталогов куда будут сохраняться созданные резервные копии баз данных. Конечно при создании
каждой конкретной базы данных вы спокойно можете указать эти самые пути вручную.
На следующей вкладке указываем расположение служебной базы TempDB и другие параметры. После установки каталоги можно изменить. Для изменения расположения баз TempDB воспользуйтесь моей статьёй
– Как в Microsoft SQL Server перенести tempdb на другой диск
Ход установки
Перейдя на следующий этап мы будем наблюдать за ходом установки MS SQL сервера.
По завершению мы получим окно с дополнительными сведениями о статусе всех шагов установки SQL сервера майкрософт. Надеюсь у вас всё будет такое же зелёное, как и у меня .
PostgreSQL. Добавляем not null constraints в большие таблицы
Проекты развиваются, клиентская база увеличивается, базы данных разрастаются, и наступает момент, когда мы начинаем замечать, что некогда простые манипуляции над базами данных требуют более сложных действий, а цена ошибки сильно повышается. Уже нельзя за раз промигрировать данные с одного столбца в другой, индексы лучше накатывать асинхронно, добавлять столбцы с default значениями теперь нельзя.
Одной из команд, с которой надо быть осторожным на таблицах с большим количеством записей, является добавление not null constraint на столбец. При добавлении данного constraint PostgreSQL приобретает access exclusive lock на таблицу, в результате чего другие сессии не могут временно даже читать таблицу; затем БД проверяет, что в столбце действительно ни одного null нет, и только после этого вносятся изменения. Под катом я рассмотрю различные варианты, как можно добавить not null constraint , лоча таблицу на минимально возможное время или даже не лоча ее совсем.
Установка Microsoft SQL Server Management Studio 18
После того как Вы установили Microsoft SQL Server 2019, нужно установить инструмент, с помощью которого можно будет подключиться к серверу баз данных. Для этого у Microsoft есть среда SQL Server Management Studio (SSMS).
Шаг 1 – Скачивание SSMS
Чтобы скачать актуальную версию SSMS (она также бесплатная), нужно перейти на страницу загрузки официального сайта.
Для этого нажмите на пункт «Установка средства управления SQL Server в программе «Центр установки SQL Server

В результате в браузере откроется необходимая страница.
На странице Вам необходимо нажать на ссылку «Скачивание SSMS», в итоге у Вас должен загрузиться установочный файл SSMS—Setup—RUS.exe размером около 600 мегабайт.
Шаг 2 – Запуск установки SSMS
После того как дистрибутив загрузится, запускаем его. Далее, для того чтобы запустить процесс установки, нажимаем «Установить».
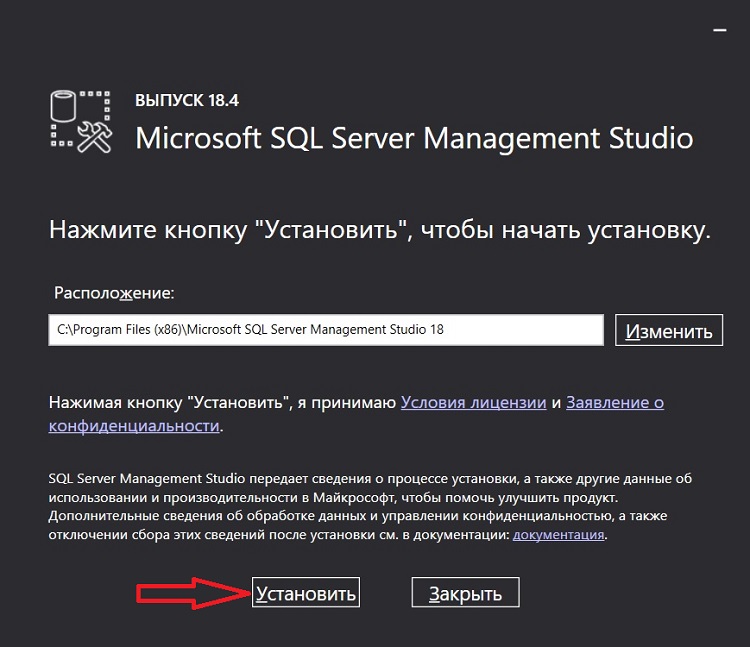
Процесс сразу же начнётся.
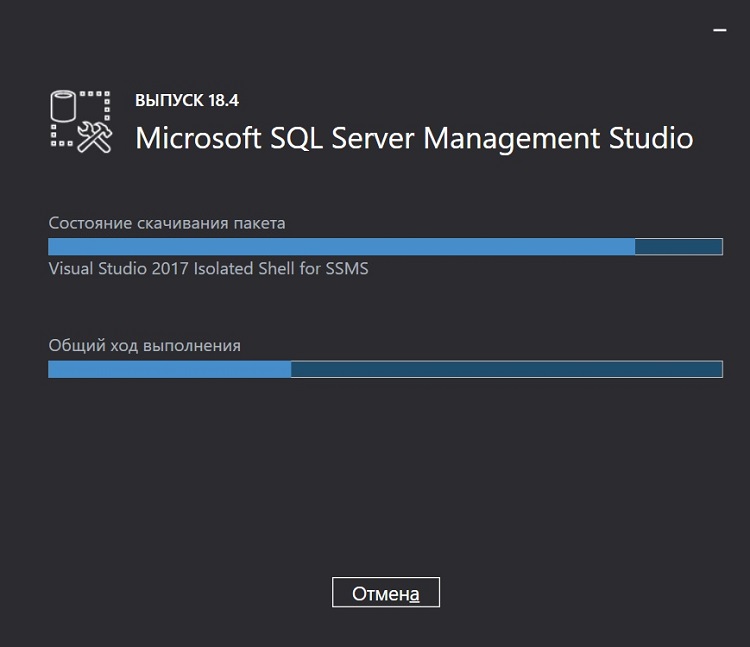
Шаг 3 – Завершение установки SSMS
Процесс установки среды SQL Server Management Studio будет завершен, когда программа выдаст соответствующее сообщение.
Как установить Visual Studio Code?
Настоящие пользователи «пингвиненка» уже, скорее всего, разобрались сами, и не требуют помощи сторонних людей. А если нет? Что же делать, если хочешь установить эту программу?
- Выполняем первый шаг, описанный выше.
- После скачивания открываем терминал и уже с помощью него устанавливаем программу. Ну, или кликаем на исполняемый файл, если вы пользуетесь пользовательским интерфейсом.
- Готово. Теперь вы можете пользоваться этой программой.
Все было бы хорошо, если бы не одно «но». В этой программе намного меньше функционала, чем в предыдущей, ведь в ней вы не сможете встретить визуальной части разработки. Попросту говоря, Code — это редактор кода, который позволит писать код и сохранять его исполняемые файлы самостоятельно. К сожалению, Visual Studio Community и другие подобные версии не могут поддерживать подобную операционную систему, поэтому компания Microsoft предложила компромисс для пользователей Linux — она добавила VS Code.
Installation Requirements to Install SQL Server Express 2019
In this section, we will learn about the Hardware and Software requirements to install SQL Express Edition on Windows 10.
| Hardware & Software | Requirement |
|---|---|
| Processor | All these processors must be 64-bit: AMD Athlon 64, AMD Opteron, Intel Xeon with Intel EM64T support, Intel Pentium IV with EM64T support |
| The minimum Processor speed should be: 1.4 GHz for 64-bit ArchitectureRecommended Processor speed should be 2.0 GHz or faster. | |
| Memory Requirement | Minimum memory required is 512 MB.Recommended memory is 1 GB or above. |
| Hard Disk Requirement | Minimum 6 GB of secondary memory is required for installation. |
| Operating System | Windows 10 TH1 1507 or greaterWindows Server 2016 or greater |
| Others | .NET Framework |
installation requirements to install sql server express 2019
Проект «Сиэтл»
На встрече со Славой на следующий день я быстро узнал, что за несколько часов мы приступили к одному из самых амбициозных усовершенствований SQL Server, которые я когда-либо наблюдал за всю свою карьеру. Я говорю это, уже зная, что мы выводим на рынок SQL Server под Linux, что ранее считалось невозможным.
Слава и команда проекта выбрали для проекта кодовое название «Сиэтл», потому что в качестве кодового названия SQL Server 2017 использовалось «Хельсинки», и команда и искала новое наименование города для кодового названия проекта. По иронии судьбы, никто в Microsoft раньше не использовал название «Сиэтл», поэтому оно быстро прижилось. Я спросил Славу, когда он впервые начал планировать проект «Сиэтл». Я был поражен, услышав ответ: в январе 2017 года. Тот факт, что такие люди, как Слава, Конор Каннингем (Conor Cunningham) и Трэвис Райт (Travis Wright), планировали проект «Сиэтл», работая над завершением SQL Server 2017 на Linux, стал свидетельством их преданности команде, их стремления удерживать SQL Server на позиции лидера инноваций в отрасли баз данных.
Трудно было поверить, что мы могли так быстро запланировать нечто большее, после того как предоставили так много полезных и инновационных функций в SQL Server 2016 и SQL Server 2017.
В SQL Server 2016 мы добавили новые возможности диагностики производительности с помощью Query Store, а именно новые функции для разработчиков, такие как временные таблицы и интеграция c JSON. Мы повысили безопасность работы благодаря технологии Always Encrypted, динамическому маскированию данных и защите на уровне строк. И мы представили две новые инновационные возможности, выходящие за пределы «обычных» функций для реляционной системы управления базами данных. Одной из них была интеграция языка R для моделей машинного обучения. Второй была интеграция с системами Hadoop при помощи Polybase (что в итоге приведет к чему-то большему в 2019 году; однако я забегаю вперед). Создание возможностей для включения новых сценариев, таких как машинное обучение и большие данные, привело меня и других сотрудников Microsoft к мысли о том, что SQL Server — уже не просто механизм управления реляционными базами данных, а платформа данных.
Однако, чтобы создать современную и полнофункциональную платформу данных, нам нужно было расширять возможности приложений в системах, отличных от Windows Server. Это привело к появлению в SQL Server 2017 поддержки Linux и Docker-контейнеров. Запуск на Linux и использование контейнеров стали очень большим шагом вперед для Microsoft, но SQL Server 2017 также включал другие возможности, такие как адаптивная обработка запросов (Adaptive Query Processing), автоматическая настройка, графовая база данных, группы доступности вне кластеров и интеграция с Python, в дополнение к поддержке языка R для служб машинного обучения.
Учитывая все эти новые возможности, как мы можем за короткий период времени спланировать и создать что-то более новое, замечательное и интересное, чем SQL Server 2016 и 2017? Я задал себе этот вопрос, внимательно слушая коллег во время моей первой встречи с командой проекта «Сиэтл». В первые несколько минут меня познакомят с идеей, которая, когда ее позже объявят общественности, будет считаться довольно радикальной. И это новшество было «краеугольным камнем» проекта «Сиэтл», который имеет собственный код проекта: Aris.
How to Upgrade to SQL Server 2019 From an Earlier Version
Installing an entire new version of SQL Server is not necessary if you have an older version of SQL Server on your computer. For example, if you have installed SQL Server 2017 and want to update it to 2019, you can do that. First, launch SQL Server Installation Center:
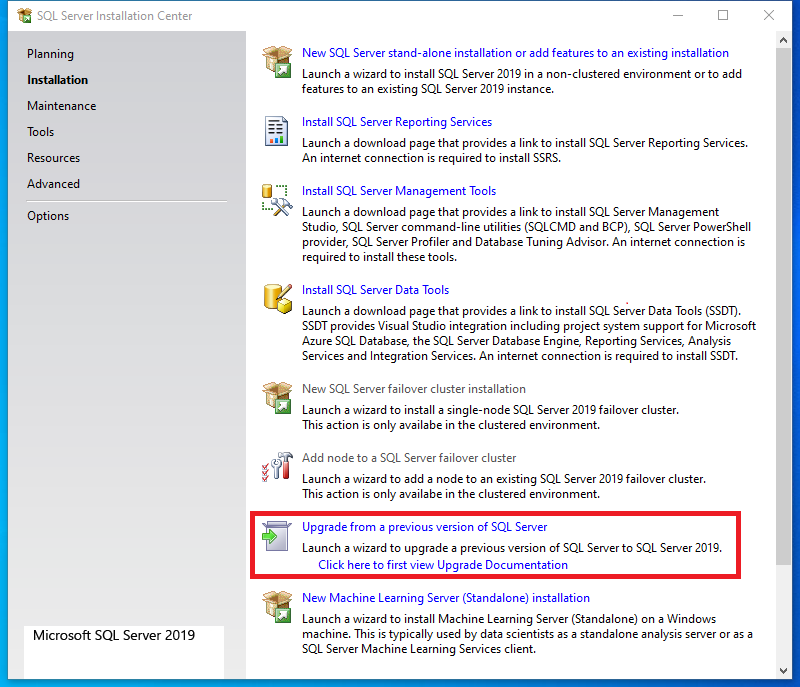
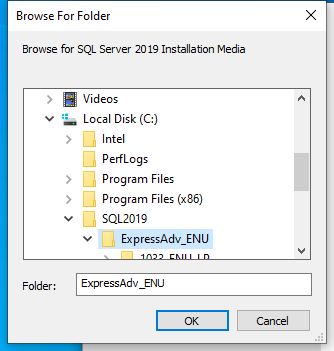
Next, click Upgrade from a previous version of SQL Server. In the Browse For Folder window, select your SQL Server media folder (the actual name may vary) and click OK.
The upgrade process will start. It’s very similar to the installation process we used earlier. Just follow the steps and you’ll have the new version of SQL Server installed.


