1.4 SSRS Configuration
The assumption is SQL Server 2008 R2 is installed with SSRS and simply needs to be properly configured. If SSRS is not currently installed, please reference guidance from Microsoft. To start SSRS configuration reference .
1.4.1 Permissions
Site and Folder security settings must be set properly for client, non Admin users to access SSRS features. Groups and Users will not be able to access SSRS until these security settings are configured properly. For demo purposes add your local user account. For additional information and guidance concerning roles reference .
1.4.1.1 Security Configuration
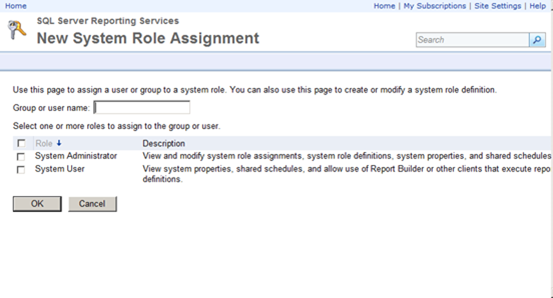
1.4.1.1.1 Site Settings Security
On the left hand menu click . At the top ribbon menu click to add a new role. For additional information and guidance concerning roles reference .

1.4.1.1.2 Folder Settings Security
In addition to setting system roles folder and viewing security roles must be setup too. Navigate to , then click . At the top ribbon menu click to add a new role. For additional information and guidance concerning roles reference .


2 Development Configuration
Advantages of using SSRS
- It is faster and cheaper.
- Efficient reporting access to information that is residing in both MS SQL Server database or Oracle
- No need for expensive specialist skills
- In SSRS the default report designer is integrated with Visual Studio .NET. This allows us to create an application and reports in the same environment.
- The security is managed in a role-based method which can be applied to folders and reports.
- Subscription-based reports are automatically sent to the users.
- Faster production of reports on both relational and cube data
- Real time information to the business, providing better decision support
SQL Server Reporting Services — Summary
SQL Server Reporting Services enhances business intelligence skills by providing developers the ability to generate rich,
nicely formatted reports.
The architecture consists of Report server maintaining information about reports at the backend and report manager to provide a
web user interface to display reports.
Generating a report requires you to install SQL Server, Reporting services and Business Intelligence studio.
Generating reports involve specifying the data source from which data is to be fetched for our report and defining
the desired layout.
Tutorial toolbar: Tell A Friend | Add to favorites | Feedback |
Configure your report server
After you select Configure Report Server in the setup, you’re’ presented with Report Server Configuration Manager. For more information, see Report Server Configuration Manager.
You need to create a report server database to complete the initial configuration of Reporting Services. A SQL Server Database server is required to complete this step.
Creating a database on a different server
If you’re creating the report server database on a database server on a different machine, you need to change the service account for the report server to a credential that is recognized on the database server.
By default, the report server uses the virtual service account. If you try to create a database on a different server, you may receive the following error on the Applying connection rights step.
To work around the error, you can change the service account to either Network Service or a domain account. Changing the service account to Network Service applies rights in the context of the machine account for the report server.
For more information, see Configure the report server service account.
Introduction
Microsoft SQL Server Reporting Services (SSRS) is a server-based report generating software system. SSRS is a part of a suite of Microsoft SQL Server services which consists of SSAS (SQL Server Analysis Services) and SSIS (SQL Server Integration Services). This means that, it comes with a SQL Server License. We can use it to prepare and deliver a variety of interactive and printable reports with less effort. It represents the RDL (Report Definition Language) component to graphic icons in a GUI (Graphical User Interface). Instead of writing code, the user can drag-and-drop graphic icons into an SSRS report format.
This article will describe the simple steps to configure the Report Server.
First, you need to install SQL Server Reporting Services. There are two methods to install it.
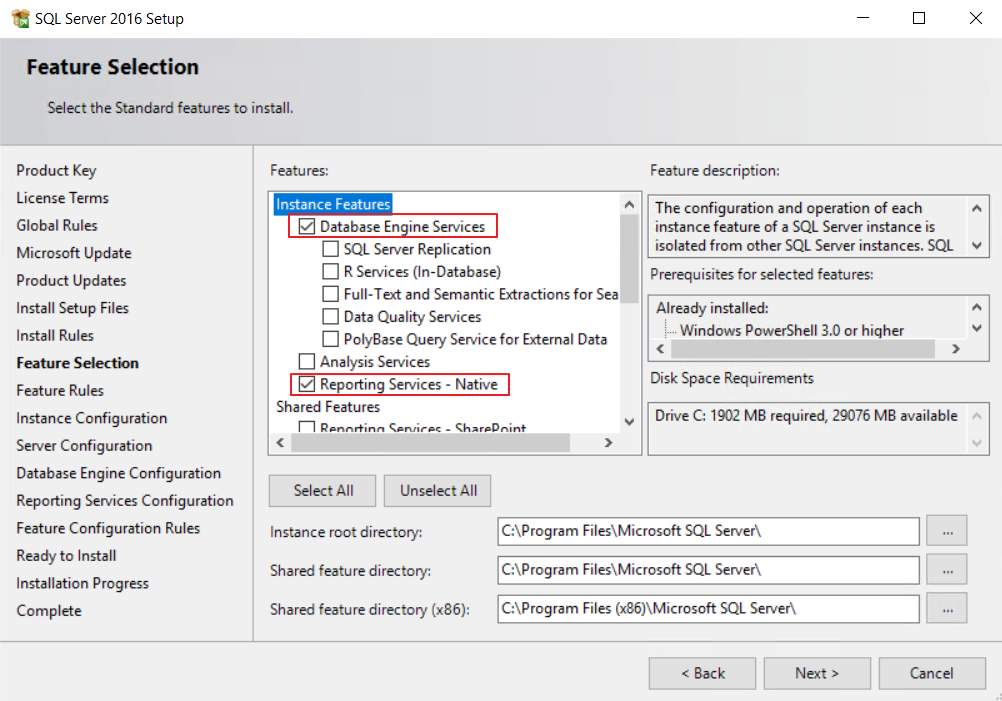
Method 1
Install it from SQL Server installation file while installing SQL Server:

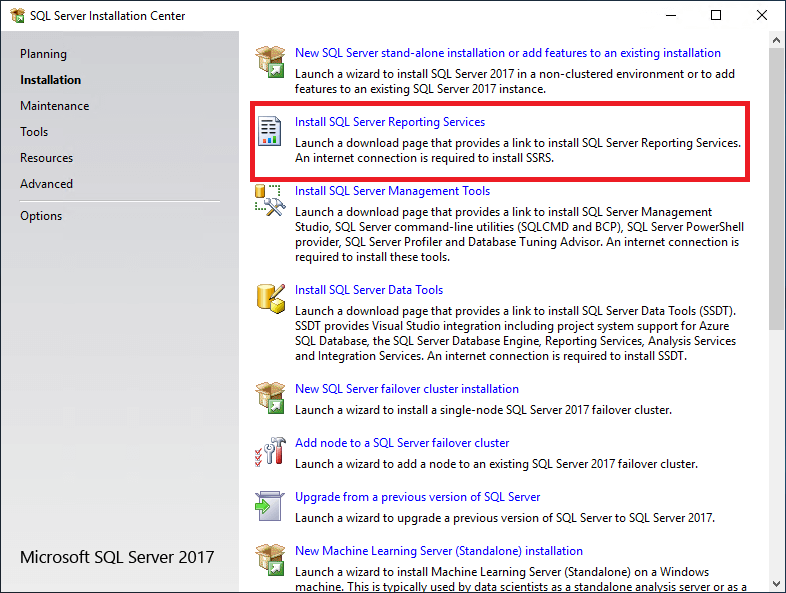
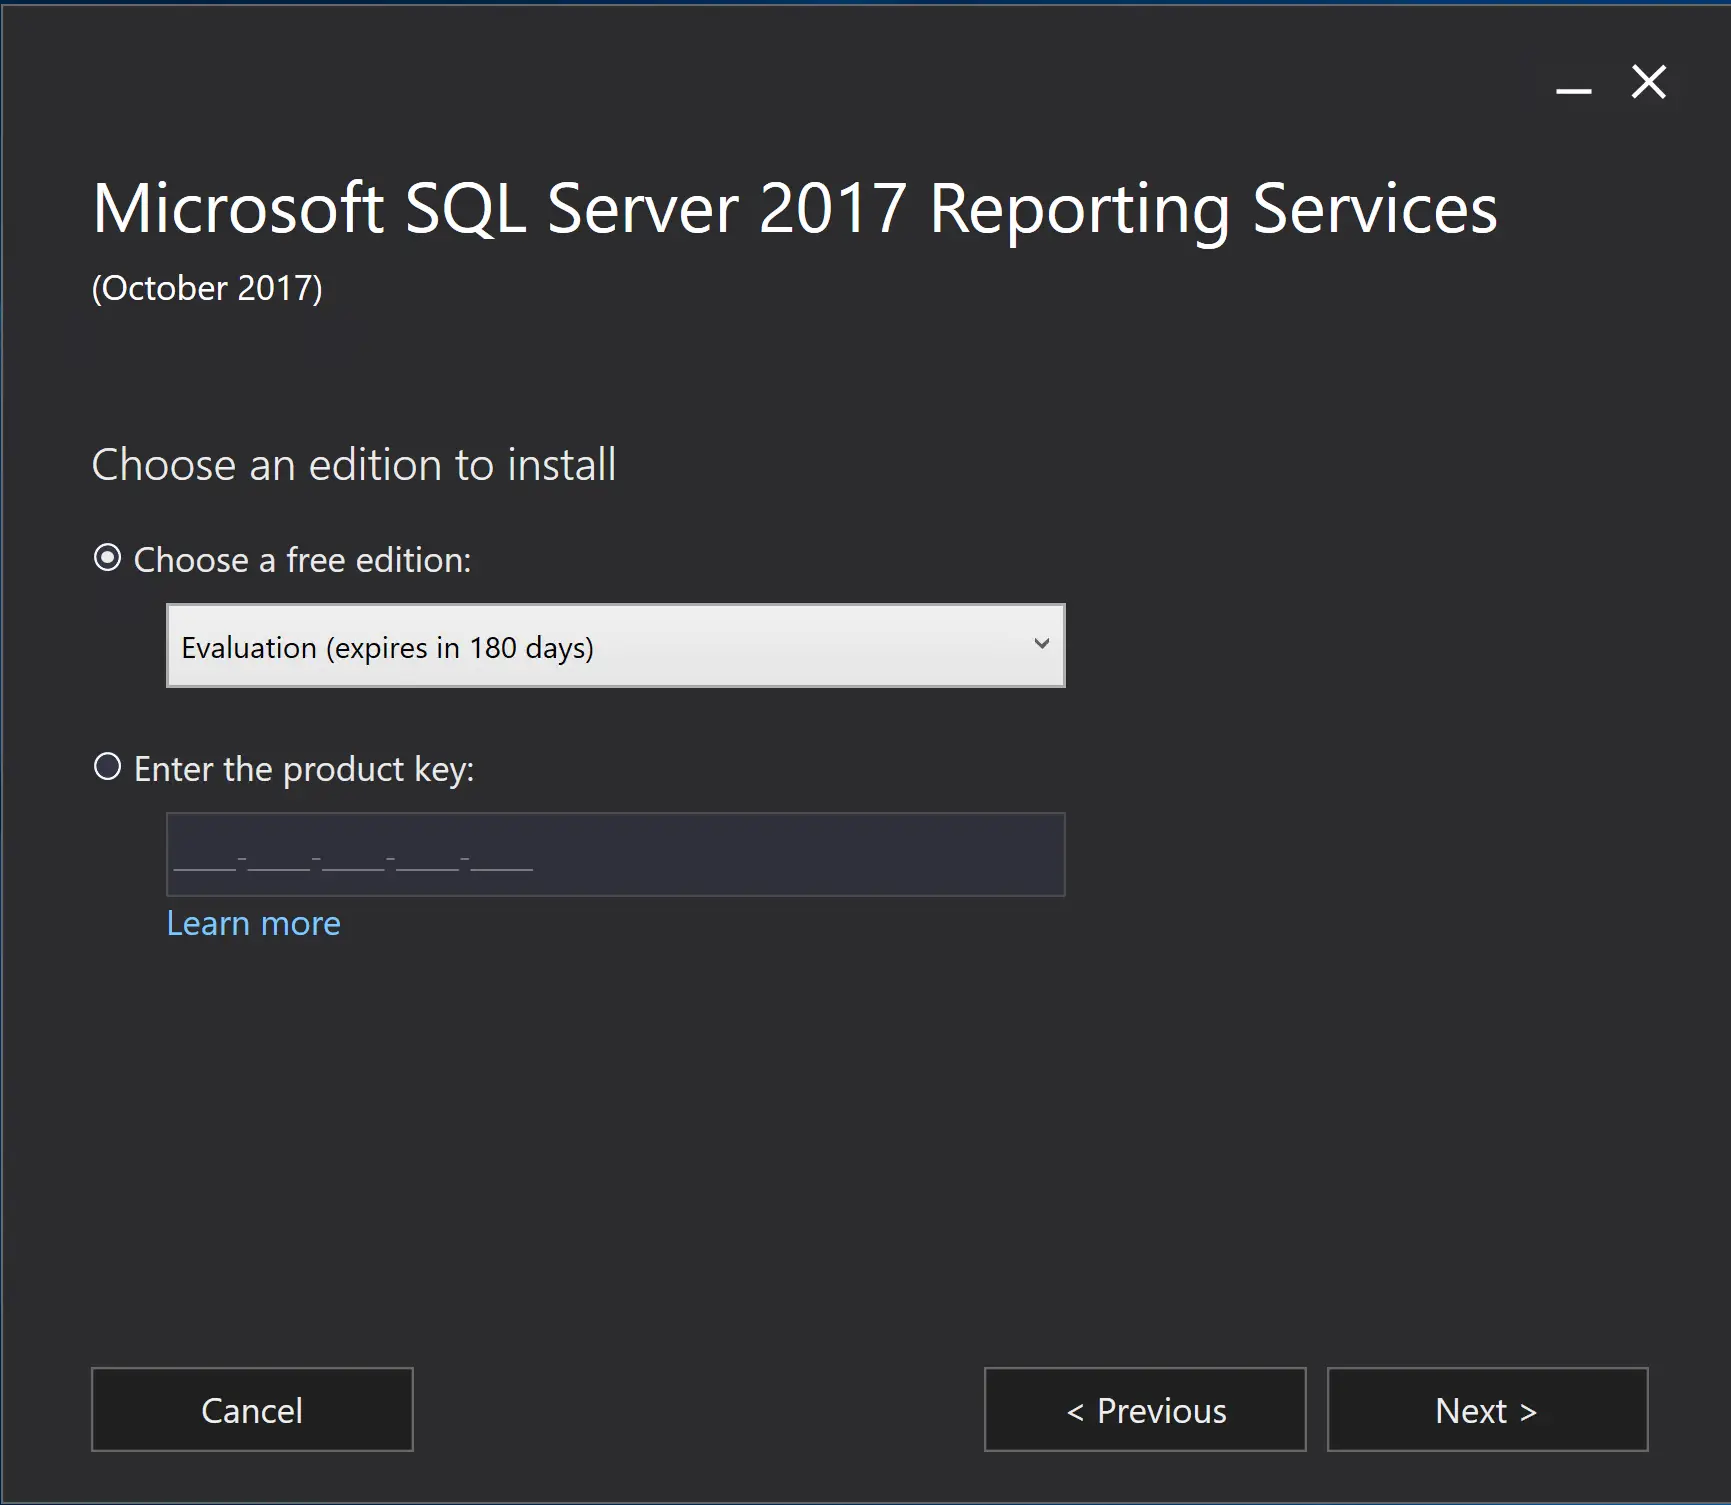
Method 2
Another method is Download SQL Server Reporting Services separately and install it. After installation of SQL server reporting services, type Reporting server configuration manager in the windows search box and open it. Then follow the given steps below.
Default URL reservations
URL reservations are composed of a prefix, host name, port, and virtual directory:
| Part | Description |
|---|---|
| Prefix | The default prefix is HTTP. If you previously installed a Transport Layer Security (TLS), previously known as Secure Sockets Layer (SSL), certificate, Setup tries to create URL reservations that use the HTTPS prefix. |
| Host name | The default host name is a strong wildcard (+). It specifies that the report server accepts any HTTP request on the designated port for any host name that resolves to the computer, including , , or |
| Port | The default port is 80. If you use any port other than port 80, you have to explicitly add it to the URL when you open web portal in a browser window. |
| Virtual directory | By default, virtual directories are created in the format of ReportServer for the Report Server Web service and Reports for the web portal. For the Report Server Web service, the default virtual directory is reportserver. For the web portal, the default virtual directory is reports. |
An example of the complete URL string might be as follows:
-
, provides access to the report server.
-
, provides access to the web portal.
How to format your Report
Format currency and date
If you want to format Date field to show only the date, follow the steps below:
- In the Design tab, right-click the desired cell, then click Text Box Properties.
- Find and click Number, then in the field Category click Date
-
As Type select date format you want, and click OK to finish.
If in your table you have a field that holds information about currency, but you only see ordinary numbers, you can format that field to display a number as currency:
- In the Design tab, right-click the desired cell, then click Text Box Properties.
- Find and click Number, then in the field Category click Currency
- In accordance to your need you can change defaults
-
Click OK to finish.
Changing column width and text style
Text style you can change by clicking the Format menu. In Format menu find Font, then click whatever you need (bold, italic, etc.)
Adding totals
Total is the sum of numeric, non-null data in the data region, and if you want to add totals for a group, you can do that by clicking Add Total for the group in the Grouping pane, and if you want to add totals for an individual cell just click Add Total for the cell.
Add a daily total and grand total
- Right click the cell and choose Add total, then click After.
- Type Daily to format a new name, Daily Total
- After that, select the new cell , two Sum cells and the empty cell you see between them.
-
In the Format menu, choose background color. We chose color orange.
- Right click the cell and choose Add total, and then After.
- Type Grand to format a new name, Grand Total
- Select the new cell , the two cells and the empty cell you see between them.
-
In the Format menu, choose background color. We chose color light-blue.
Tips and tricks
After you add total, you can change the default function Sum. There is a list of different function you can use (avg, count, etc.).
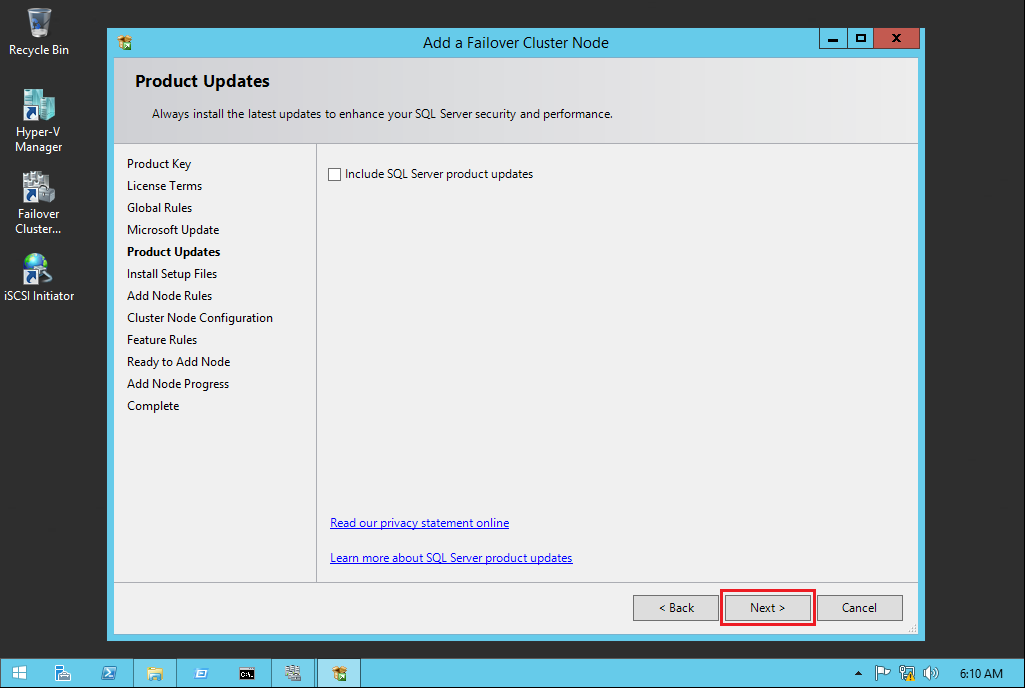
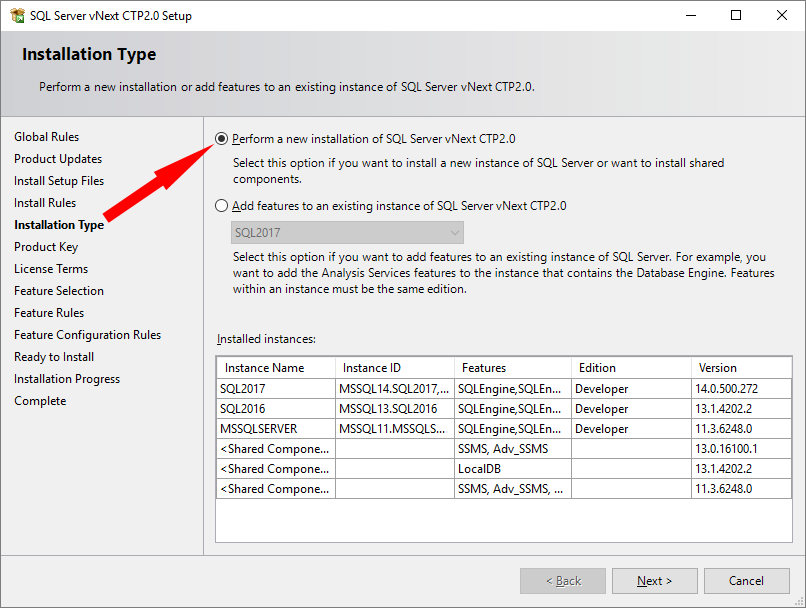
Installation of SQL Server Reporting Services to a New Server
We have suggested to infrastructure team to install Sql Server 2017 on a new server and choose “Install Only” option during Reporting Services Configuration step.

We will configure Reporting Services in below steps after installation of Reporting Services 2017.
Backup Encryption Key
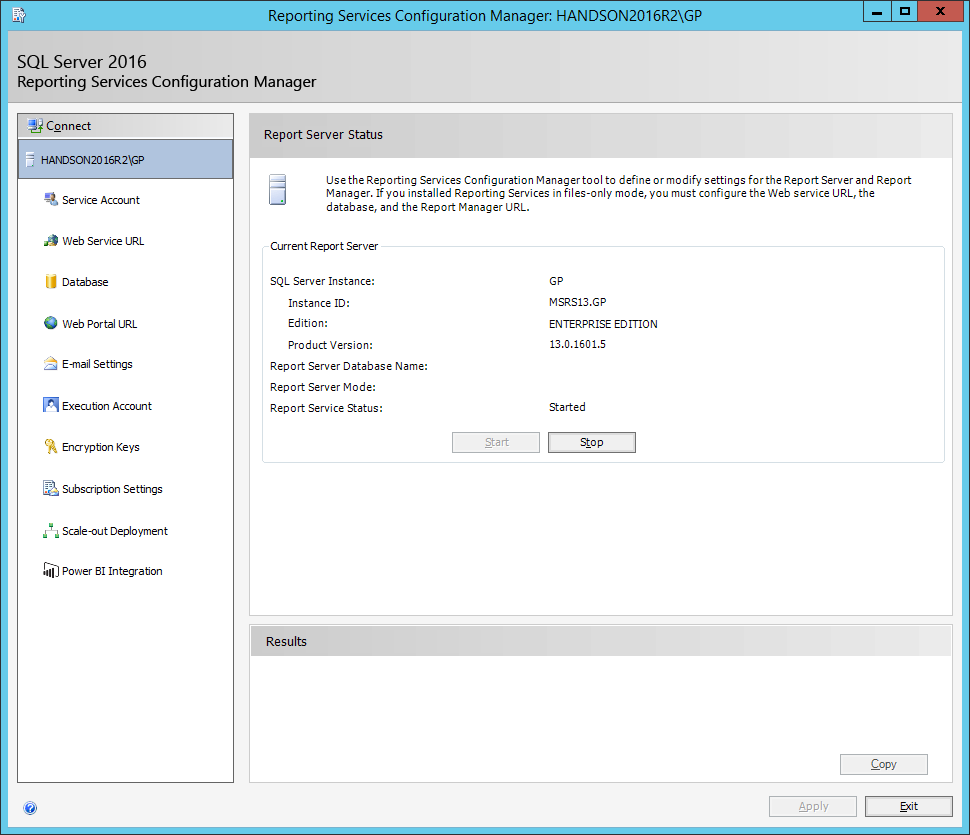
As a next step, backup the encryption key from old report server instance. The report server encryption key is backed up using the Reporting Services Configuration Manager tool. Search for Reporting Services Configuration Manager in old report server instance and connect with the old report server instance name. Reporting Services Configuration Manager tool will look like as following screenshot.
In the navigation panel on the left, select Encryption Keys option (highlighted in above screenshot), then click Backup. Enter a Password in the Encryption Key Information dialog and click the button next to Key File to specify a location and name for the key backup file. At the end, Click Exit to exit from the Reporting Services Configuration Manager.
Backup ReportServer and ReportServerTempDB databases
As a next step, backup the old report server databases using any supported method for backing up SQL Server database. We choose to backup the databases using SQL Management Studio. Microsoft states that both the ReportServer and ReportServerTempDB databases should be backed up and restored to the new server. In SQL Management Studio expand Databases and right click the ReportServer database, select Tasks and select Back Up….
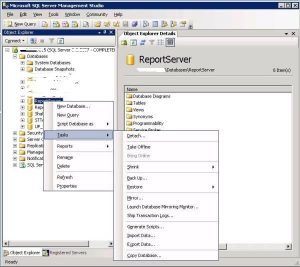
Make sure the Backup Type is set to Full and specify a location and filename for the backup.

Do the same as above to take the backup of ReportServerTempDB database.
Migration of old ReportServer database on New Reporting Services instance
As a first step, you will need to create the RSExecRole on new instance of sql server 2017. Click this link to see the detail instructions. You will see below script in instruction that needs to be executed at new instance of Sql Server 2017.
USE master;
GO
IF NOT EXISTS (SELECT 1 FROM sys.database_principals WHERE = ‘R’ AND = ‘RSExecRole’) BEGIN
CREATE ROLE ;
END
GRANT EXECUTE ON dbo.xp_sqlagent_enum_jobs TO ;
GRANT EXECUTE ON dbo.xp_sqlagent_is_starting TO ;
GRANT EXECUTE ON dbo.xp_sqlagent_notify TO ;
GO
USE msdb;
GO
IF NOT EXISTS (SELECT 1 FROM sys.database_principals WHERE = ‘R’ AND = ‘RSExecRole’) BEGIN
CREATE ROLE ;
END
GRANT EXECUTE ON dbo.sp_add_category TO ;
GRANT EXECUTE ON dbo.sp_add_job TO ;
GRANT EXECUTE ON dbo.sp_add_jobschedule TO ;
GRANT EXECUTE ON dbo.sp_add_jobserver TO ;
GRANT EXECUTE ON dbo.sp_add_jobstep TO ;
GRANT EXECUTE ON dbo.sp_delete_job TO ;
GRANT EXECUTE ON dbo.sp_help_category TO ;
GRANT EXECUTE ON dbo.sp_help_job TO ;
GRANT EXECUTE ON dbo.sp_help_jobschedule TO ;
GRANT EXECUTE ON dbo.sp_verify_job_identifiers TO ;
GRANT SELECT ON dbo.syscategories TO ;
GRANT SELECT ON dbo.sysjobs TO ;
GO
As a next step, restore the ReportServer and ReportServerTempDB databases to the new instance of Sql server 2017. In SQL Management Studio expand databases and right click the ReportServer database, from the pop up menu select Tasks/Restore/Database.


Once the ReportServer database has been restored repeat the process for the ReportServerTempDB database restore.
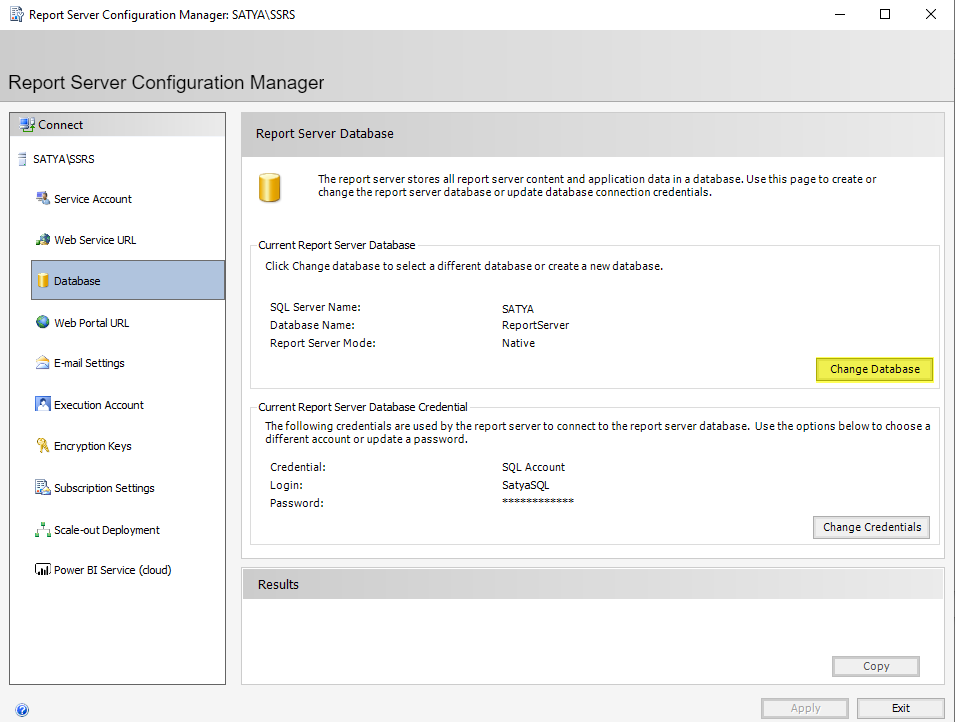
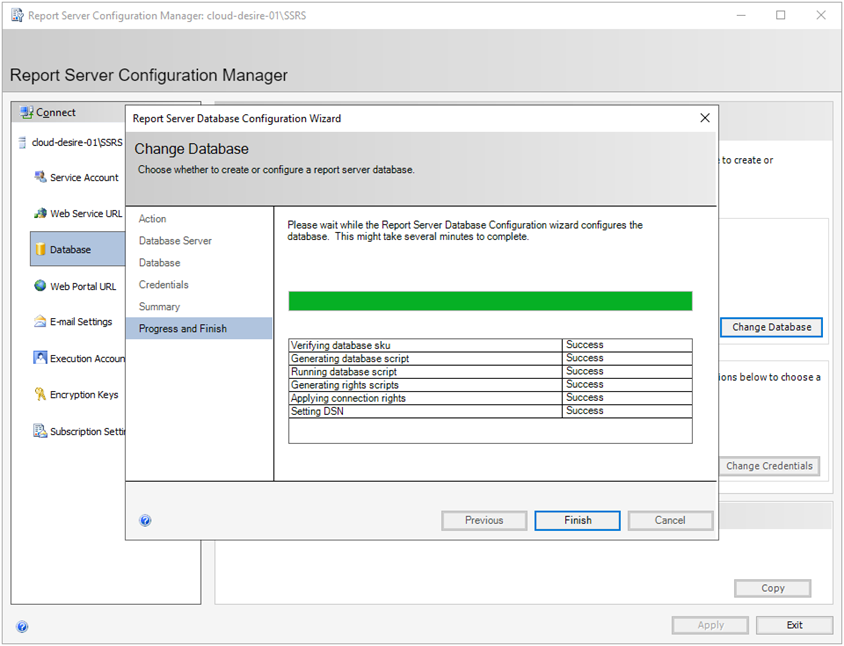
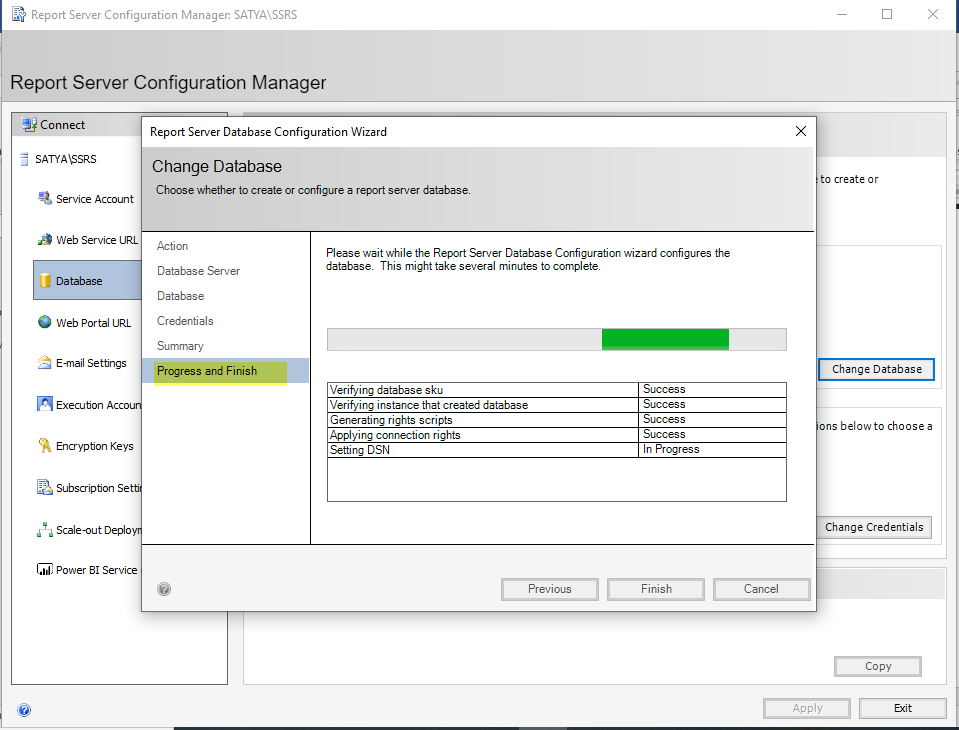
Now the databases have been moved, you must use the Report Services Configuration tool to configure Reporting Services. Search for Reporting Services Configuration Manager tool in new report server 2017 instance and connect with the new report server instance name. If Reporting Services service is stopped during the restore process click the Start button to start the service. If needed configure the URLs for the Report Server and Report Manager, instructions can be found in the Migration document under the Configure the Report Server section. For Reporting Services to recognize there is a different database you must go through the Configure Database process. In the Navigation panel click Database then click the Change Database button.
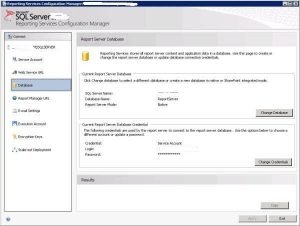
The following images shows the screens and settings when configuring the ReportServer database.


Now restore the Encryption Key that you have backed up earlier. In the Navigation panel of the Reporting Services Configuration Manager select Encryption Keys and click the Restore Button. In the Restore Encryption Key dialog click the … button to locate the file you created when backing up the Encryption Key from the server you are migrating, enter the password you used and click the OK button.

Under Scale-out Deployment in above screen, make sure there is only one instance of reporting services listed. If there is more than one instance exists, delete the old one.
1.1 PostgreSQL Configuration
The assumption is PostgreSQL 9.2 Database is already installed. For installation guides please reference Running and Installing PostgresSQL in Native Windows or Step-by-Step Installation of PostgresSQL onto Windows Server. There are a couple configuration gotchas related to setting up PostgreSQL for access over TCP/IP as by default this feature is turned off. Use psql PostgreSQL interactive terminal or pgAdmin GUI to test connection details to the server.
Defaults:
- Port: 5432
- TCP/IP: disabled
1.1.1 TCIP/IP Configuration
For demo purposes default use of prot 5432 is fine. To permit development tools and SSRS server to connect to PostgreSQL Database via an ODBC connection PostgreSQL must be configured to permit a connection over TCP/IP.
1.1.1.1 Update pg_hba.conf file
To permit the SSRS server and client tools used to build the reports permission must be added to the pg_hba.config file permitting TCP/IP access. If there are several machines on the same subnet requiring access use a DO NOT add seperate entries as this will cause the service to fail. For example, there are five IPs starting at 192.168.12.10 to 192.168.12.15 that require access. The entry below is valid.
| TYPE | DATABASE | USER | DATABASE | METHOD | |
|---|---|---|---|---|---|
| host | all | all | 192.168.12.10/5 | md5 | |
Any changes to pg_hba.conf the PostgreSQL service require a service restarted. To restart the service open the
command prompt as Administrator and execute one of the commands below based on the version and kernal installed.
1.1.1.1.1 PostgreSQL 32 bit Service Restart
1.1.1.1.2 PostgreSQL 64 bit Service Restart
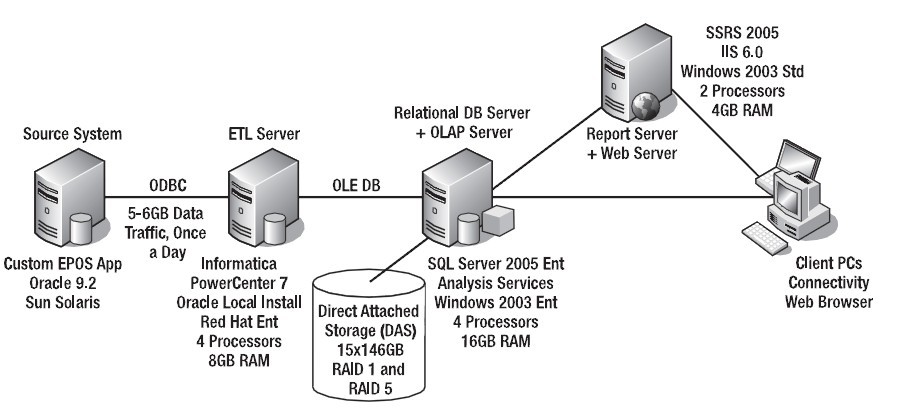
SSRS Architecture
SSRS Architecture
SSRS has quite a complex architecture. The report services architecture includes development tools, administration tools, and report viewers.
Here, are important components of SSRS
Report Builder
It is an ad-hoc report publishing tool that is executed on a client’s computer. It has a drag and drop interface that is easy to use.
Report Designer
The Report designer tool helps to develop all types of reports. It is a publishing tool, that is hosted in Visual Studio or Business Intelligence Development Studio (BIDS).
Report Manager
The report managers check the report, matching it with the given requirements. They make decisions based on those reports.
SSRS Development Tools
Early versions of SQL Server used Business Intelligence Development Studio (BIDS) as the SSRS development tool. However, starting with SQL Server 2012, you will use SQL Server Data Tools – Business Intelligence (SSDT-BI), which may or may not be on the SQL Server media, depending on the version. Each tool runs as an add-in for Visual Studio. If you do not have Visual Studio in place, the BIDS or SSDT-BI installation will install a Visual Studio shell.
Naming confusion?
Just to add a little confusion, there is also an add-in called SQL Server Data Tools for Visual Studio 2012. This is for database projects, not the BI tools that will allow you to create SSRS projects. It is not the option you want for SSRS development. You will also often see SSDT-BI abbreviated simply as SSDT.
The following table should help you navigate the options, understand the differences, and find the correct process for installing the development tool for your version of SQL Server.
|
SQL Server Version |
Development Tool |
Location of Media |
Documentation |
|
2008 R2 |
BIDS |
SQL Server installation media |
|
|
2012 option 1 |
SSDT-BI and VS 2010 |
SQL Server Installation media |
|
|
2012 option 2 |
SSDT-BI and VS2012 |
Download here http://www.microsoft.com/en-us/download/details.aspx?id=36843 |
|
|
2014 |
SSDT-BI and VS2012 |
Download here http://www.microsoft.com/en-us/download/details.aspx?id=36843 |
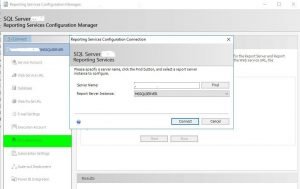
Steps to Setup Report Server Configuration Manager
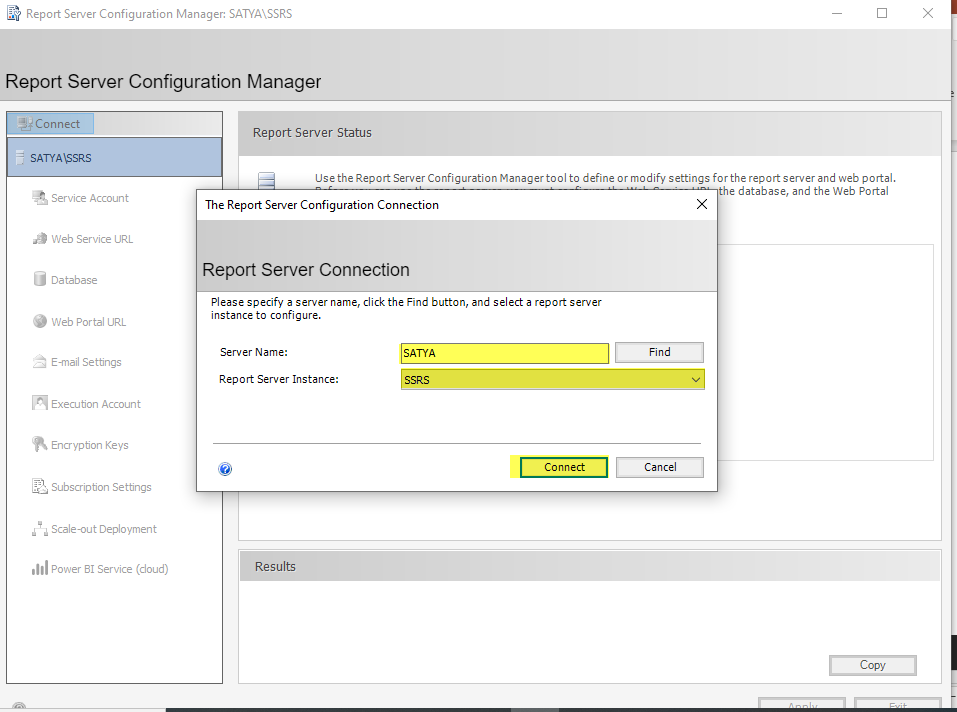
Click on Connect and insert a Server Name and Select Report Server Instance as shown below, then click on Connect.

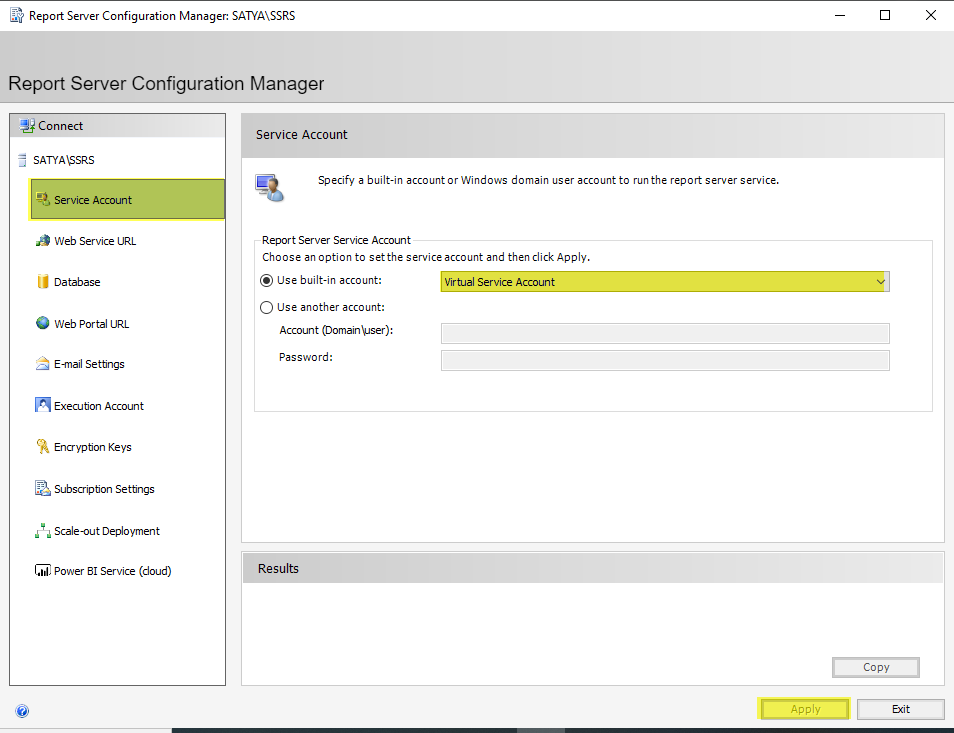
Then, click on Service Account. Now you have to sign up for a Report Server Service Account. Here, you have two options, use a built-in account, or use another account. If you choose a built-in account, you will get a Network Service as well as Virtual Service Account in the selection options. If you have a domain user, then you can choose to use another account option and provide a Domain\User Account and Password.
In my case, I have selected a built-in account -> Virtual Service Account. Which we can get by default selection.
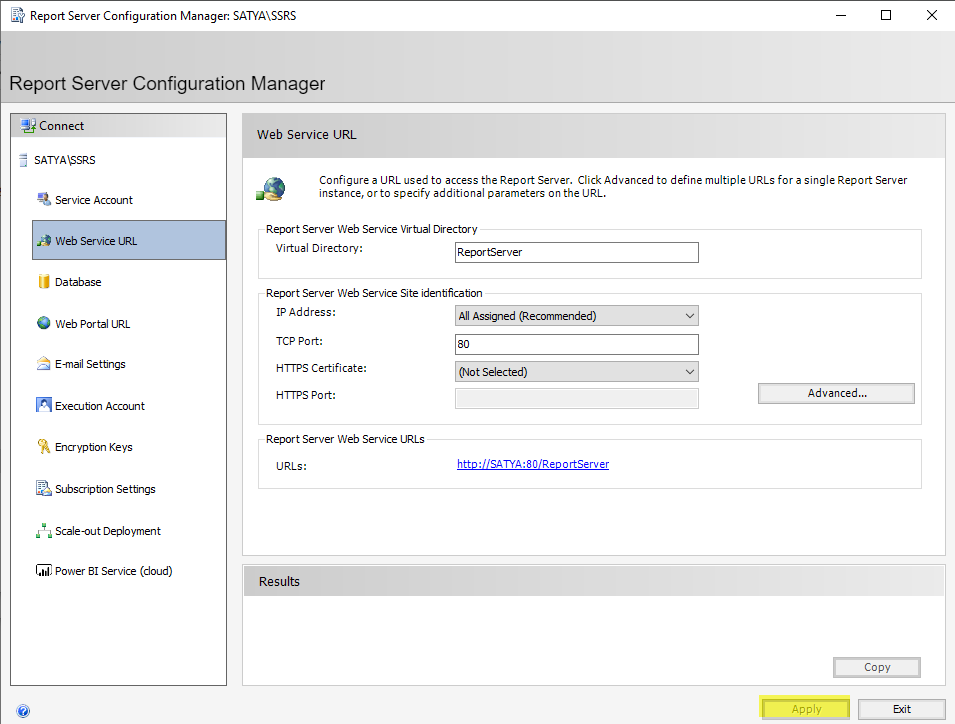
After that, click on Webservice URL. A Report Server virtual directory will be created by default. If you have your own Report Server Web Service Site then you can use its IP Address, TCP Port, HTTPS Certificate, and HTTPS Ports for your web service URL. For me, I am choosing default values for Report Server Web Service Site identification. Then click on Apply.
Click on Database then click on Change Database.
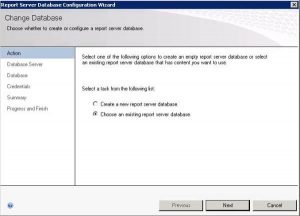
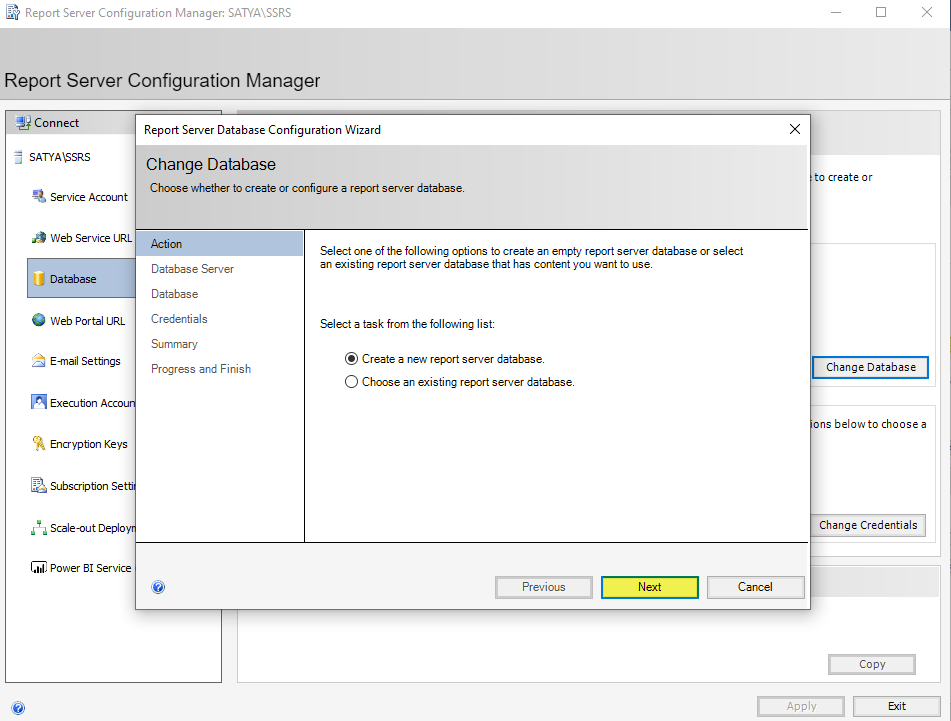
After that following screen will appear. Select create a new report server database if you are creating a report server database for the first time. However, you can select choose an existing report server database if you have already installed a report service. Then click Next.
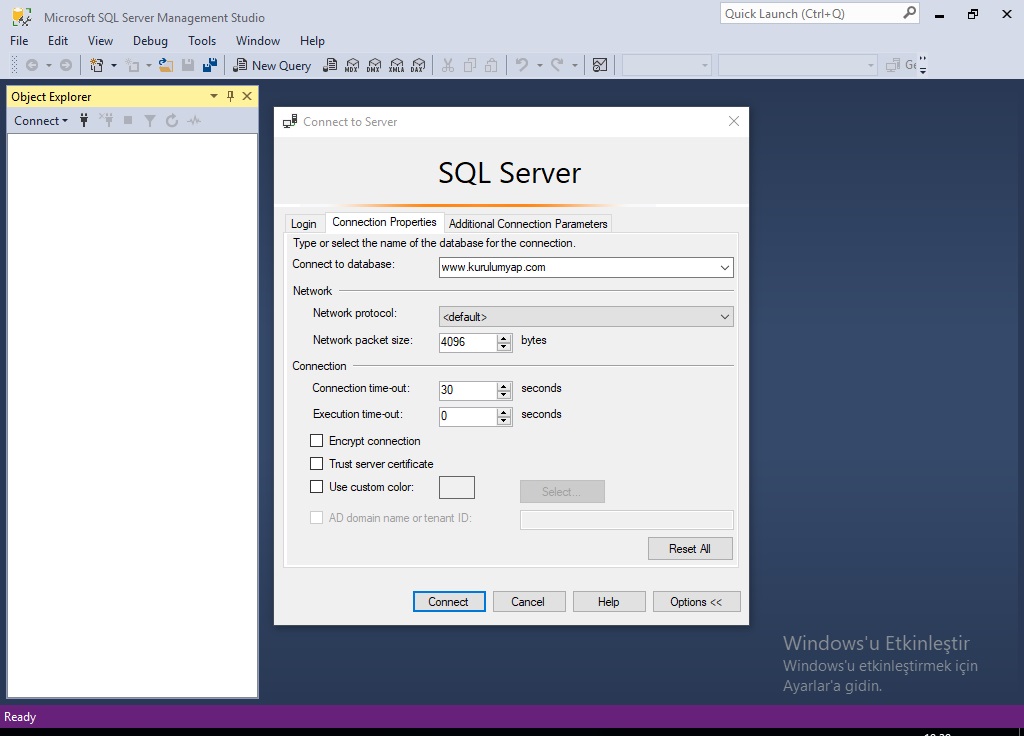
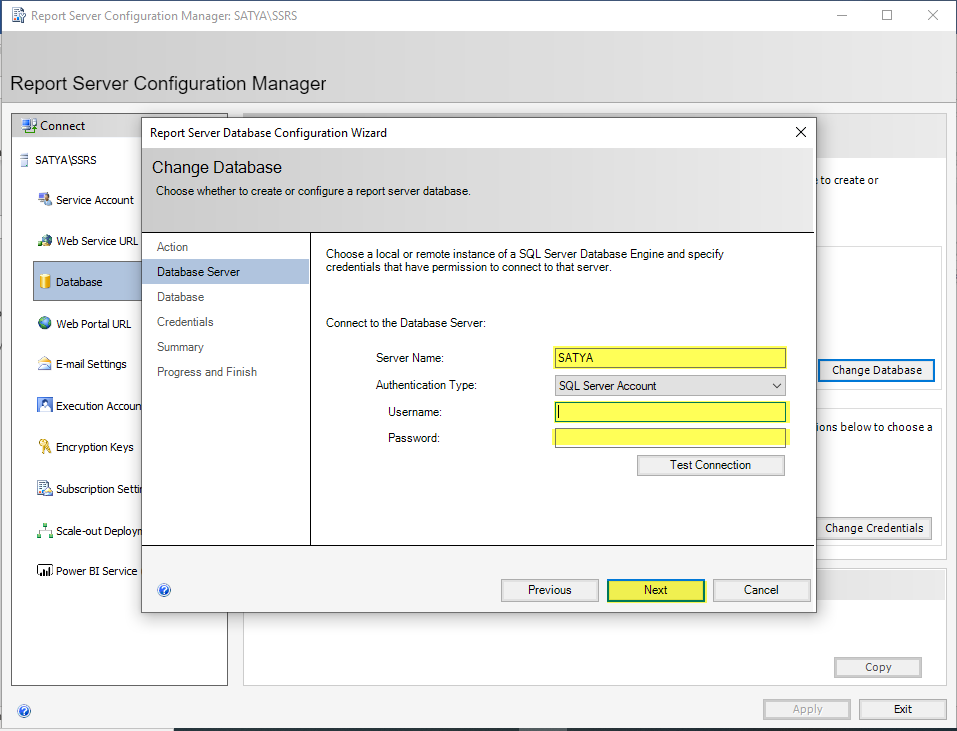
Database Server
Insert your Server name then select Authentication Type as SQL Server Account, Username, Password, and click Next.
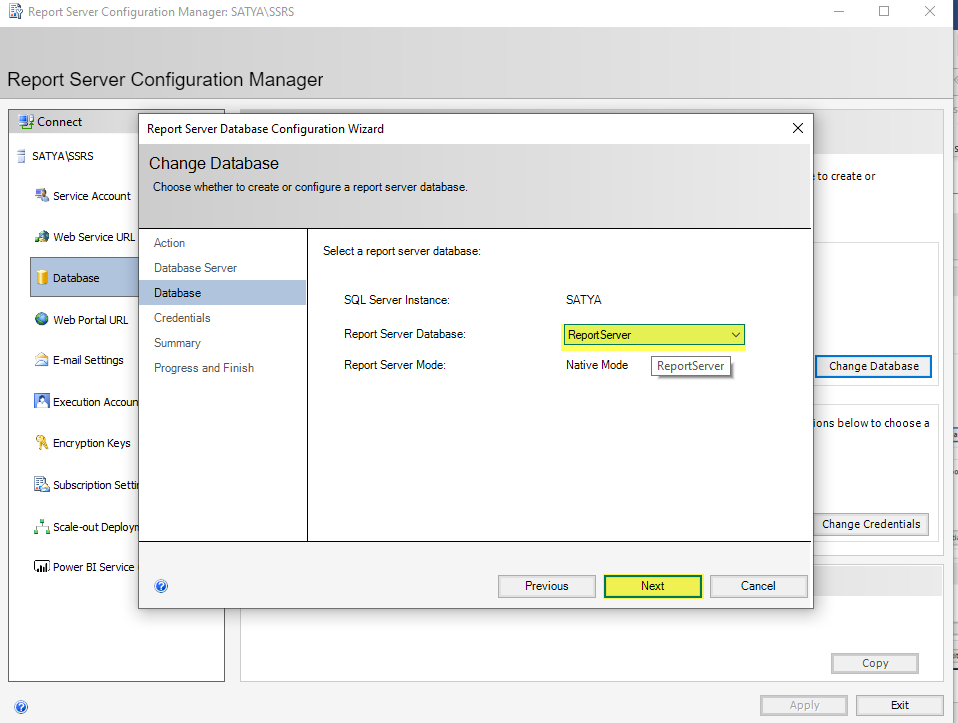
Database
Choose Report Server Database as report server and click Next.
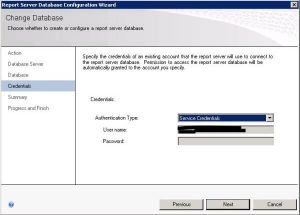
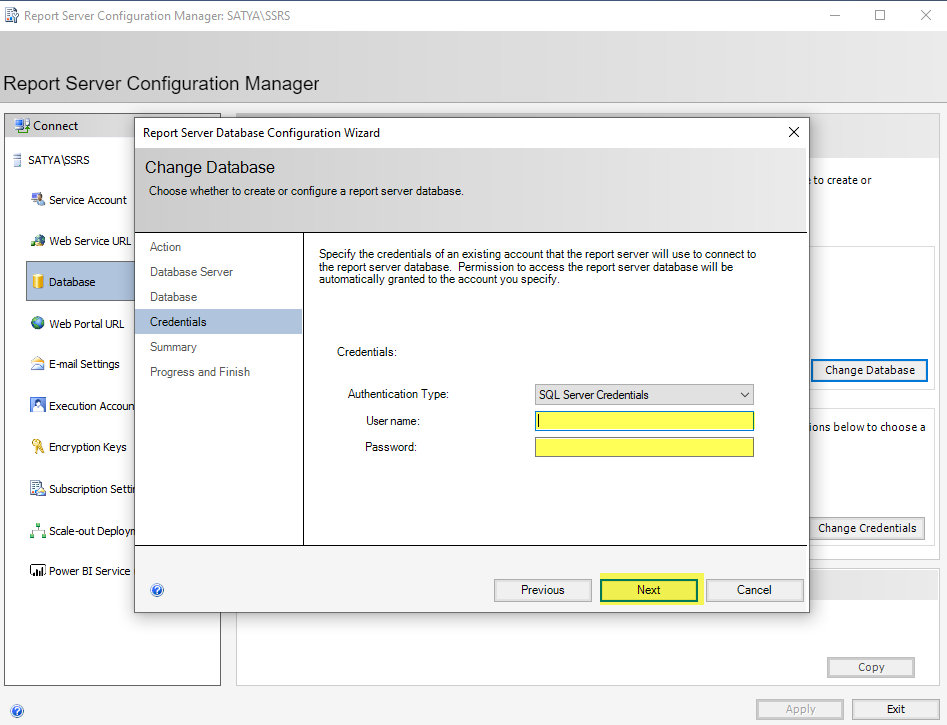
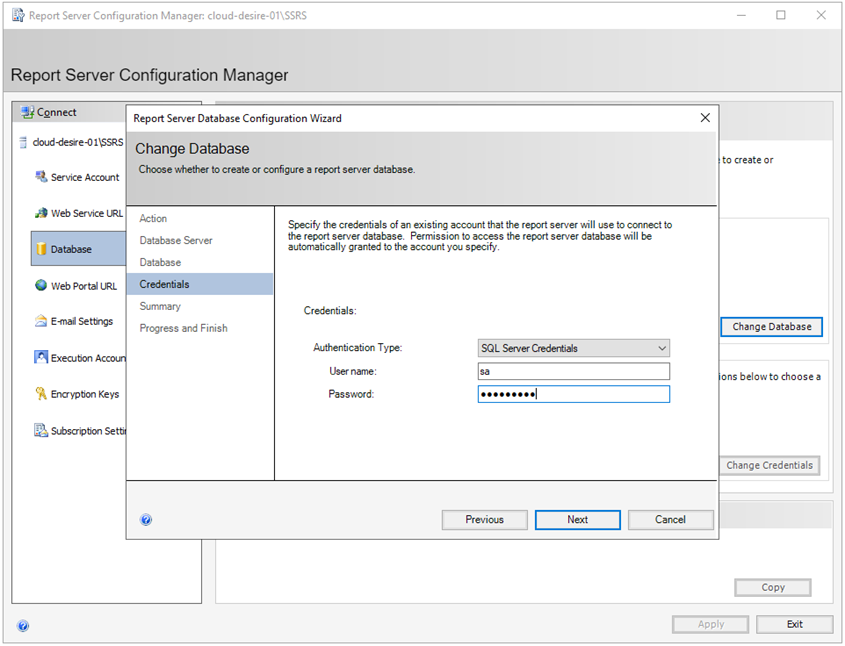
Credential
Select Authentication Type as SQL Server Credentials, insert username and password, then click Next.
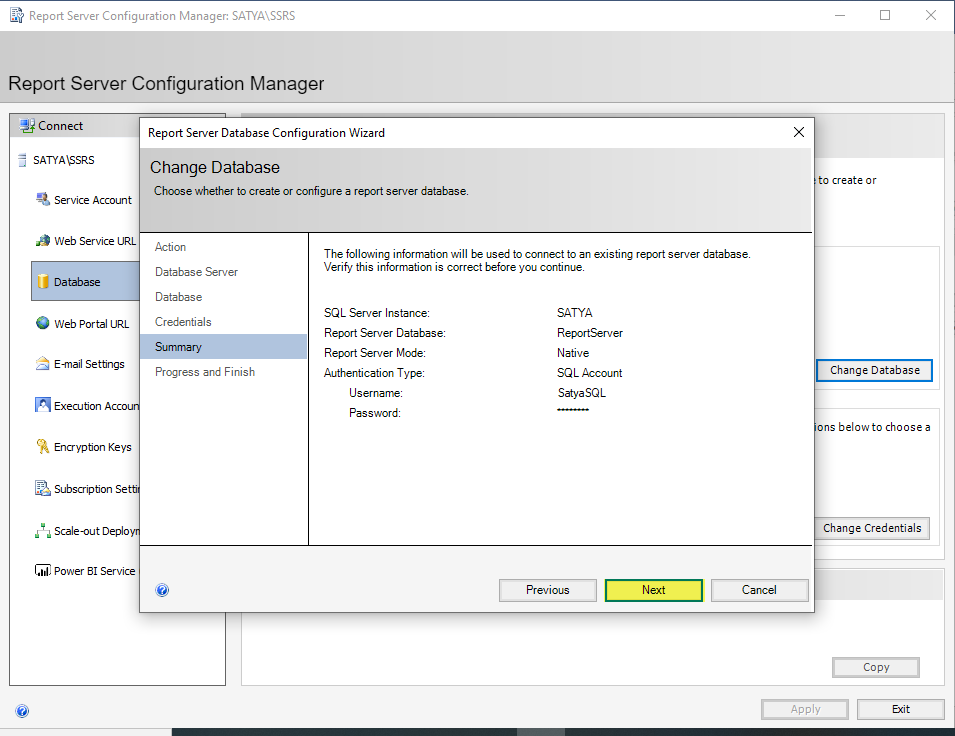
Summary
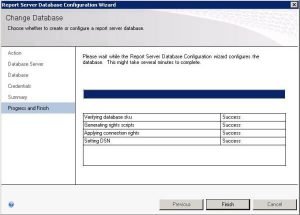
The following Summary will come and click on Next
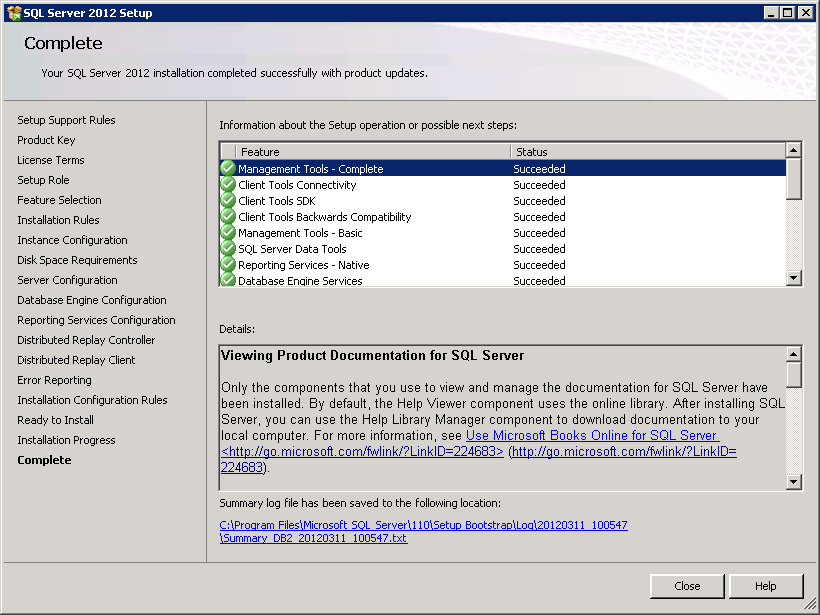
It saves the setup and completes after a few seconds. Then click on finish.


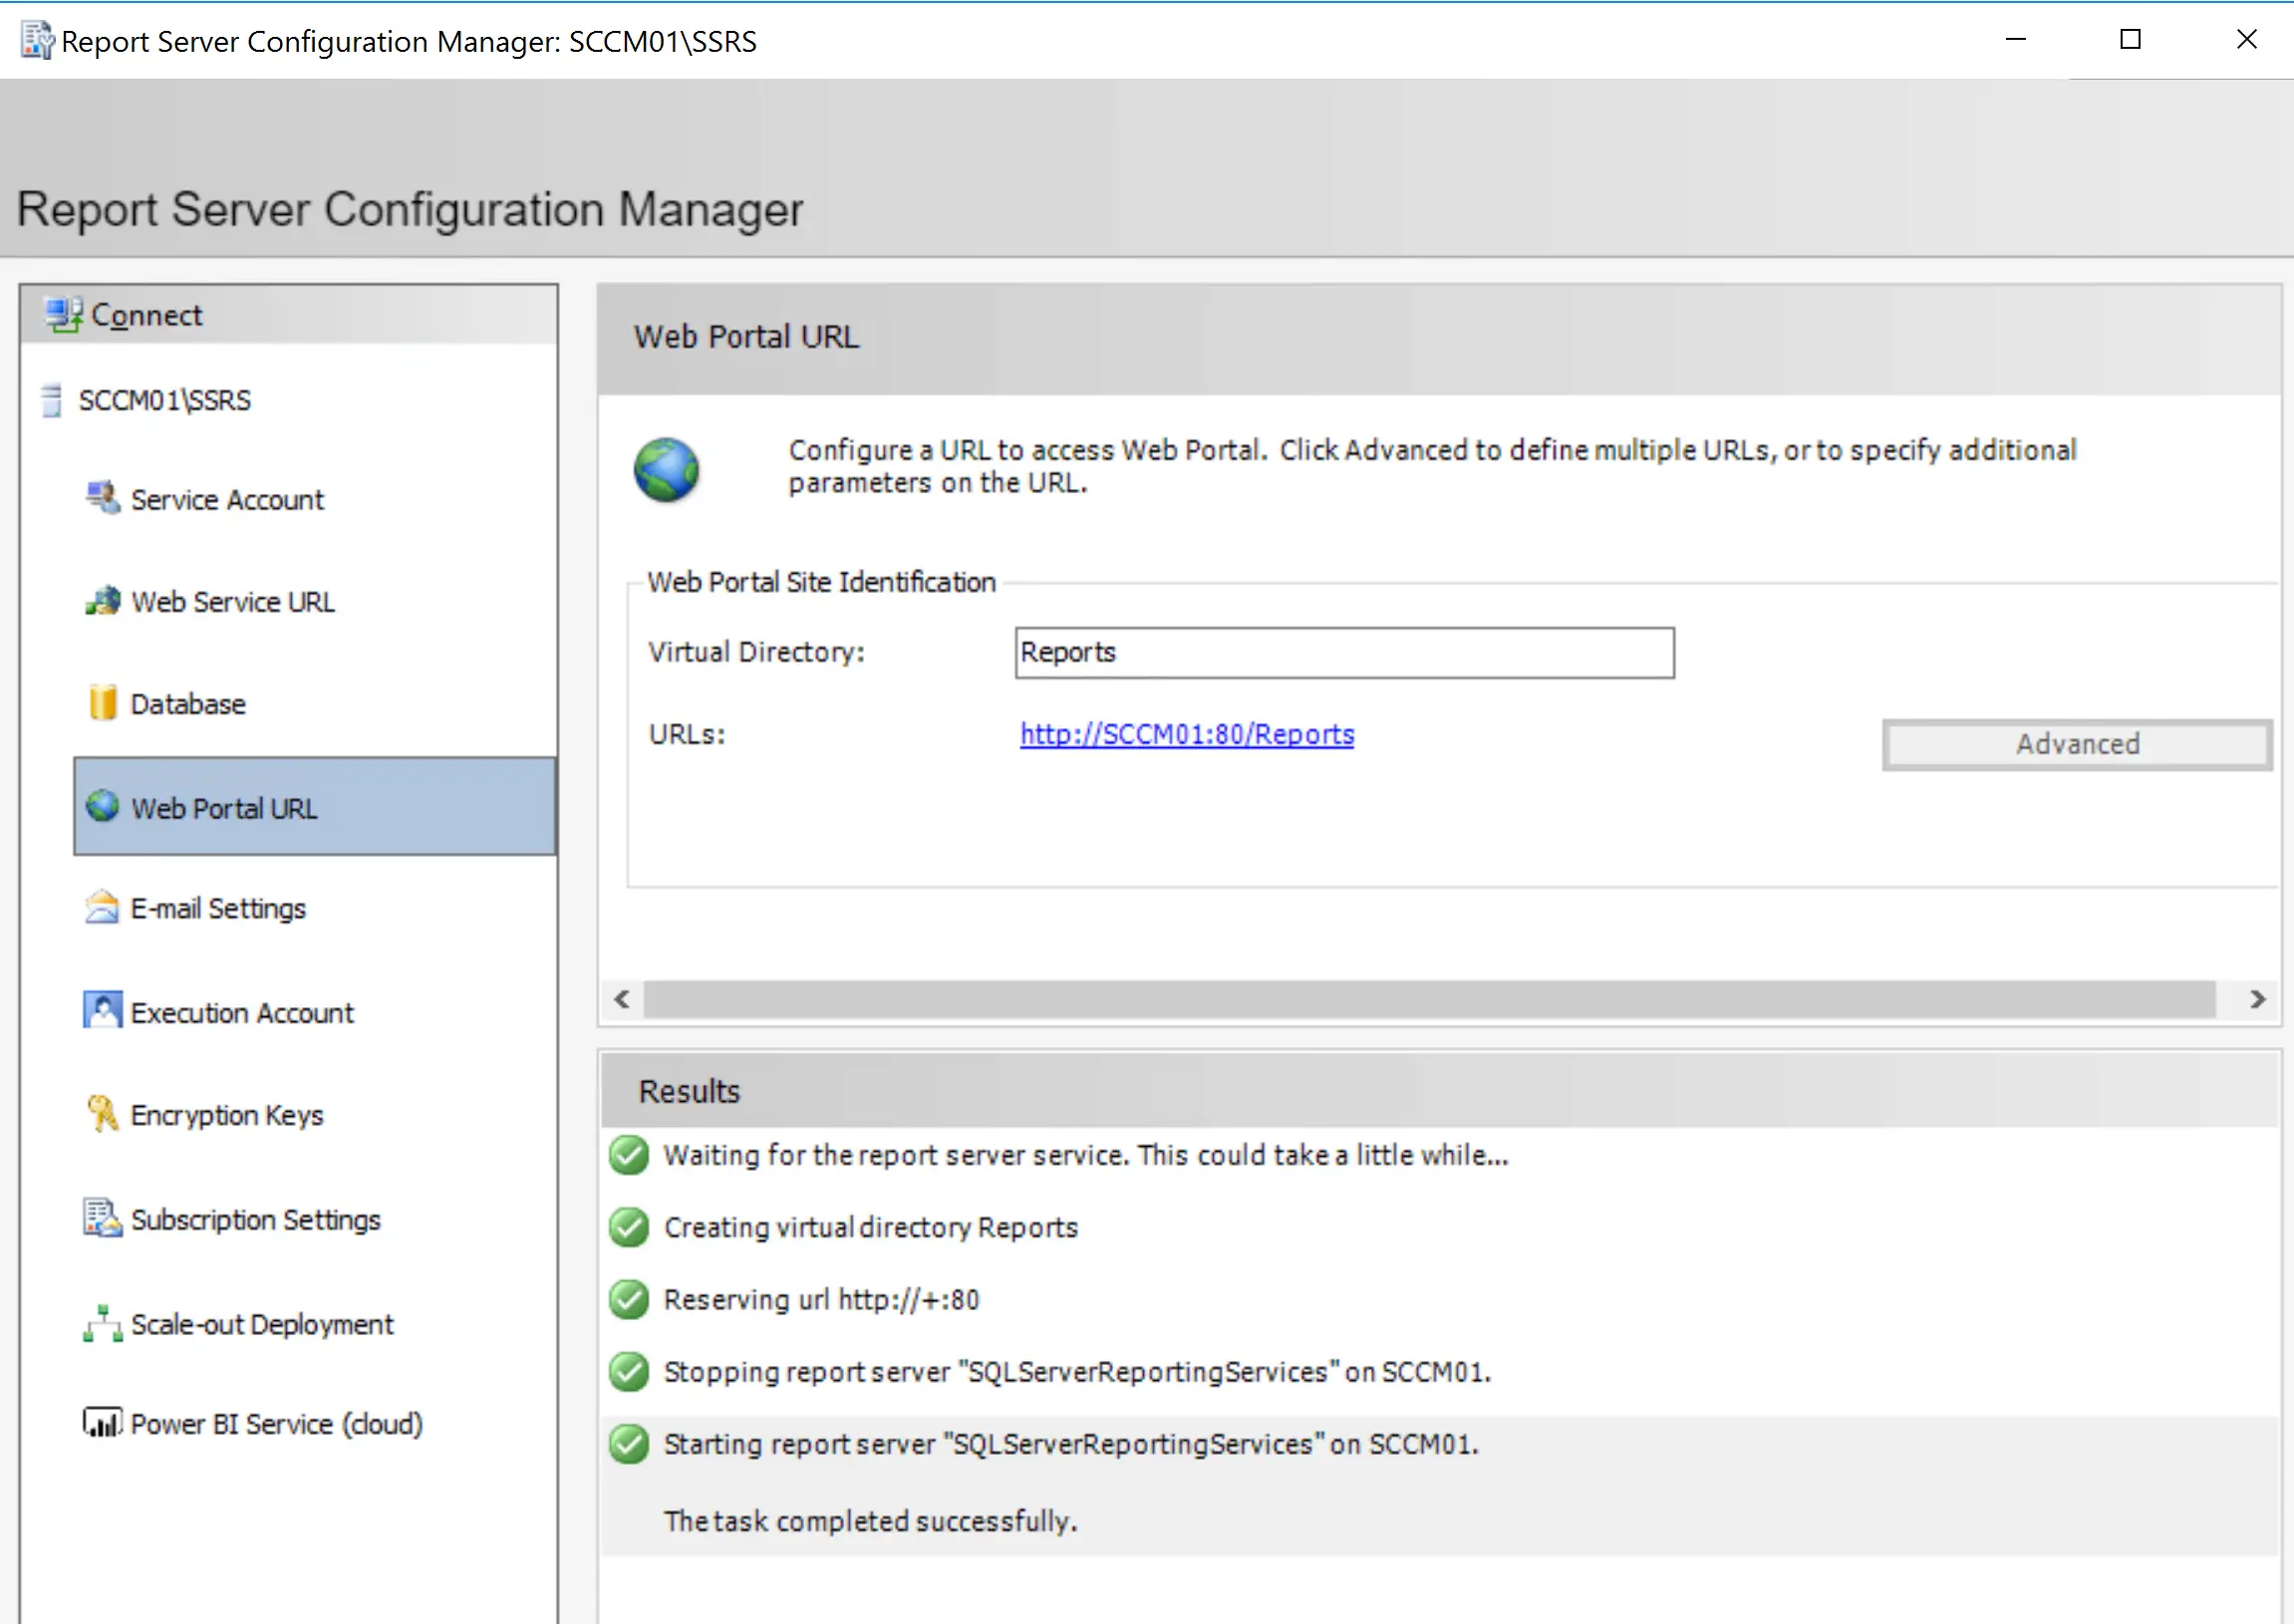
Click on the Web portal URL. A virtual directory and URL will be created by default.
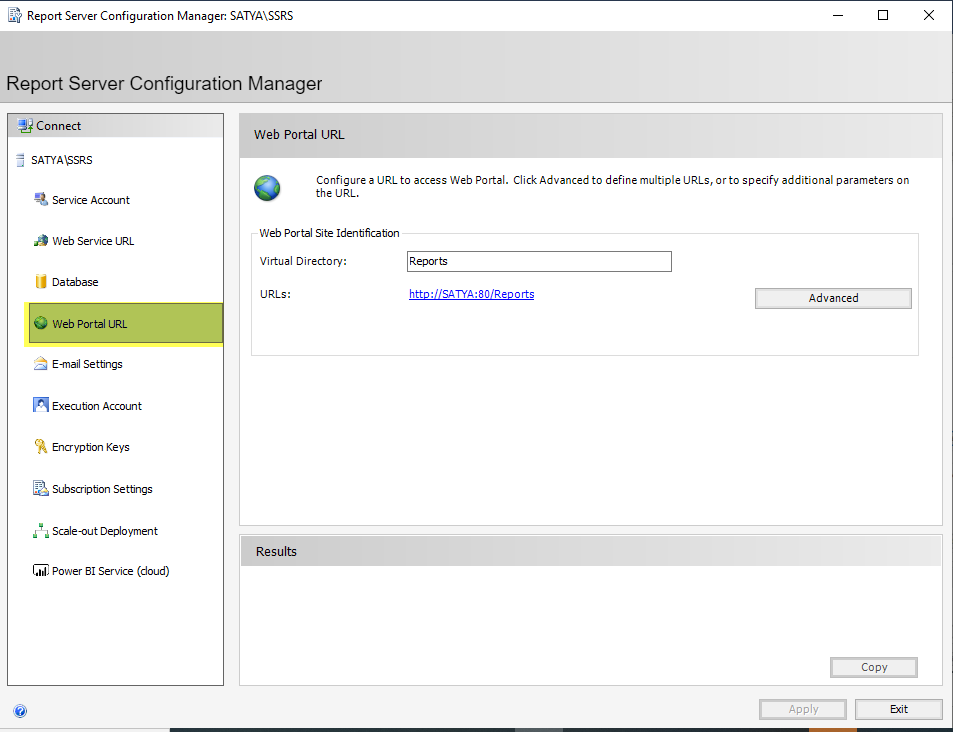
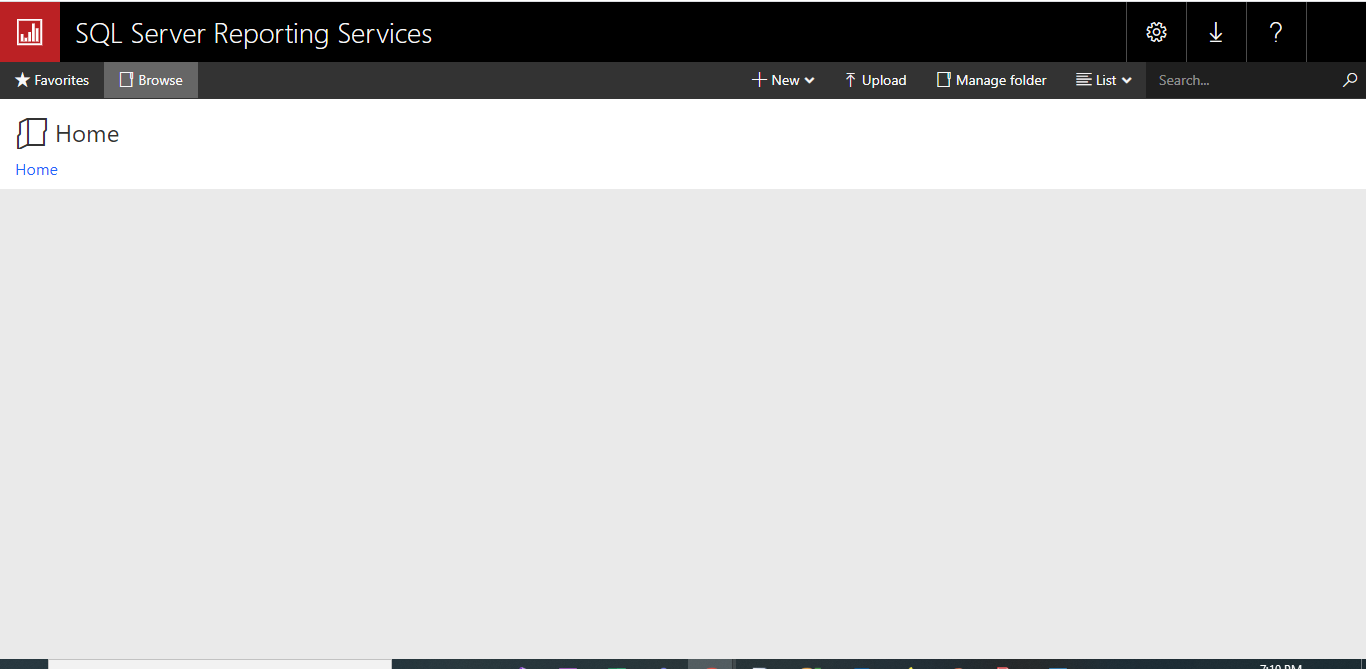
Finally, type this web portal URL in the browser. SQL Server Reporting Service will open in the browser. There you can create new report or upload any existing RDL (report file) and view the report.
Steps to Setup Report Server Configuration Manager
Click on Connect and insert a Server Name and Select Report Server Instance as shown below, then click on Connect.
Then, click on Service Account. Now you have to sign up for a Report Server Service Account. Here, you have two options, use a built-in account, or use another account. If you choose a built-in account, you will get a Network Service as well as Virtual Service Account in the selection options. If you have a domain user, then you can choose to use another account option and provide a Domain\User Account and Password.
In my case, I have selected a built-in account -> Virtual Service Account. Which we can get by default selection
After that, click on Webservice URL. A Report Server virtual directory will be created by default. If you have your own Report Server Web Service Site then you can use its IP Address, TCP Port, HTTPS Certificate, and HTTPS Ports for your web service URL. For me, I am choosing default values for Report Server Web Service Site identification. Click on Apply.
Click on Database then click on Change Database.
After that following screen will appear. Select create a new report server database if you are creating a report server database for the first time. However, you can select choose an existing report server database if you have already installed a report service. Then click Next.
Database Server
Insert your Server name then select Authentication Type as SQL Server Account, Username, Password, and click Next.
Database
Choose Report Server Database as report server and click Next
Credential
Select Authentication Type as SQL Server Credentials, insert username and password, then click Next
Configure SQL Server Reporting Services
Click on the “Start Menu” and search for “Reporting Services Configuration Manager“. Open it.
If you get an UAC prompt, just click on “Yes“.
Choose the SQL instance and click “Connect”.
On the left-hand side menu, click on “Database” and then on “Change Database“.
Select “Сreate a new report server database.” and click “Next“.
Click “Next“.
Name the report database. In this case, my goal for installing SQL Server Reporting Services is to be able do run reports against the SCCM database so, I’m calling it CM_S01_SSRS, being CM_S01 the name of the SCCM database and SSRS the acronym for SQL Server Reporting Services. Click “Next“.
Click “Next“.
Verify that all information is correct and click on “Next“.
Wait while the wizard does his job!
And click “Finish” once done!
Starting the Upgrade
Ok, now on to the upgrade. Typically what you would do is pop in the installation media for SQL server in the “CD” of each SharePoint server running an instance of SSRS. In this case it is the two App servers. Just make sure to choose the option to Upgrade from SQL Server 2005, SQL Server 2008 or SQL Server 2008 R2.
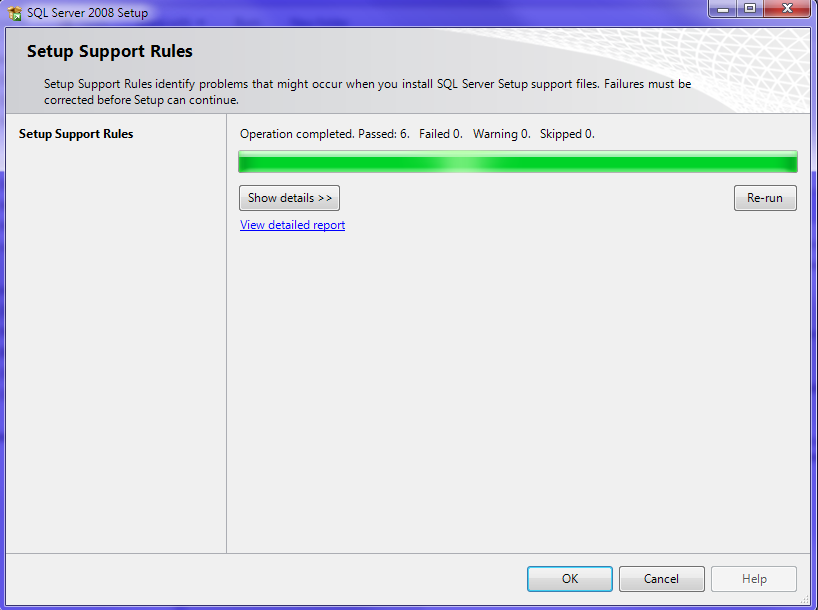
Once the upgrade wizard starts, it will install the setup files, run the System Configuration Checker, and it will detect the existing SSRS instance for you to upgrade. You pretty much just need to just move the wizard along until you get to the point in the wizard page called Reporting Services SharePoint mode Authentication. This is where I hit my biggest speed bump.
Configure Reporting Services
Before configuring the reporting point, some configuration needs to be made on the SQL side. The virtual instance needs to be created for SCCM to connect and store its reports.
If you installed Reporting Services during the installation of the SQL Server instance, SSRS will be configured automatically for you. If you install SSRS later, then you will have to go back and configure it as a subsequent step.
To configure, Open Reporting Services Configuration Manager
Click Start > All Programs > Microsoft SQL Server 2012 > Configuration Tools > Reporting Services Configuration Manager
Click Connect to connect to the SQL instance
- On the left-hand side of the Reporting Services Configuration Manager, click Database.
- Click the Change Database button
Select Create a new report server database and click Next
This wizard creates two databases: ReportServer, used to store report definitions and security, and ReportServerTempDB which is used as scratch space when preparing reports.
- Click the Web Service URL tab
- Click Apply
This step sets up the SSRS web service. The web service is the program that runs in the background that communicates between the web page, which you will set up next, and the databases.
- Select the Report Manager URL
- Accept the default settings and click Apply.
If the Apply button was already grayed out, this means the SSRS was already configured. This step sets up the Report Manager web site where you will publish reports
Exit Reporting Service Configuration Manager.
Publish your Report to the report server
Finally, when you finished with creating your first SSRS report, you may want to publish the report:
- In the Project menu click Test report Properties
- Put your report server’s name in the field TargetServerURL, then click OK.
- In the Build menu click Deploy Test report. You will get a message that indicates whether you have successful or unsuccessful deployment.
Note: A problem will occurred if you don’t have permissions on the report server or if you have been using SSDT with administrator privileges.
Most common problems
The most common problem in publishing the report to the report server is configuring the target server URL.
The first step that you need to do in configuration is to launch the SQL Server Reporting Service Configuration Manager and connect to the Reporting Service.
After that in section Web Service URL you can find URL to the report server.
In section Report Manager URL you can see URL for viewing and managing reports.
In the Project menu open the Test report Properties.
Note: Prefix “Test report” is name of your report.
Final step in configure target server URL is to fill the Web Service URL in the TargerServerURL property with correct URL that you find in Report Manager URL.
Congratulation, you have successfully created your first SSRS report!
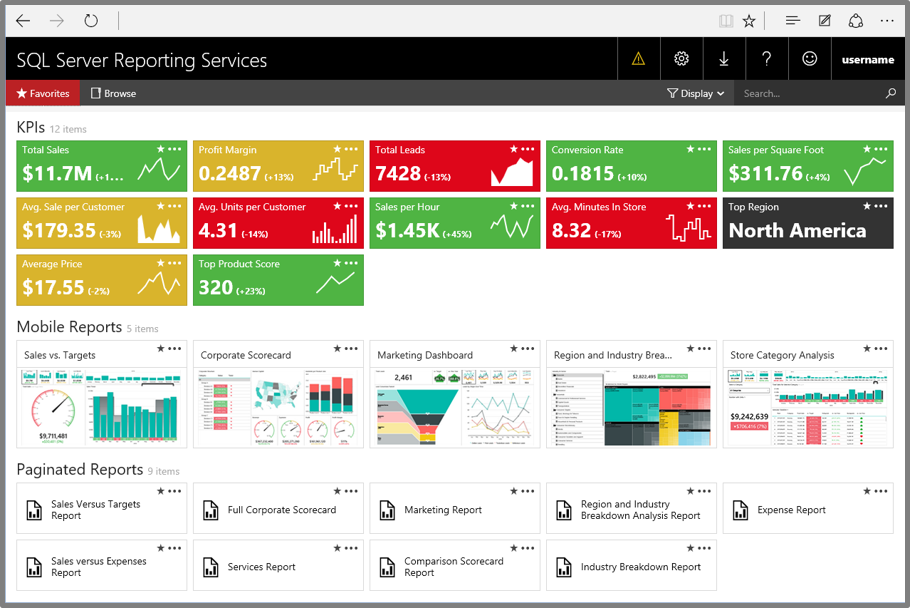
Accessing Report Server Management Interface
You can start by accessing your reporting service by going to http://localhost/reports — this is where you can manage your reporting service. You can view reports and other information directly from this web interface, manage subscriptions, security, data sources and other. Mostly, we won’t be using it in this article except for viewing reports.

The Reporting Service Web Management provides browsing folders that contain reports, data source names that you have deployed. This tool provides viewing of reports, however for developing reports, you must have Visual Studio .NET.
The above figure shows the report server windows service, as you can see, it must be running to be able to access, view and deploy reports from your development tool
As I write this article, I heard from Microsoft that they bought a tool that can provide creating reports directly from the reporting service web interface. I do not have any information when it will be released, but hopefully soon.


Confirm the Web Service URL
Back to the “Reporting Services Configuration Manager” window, click on “Web Service URL” and click on “Apply“. Not seen in the picture below – sorry.
After clicking the “Apply” button, a series of messages will be displayed on the bottom “Results” pane. If all goes well, the virtual directory and the URL are created.
After it has finished, click “Exit” to exit “Reporting Services Configuration Manager”.
And that’s it! In the next article I will install SCCM Current Branch Reporting Services Point role.
As always, if you found this article useful, share it with your friends.
If you have any questions or suggestions, leave your comment.
Thank you for reading!
Что такое MS SQL Server 2008 Express и Management Studio Express
И для начала давайте поговорим, что вообще это за программное обеспечение.
MS SQL Server 2008 Express – это облегченная бесплатная версия СУБД MS SQL 2008, которая идеально подходит для обучения и разработки своих первых приложений. На момент написания статьи данное ПО доступно на официальном сайте и скачать его можно здесь — http://www.microsoft.com/ru-ru/download/details.aspx?id=1695
MS SQL Server 2008 Management Studio Express – это бесплатная среда для разработки, администрирования, управления базами данных SQL сервера. Она доступна также на официальном сайте — http://www.microsoft.com/ru-ru/download/details.aspx?id=7593
Примечание! Я буду устанавливать данные продукты на операционную систему Windows Server 2008 r2, так как под рукой у меня тестовый сервер с установленной именно этой версии ОС, соответственно версии будут скачены под 64-разрядную архитектуру процессора, мои файлы называются следующем образом: SQLEXPR_x64_RUS и SQLManagementStudio_x64_RUS, но Вы не переживайте процесс установки абсолютно идентичен. Вы, соответственно, скачиваете дистрибутивы под свои ОС, например, для 32-разрядной архитектуры файлы будут называться: SQLEXPR_x86_RUS и SQLManagementStudio_x86_RUS. Это если Вы, например, хотите установить себе на домашний компьютер. Данные продукты можно установить на такие операционные системы как: Windows XP Service Pack 2, Windows XP Service Pack 3, Windows Vista, Windows 7 и конечно на все серверные операционные системы от компании Microsoft начинаю с 2003 версии. Но более подробней о требованиях и сведениях можете найти на официальной странице загрузке, советую почитать.
Creating a report
So, we are ready to create a report now. The steps are:
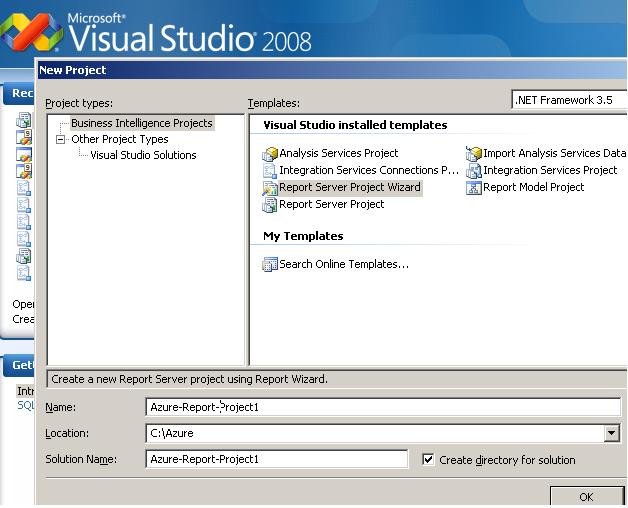
1. Open SQL Server Business Intelligence studio and create a new report server wizard project.
Figure 7: Create a new wizard project
You can also create Report Server project instead but at this stage, it is recommended you start with a wizard project.
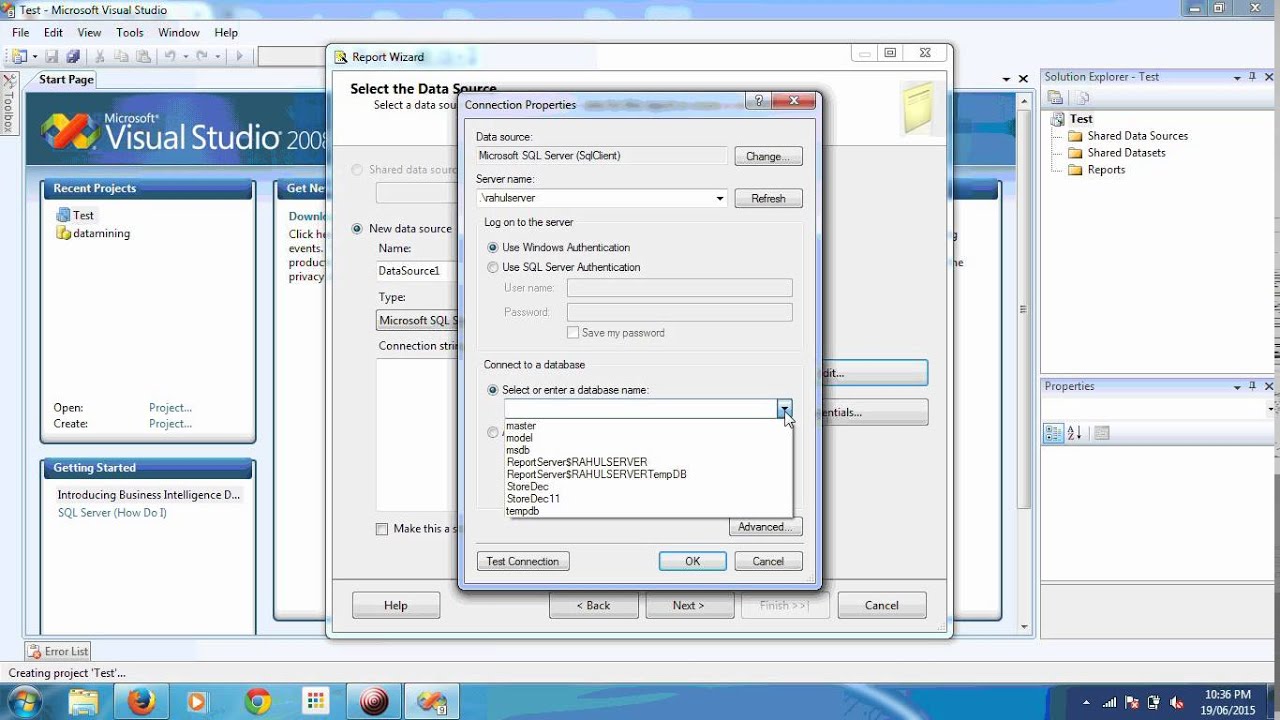
2. Once you have created the project, you can specify the data source from where to bring data for our report.
Figure 8: Defining Connection string in Data Source
3. In the next step, you can specify the query to fetch data which would be used in your report.
4. Next comes different options for formatting your report and that can be done using your preference as to how you want
to display your data.
5. Once you have report defined via wizard, you will be able to edit it using Business Intelligence studio.
Figure 8: Editing reports
6. As you can see in figure 8, you can define the layout of report using the toolbox at the left. And before you build and
deploy your report, you can preview it here as well. Note that a report to be accessible in another project,
say in ASP.Net website on developer machine, you would need to deploy the report on report server. Also, any change in report
would require you to re-deploy the report in order to reflect the latest change.
7. This completes our process of creating a report and deploying it on report server.
Summary
- The SSRS full form is SQL Server Reporting Services which allows you to produce formatted reports with tables in the form of data, graph, images, and charts.
- Three types of analytical SSRS services are 1) Integration 2) Analytics 3) Reporting.
- SSRS offers faster processes of reports on both relational and multidimensional data.
- SSRSS helps you to retrieve data from managed, OLE, ODBC, and DB connections.
- Report Builder, Report Designer, Report Manage, Report Server, Data sources are important SSRS components.
- Reporting life-cycle main based on three aspects 1) Authoring 2) Management 3) Delivery.
- Report Definition Language (RDL) describes all possible elements of a report using an XML grammar which is validated by an XML schema.
- Important types of SSRS reports are: 1)Parameterized reports 2)Linked Reports 3) Snapshot reports 4) Cached 5) Drill through Reports, etc.
1.2 PostgreSQL ODBC Driver Installation
1.2.1 Download Install Drivers
Download Windows Installer for PostgreSQL ODBC drivers for Windows 32 and 64 bit here and run the windows installer.On the server it is very likely all that is required is the 64 bit version. However, this assumes you are going to reference a shared ODBC connection using DSN and always force clients to deploy using that 64 bit version. Otherwise one of three things must occur:
- Install 32 bit and 64 bit driver, create a shared ODBC connection using DSN
- Create an SSRS shared connection to point to each ODBC DSN 32 and 64 bit and require client applications creating and deploying reports to use the same named DSN as the server locally.
- Create an automated build and deployment to transform the DSN names to match server DSN.
Introduction
SQL Server Reporting Services (SSRS) is a server-based report generating software system provided by Microsoft. It is a part of a suite of Microsoft SQL Server services, including SSAS (SQL Server Analysis Services) and SSIS (SQL Server Integration Services). It can be used to prepare and deliver a variety of interactive and printable reports with less effort. It represents the RDL (Report Definition Language) component to graphic icons in a GUI (Graphical User Interface). Instead of writing code, the user can drag-and-drop graphic icons into an SSRS report format.
This article will describe the simple steps to configure the Report Server.
First, you need to install SQL Server Reporting Services. There are two methods to install it.
Install it from SQL Server installation file while installing SQL Server
Download SQL Server Reporting Services separately and install it.
After installation of SQL server reporting services, type Reporting server configuration manager in the windows search box and open it. Then follow the given steps below.
Steps to Setup Report Server Configuration Manager
Click on Connect and insert a Server Name and Select Report Server Instance as shown below, then click on Connect.
Then, click on Service Account. Now you have to sign up for a Report Server Service Account. Here, you have two options, use a built-in account, or use another account. If you choose a built-in account, you will get a Network Service as well as Virtual Service Account in the selection options. If you have a domain user, then you can choose to use another account option and provide a Domain\User Account and Password.
In my case, I have selected a built-in account -> Virtual Service Account. Which we can get by default selection
After that, click on Webservice URL. A Report Server virtual directory will be created by default. If you have your own Report Server Web Service Site then you can use its IP Address, TCP Port, HTTPS Certificate, and HTTPS Ports for your web service URL. For me, I am choosing default values for Report Server Web Service Site identification. Click on Apply.
Click on Database then click on Change Database.
After that following screen will appear. Select create a new report server database if you are creating a report server database for the first time. However, you can select choose an existing report server database if you have already installed a report service. Then click Next.
Database Server
Insert your Server name then select Authentication Type as SQL Server Account, Username, Password, and click Next.
Database
Choose Report Server Database as report server and click Next
Credential
Select Authentication Type as SQL Server Credentials, insert username and password, then click Next
Summary
The following Summary will come, then click on Next
It saves the setup and completes after a few seconds. Then click on finish.
Click on the Web portal URL. A virtual directory and URL will be created by default.
Finally, type this web portal URL in the browser. SQL Server Reporting Service will open in the browser.