Код
четыретритри
Msg 156, Level 15, State 1, Line 26
Incorrect syntax near the keyword 'select'.
Msg 102, Level 15, State 1, Line 28
Incorrect syntax near ')'.
Msg 9829, Level 16, State 1, Line 62
STRING_AGG aggregation result exceeded the limit of 8000 bytes.
Use LOB types to avoid result truncation.
-- FOR XML PATH
select @strFilter = reverse( stuff( reverse(
	(select 'FullTableName = ' + '''' +  + '''' +
@strSeparator as
from IndexColumnAnalysisList
where RecID
)
) -- первый reverse
	,1,1,'') -- stuff
	) -- второй reverse
Set @strFilter = left(@strFilter, len(@strFilter) - 3) –- удаление последнего ‘ or ’
-- FOR XML PATH
-- String_agg
select @strFilter = string_agg('FullTableName = ' + '''' +
cast( as nvarchar(max)) + '''', @strSeparator)
	from IndexColumnAnalysisList
	where RecID
–- String_agg
Tag-Based XML
This example uses tag-based XML, where each data element for an employee is surrounded by its own start and end tag.
First we create a table to hold our XML document and populate it with a document containing multiple rows of data. Using gives us a separate tag for each column in the query.
CREATE TABLE xml_tab (
  id        NUMBER,
  xml_data  XMLTYPE
);

DECLARE
  l_xmltype XMLTYPE;
BEGIN
  SELECT XMLELEMENT("employees",
           XMLAGG(
             XMLELEMENT("employee",
               XMLFOREST(
                 e.empno AS "empno",
                 e.ename AS "ename",
                 e.job AS "job",
                 TO_CHAR(e.hiredate, 'DD-MON-YYYY') AS "hiredate"
               )
             )
           )
         )
  INTO   l_xmltype
  FROM   emp e;

  INSERT INTO xml_tab VALUES (1, l_xmltype);
  COMMIT;
END;
/
We can see the resulting row containing the tag-based XML using the following query.
SET LONG 5000
SELECT x.xml_data.getClobVal()
FROM   xml_tab x;

X.XML_DATA.GETCLOBVAL()
--------------------------------------------------------------------------------
<employees>
  <employee>
    <empno>7369</empno>
    <ename>SMITH</ename>
    <job>CLERK</job>
    <hiredate>17-DEC-1980</hiredate>
  </employee>
  <employee>
    <empno>7499</empno>
    <ename>ALLEN</ename>
    <job>SALESMAN</job>
    <hiredate>20-FEB-1981</hiredate>
  </employee>
  <employee>
    <empno>7521</empno>
    <ename>WARD</ename>
    <job>SALESMAN</job>
    <hiredate>22-FEB-1981</hiredate>
  </employee>
  <employee>
    <empno>7566</empno>
    <ename>JONES</ename>
    <job>MANAGER</job>
    <hiredate>02-APR-1981</hiredate>
  </employee>
  <employee>
    <empno>7654</empno>
    <ename>MARTIN</ename>
    <job>SALESMAN</job>
    <hiredate>28-SEP-1981</hiredate>
  </employee>
  <employee>
    <empno>7698</empno>
    <ename>BLAKE</ename>
    <job>MANAGER</job>
    <hiredate>01-MAY-1981</hiredate>
  </employee>
  <employee>
    <empno>7782</empno>
    <ename>CLARK</ename>
    <job>MANAGER</job>
    <hiredate>09-JUN-1981</hiredate>
  </employee>
  <employee>
    <empno>7788</empno>
    <ename>SCOTT</ename>
    <job>ANALYST</job>
    <hiredate>19-APR-1987</hiredate>
  </employee>
  <employee>
    <empno>7839</empno>
    <ename>KING</ename>
    <job>PRESIDENT</job>
    <hiredate>17-NOV-1981</hiredate>
  </employee>
  <employee>
    <empno>7844</empno>
    <ename>TURNER</ename>
    <job>SALESMAN</job>
    <hiredate>08-SEP-1981</hiredate>
  </employee>
  <employee>
    <empno>7876</empno>
    <ename>ADAMS</ename>
    <job>CLERK</job>
    <hiredate>23-MAY-1987</hiredate>
  </employee>
  <employee>
    <empno>7900</empno>
    <ename>JAMES</ename>
    <job>CLERK</job>
    <hiredate>03-DEC-1981</hiredate>
  </employee>
  <employee>
    <empno>7902</empno>
    <ename>FORD</ename>
    <job>ANALYST</job>
    <hiredate>03-DEC-1981</hiredate>
  </employee>
  <employee>
    <empno>7934</empno>
    <ename>MILLER</ename>
    <job>CLERK</job>
    <hiredate>23-JAN-1982</hiredate>
  </employee>
</employees>

1 row selected.

SQL>
The operator allows us to split the XML data into rows and project columns on to it. We effectively make a cartesian product between the data table and the call, which allows to split a XML document in a single row into multiple rows in the final result set. The table column is identified as the source of the data using the clause. The rows are identified using a XQuery expression, in this case ‘/employees/employee’. Columns are projected onto the resulting XML fragments using the clause, which identifies the relevant tags using the expression and assigns the desired column names and data types. Be careful with the names of the columns in the clause. If you use anything other than upper case, they will need to be quoted to make direct reference to them. Notice we are querying using the alias of the call, rather than the regular table alias.
SELECT xt.*
FROM   xml_tab x,
       XMLTABLE('/employees/employee'
         PASSING x.xml_data
         COLUMNS
           empno     VARCHAR2(4)  PATH 'empno',
           ename     VARCHAR2(10) PATH 'ename',
           job       VARCHAR2(9)  PATH 'job',
           hiredate  VARCHAR2(11) PATH 'hiredate'
         ) xt;

EMPN ENAME      JOB       HIREDATE
---- ---------- --------- -----------
7369 SMITH      CLERK     17-DEC-1980
7499 ALLEN      SALESMAN  20-FEB-1981
7521 WARD       SALESMAN  22-FEB-1981
7566 JONES      MANAGER   02-APR-1981
7654 MARTIN     SALESMAN  28-SEP-1981
7698 BLAKE      MANAGER   01-MAY-1981
7782 CLARK      MANAGER   09-JUN-1981
7788 SCOTT      ANALYST   19-APR-1987
7839 KING       PRESIDENT 17-NOV-1981
7844 TURNER     SALESMAN  08-SEP-1981
7876 ADAMS      CLERK     23-MAY-1987
7900 JAMES      CLERK     03-DEC-1981
7902 FORD       ANALYST   03-DEC-1981
7934 MILLER     CLERK     23-JAN-1982

14 rows selected.

SQL>
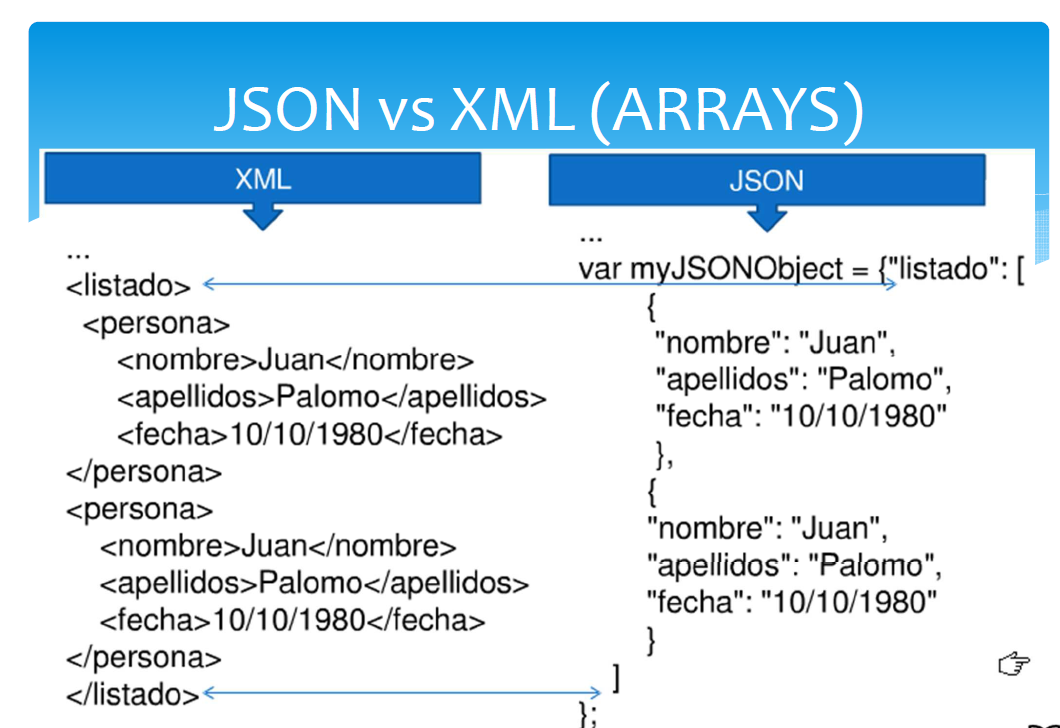
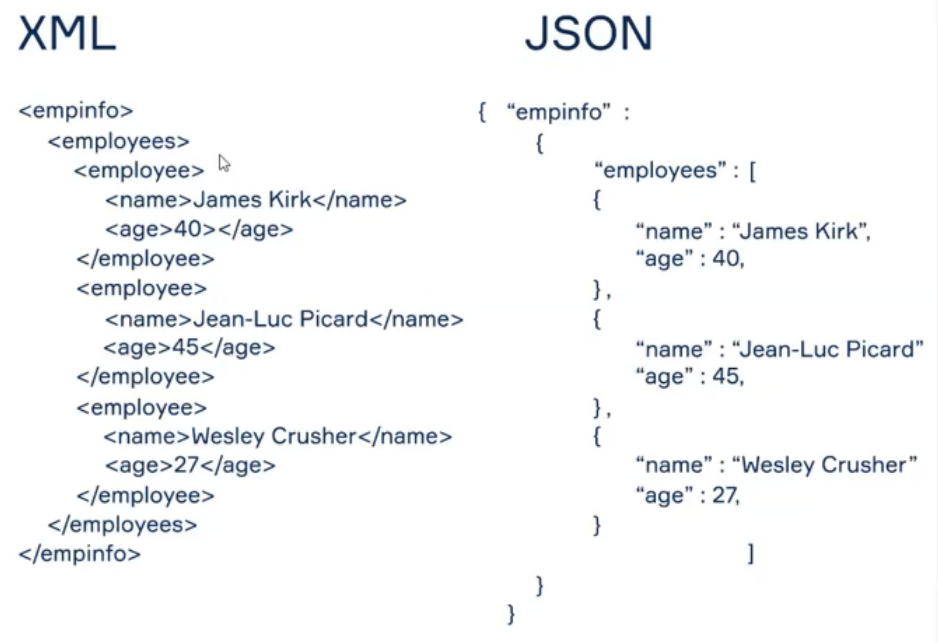
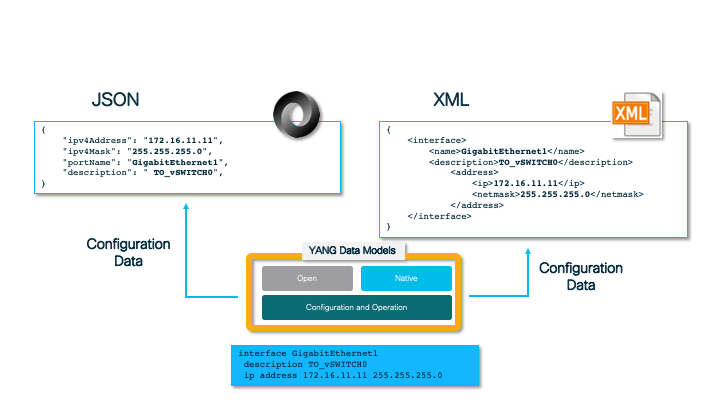
OpenJSON
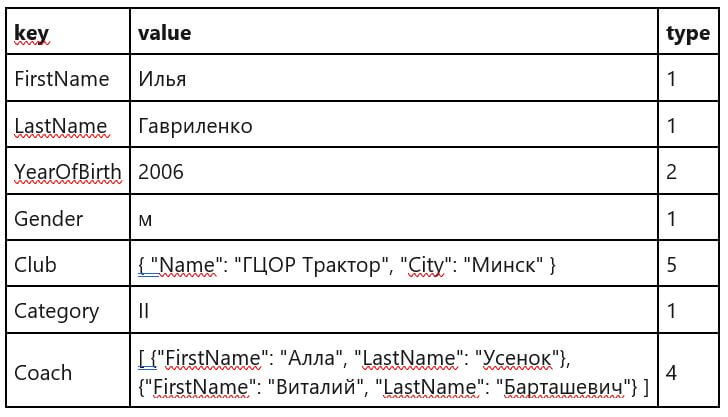
Преобразование данных из JSON в реляционный формат
OPENJSON — функция с табличным значением, которая выполняет синтаксический анализ текста JSON и возвращает объекты и свойства из входных данных JSON в виде строк и столбцов.
In :

declare @json nvarchar(4000)
set @json = N'
{
    "FirstName": "Илья",
    "LastName": "Гавриленко",
    "YearOfBirth": 2006,
    "Gender": "м",
    "Club": {
        "Name": "ГЦОР Трактор",
        "City": "Минск"
    },
    "Category": "II",
    "Coach":
}
'

select *
from openjson(@json)

--извлечь все атрибуты, в том числе, более чем 1 уровня вложенности
select *
from openjson(@json)
    with
        (
            FirstName       nvarchar(20)    N'$.FirstName',
            LastName        nvarchar(30)    N'$.LastName',
            YearOfBirth     smallint        N'$.YearOfBirth',
            Gender          nchar(1)        N'$.Gender',
            Category        nvarchar(20)    N'$.Category',
            ClubCity        nvarchar(50)    N'$.Club.City',
            ClubName        nvarchar(100)   N'$.Club.Name',
            Coach           nvarchar(max)   N'$.Coach'        as json
        )  js

(7 rows affected)
(1 row affected)
Total execution time: 00:00:00.0173023
Out:
Out:

Если вы хотите получить данные из вложенного массива JSON, можно использовать корреляционный вызов OPENJSON с помощью CROSS APPLY или OUTER APPLY:
In :

declare @json nvarchar(4000)
set @json = N'
{
    "FirstName": "Илья",
    "LastName": "Гавриленко",
    "YearOfBirth": 2006,
    "Gender": "м",
    "Club": {
        "Name": "ГЦОР Трактор",
        "City": "Минск"
    },
    "Category": "II",
    "Coach":
}
'

--извлечь все атрибуты, в том числе, более чем 1 уровня вложенности
select      js.FirstName,
            js.LastName,
            js.YearOfBirth,
            js.Gender,
            js.Category,
            js.ClubCity,
            js.ClubName,
            jsc.CoachFirstName,
            jsc.CoachLastName
from openjson(@json)
    with
        (
            FirstName       nvarchar(20)    N'$.FirstName',
            LastName        nvarchar(30)    N'$.LastName',
            YearOfBirth     smallint        N'$.YearOfBirth',
            Gender          nchar(1)        N'$.Gender',
            Category        nvarchar(20)    N'$.Category',
            ClubCity        nvarchar(50)    N'$.Club.City',
            ClubName        nvarchar(100)   N'$.Club.Name',
            Coach           nvarchar(max)   N'$.Coach'        as json
        )  js
outer apply openjson(js.Coach)
    with
        (
            CoachFirstName  nvarchar(20)    N'$.FirstName',
            CoachLastName   nvarchar(30)    N'$.LastName'
        )  jsc

(2 rows affected)
Total execution time: 00:00:00.0071696
Out :

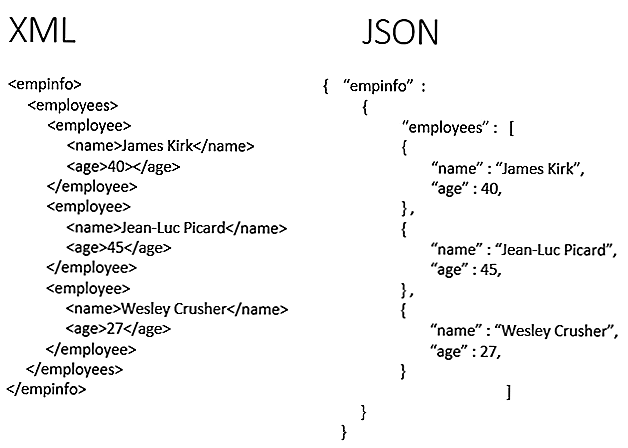
Introduction
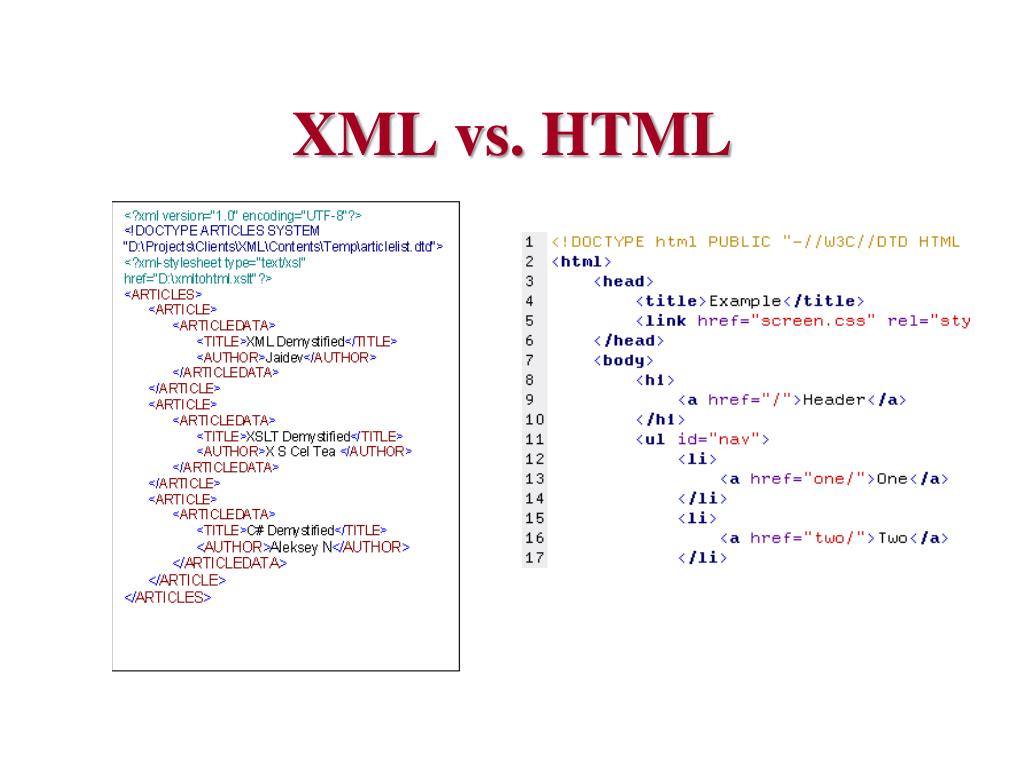
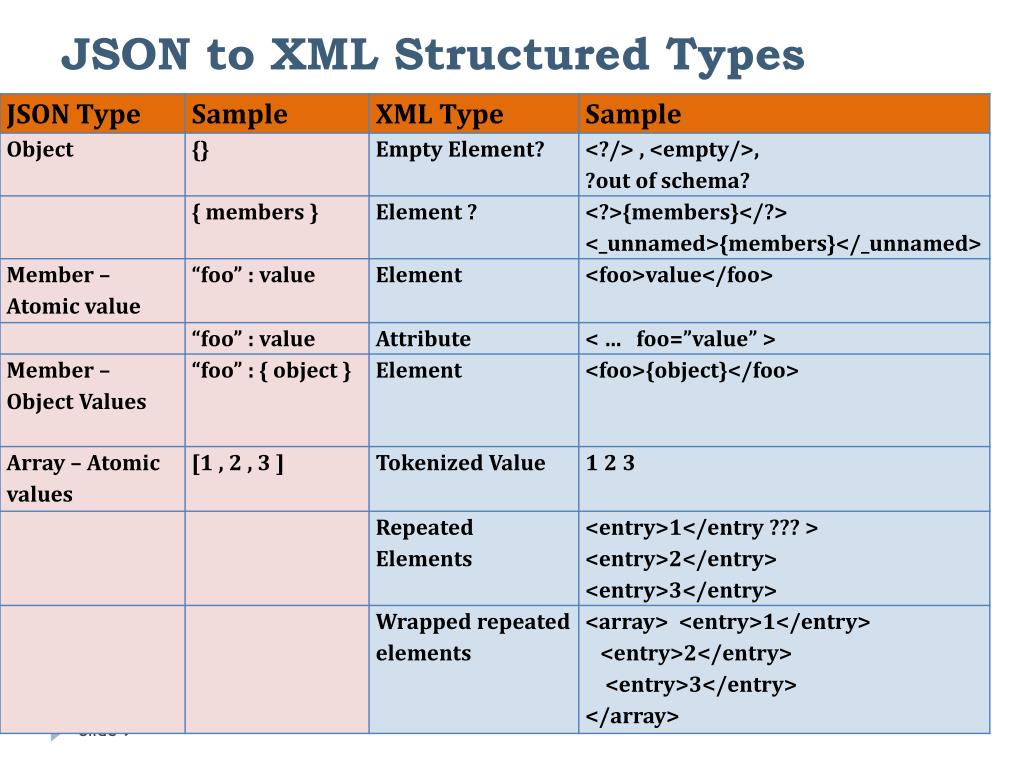
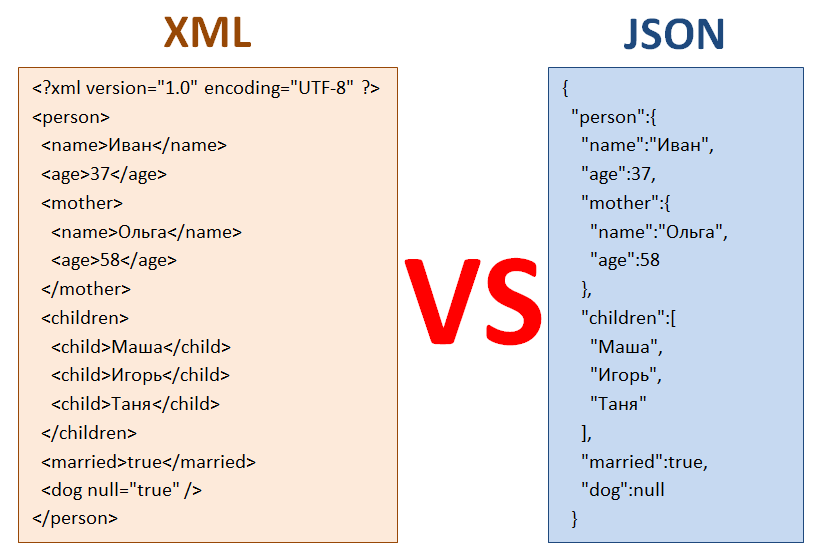
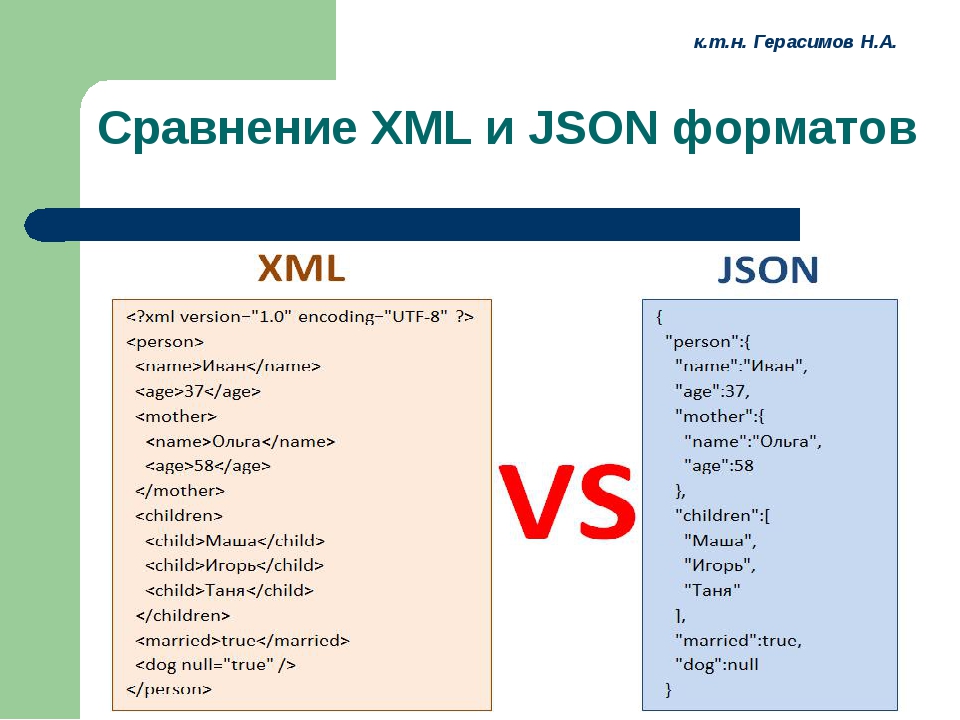
Extensible Markup Language (XML) has been in existence for more than two decades. XML is a markup language for encoding documents in a format that is both human and machine readable. In XML, you define your own custom tags, elements and attributes to meet your specific needs. XML is case sensitive, allows comments and hierarchy is important. An XML file is a text file and can be opened with any text editor. The following is a sample of an XML document:
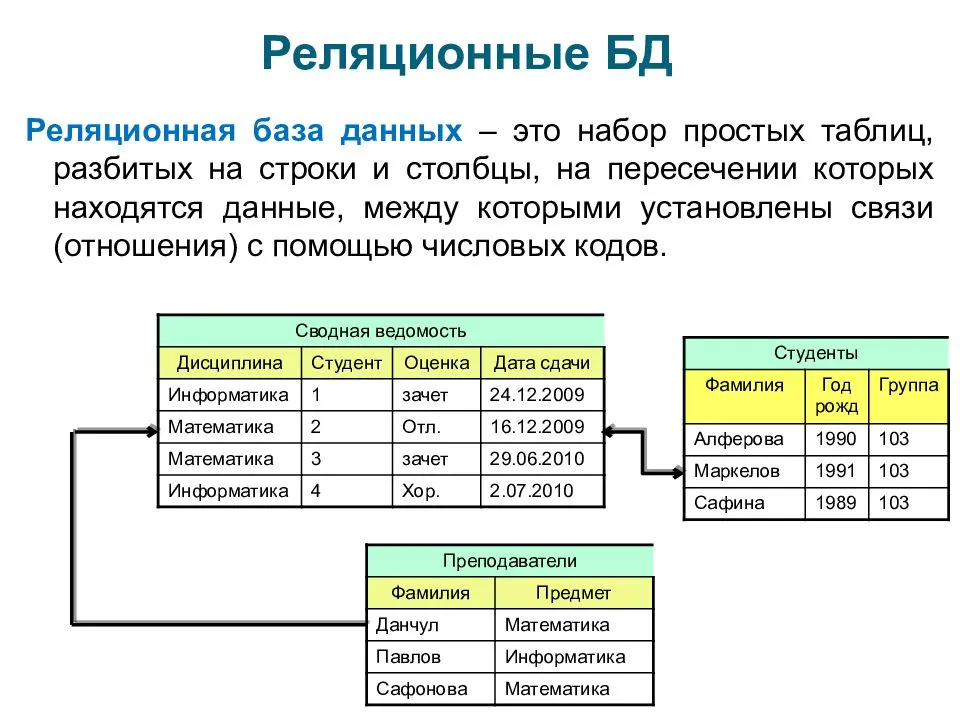
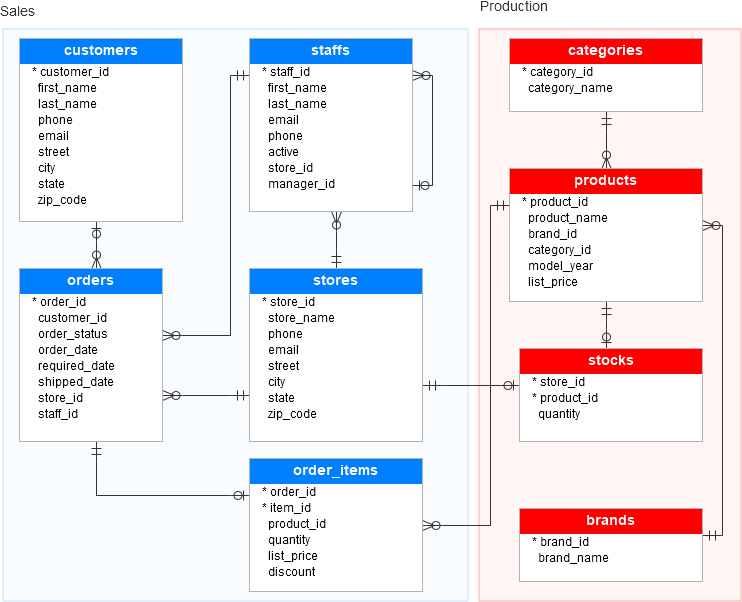
When we run a query against a relational database table, the resulting data is presented mostly in tabular format. Each horizontal row represents a record while the columns flow vertically and represent an attribute of the record.
In this post, I explore how MS SQL Server and PostgreSQL databases may be queried to output the data in an XML format instead of tabular format. Each of these databases contain inbuilt functionality to output XML. You can also manually write queries combining XML elements and data from the databases to create XML output. Manually created XML output is tedious, will be missing a root element and will therefore not conform to a .
AUTO mode
AUTO mode is one of the approaches to converts over to the XML elements from the rows of the table. Element names of the XML document corresponding to the column alias or column name of the SELECT query.
For example, the query result has been produced with a single XML document for the above sample data. The query result had 5 rows in a result set, which is changed over to a solitary cell result-set. This methodology is utilized in a single-valued function to return multiple rows in a single return variable.
|
1 |
SELECTuser_id,fname,lname,email_ FROMuser_details FORXMLAUTO; |
Here, AUTO produces header names utilizing table names.
Recap
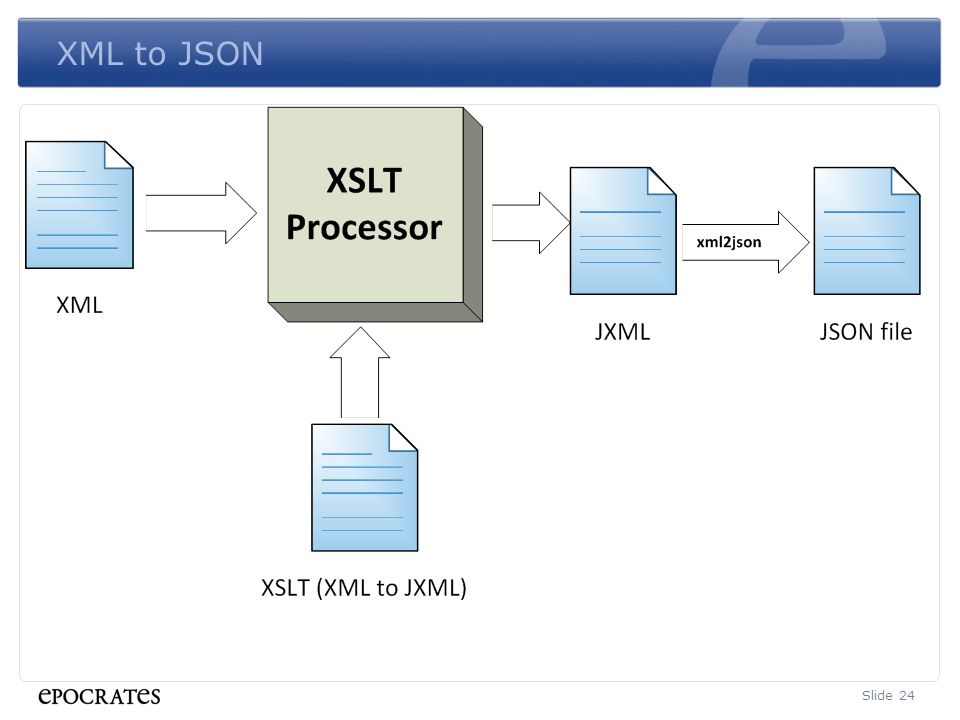
XML Serializable Models
As mentioned above, I have an article on the subject of Using the XmlSerializer Attributes. If you have sample XML or an XSD schema to work from, you can use tools like XSD.exe or Skeleton Crew to generate XML Serializable code models. And, if you don’t already have a model, you might want to start with the XML structure and generate code from there. If you already have a model that’s not XML serializable, the article above can help you pepper your model with the attributes necessary to produce the XML you want.
XML Queries
Documentation on the mode of the clause seems to be spread fairly thin. Most write-ups I could find on the subject were basic. But with some experimentation, hopefully, you can make it do what you need. In any event, these are a couple of the references I found:
- Moving FOR XML EXPLICIT to the new PATH mode (part II)
- What’s New in FOR XML in Microsoft SQL Server 2005
XMLSerializer
You can, of course, re-use the demo project’s class. You can change it to suit your needs. Or, you can start from scratch and create your own. I chose to specifically use the implementations because, to my knowledge, SQL Server 2005 is the only engine that supports the clause, but I could very well be wrong about that.
Создание полнотекстового индекса в SQL Server
После создания полнотекстового каталога можно начинать создавать в нем полнотекстовые индекса. В нашем случае мы хотим создать полнотекстовый индекс, в котором участвует поле textdata таблицы TestTable.
Создание полнотекстового индекса на T-SQL
Для того чтобы создать полнотекстовый индекс можно написать следующую SQL инструкцию
CREATE FULLTEXT INDEX ON TestTable(textdata)
	KEY INDEX PK_TestTable ON (TestCatalog)
	WITH (CHANGE_TRACKING AUTO)
GO
Где,
- CREATE FULLTEXT INDEX – команда создания полнотекстового индекса;
- TestTable(textdata) – таблица и столбец, включенные в индекс;
- KEY INDEX PK_TestTable – имя уникального индекса таблицы TestTable;
- ON (TestCatalog) — указываем, что полнотекстовый индекс будет создан в полнотекстовом каталоге TestCatalog. Если не указать этот параметр, то индекс будет создан в полнотекстовом каталоге по умолчанию;
- WITH (CHANGE_TRACKING AUTO) – это мы говорим, что все изменения, которые будут вноситься в базовую таблицу (TestTable), автоматически отобразятся и в нашем полнотекстовом индексе, т.е. автоматическое заполнение.
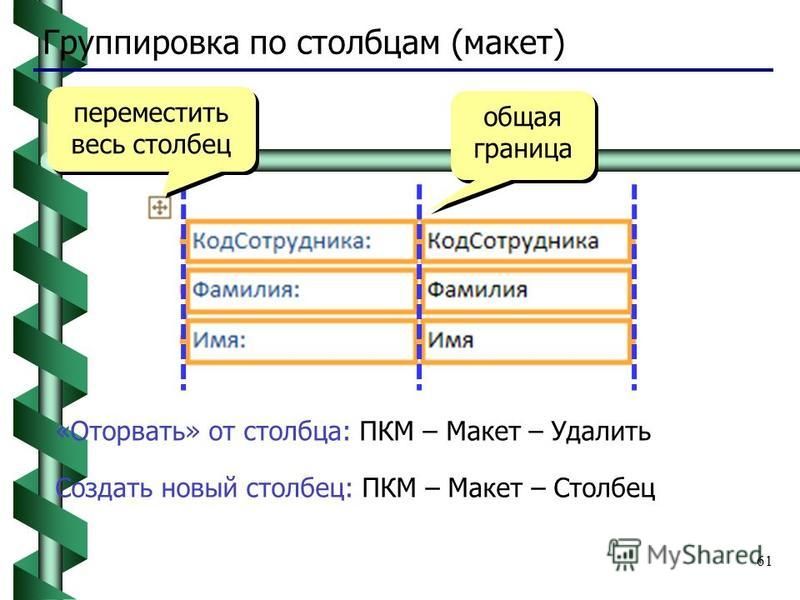
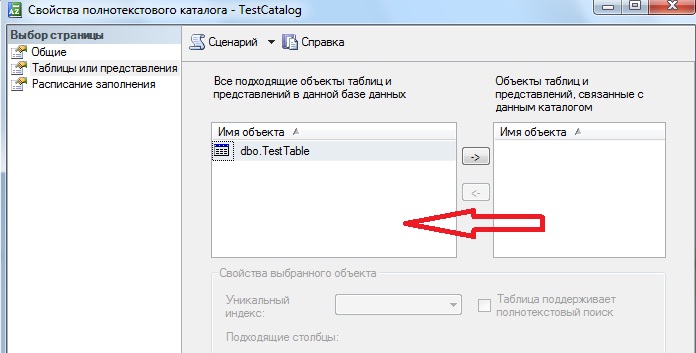
Создание полнотекстового индекса в графическом интерфейсе Management Studio
Полнотекстовый индекс можно создать, используя и графические инструменты, для этого открываем свойства полнотекстового каталога и переходим в пункт «Таблицы или представления», выбираем нужную таблицу, поле, уникальный индекс и способ отслеживания изменений. В нашем случае у нас всего одна доступная таблица и одно поле.


Filtering Rows with XPath
We can limit the rows returned by altering the XPath expression. In the following example we only return rows with the job type of «CLERK».
SELECT xt.*
FROM   xml_tab x,
       XMLTABLE('/employees/employee'
         PASSING x.xml_data
         COLUMNS
           empno     VARCHAR2(4)  PATH 'empno',
           ename     VARCHAR2(10) PATH 'ename',
           job       VARCHAR2(9)  PATH 'job',
           hiredate  VARCHAR2(11) PATH 'hiredate'
         ) xt;

EMPN ENAME      JOB       HIREDATE
---- ---------- --------- -----------
7369 SMITH      CLERK     17-DEC-1980
7876 ADAMS      CLERK     23-MAY-1987
7900 JAMES      CLERK     03-DEC-1981
7934 MILLER     CLERK     23-JAN-1982

4 rows selected.

SQL>
We could parameterise the job type using variable in the XPath, which is prefixed with a «$». The value for this variable is then passed in the clause. The variable must be aliases using and double quoted to make sure the name and case matches that of the variable in the XPath expression.
VARIABLE v_job VARCHAR2(10);
EXEC :v_job := 'CLERK';

SELECT xt.*
FROM   xml_tab x,
       XMLTABLE('/employees/employee'
         PASSING x.xml_data, :v_job AS "job"
         COLUMNS
           empno     VARCHAR2(4)  PATH 'empno',
           ename     VARCHAR2(10) PATH 'ename',
           job       VARCHAR2(9)  PATH 'job',
           hiredate  VARCHAR2(11) PATH 'hiredate'
         ) xt;

EMPN ENAME      JOB       HIREDATE
---- ---------- --------- -----------
7369 SMITH      CLERK     17-DEC-1980
7876 ADAMS      CLERK     23-MAY-1987
7900 JAMES      CLERK     03-DEC-1981
7934 MILLER     CLERK     23-JAN-1982

4 rows selected.

SQL>
Изменение и удаление полнотекстового индекса
В случае необходимости можно изменить параметры полнотекстового индекса. Давайте в качестве примера, изменим способ отслеживания изменений с автоматического на ручной. Для изменения в графическом интерфейсе можно использовать окно «Свойства полнотекстового каталога -> Таблицы или представления», которое мы использовали при создании полнотекстового индекса.
Или можно написать следующий код
 ALTER FULLTEXT INDEX ON TestTable
	SET CHANGE_TRACKING = MANUAL
Для того чтобы удалить полнотекстовый индекс достаточно просто удалить таблицу из списка объектов связанных с полнотекстовым каталогом в том же окне «Свойства полнотекстового каталога -> Таблицы или представления»
Или написать код T-SQL
DROP FULLTEXT INDEX ON TestTable