
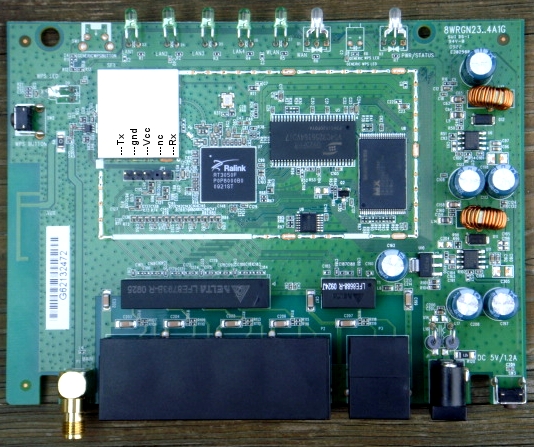
[edit] Install DD-WRT
The following will work for the initial flash AND a recovery
connect to the bootloader with telnet on port 9000 and ip 192.168.1.1 (If you have installed Micro_Redboot read the wiki page about it first)
now do the following (consider that fis create operations are taking sometimes *several* minutes to finish, in my particular case it took more than 5 minutes):
fis init
ip_address -h 192.168.1.2
load -r -b 0x80041000 linux.bin
fis create linux
fconfig boot_script true
fconfig boot_script_timeout 5
now type fconfig again and configure the bootscript to:
fis load -l linux
exec
and press enter for every other option to confirm the defaults.
Now type reset again. The unit should now boot dd-wrt and work as known from other atheros based platforms
You are done now. Wait for your router to reboot. It will take about 1-2 minutes. It may blink and reset once or twice (as noted).
Now open a Browser and connect to address 192.168.1.1 you should be able to see the dd-wrt page.
That’s All
[edit] Install RedBoot
configure your local ip to 192.168.20.80
connect your lan cable to the WAN port of the router.
plugoff the power cord and replug it. You must press the RESET key for 5 sec.
now enter the redboot using telnet and ip 192.168.20.81 and port 9000. connect your lan cable to the dir300 wan port.
you might need several tries since its only available for 1 second after aprox. 5 sec. of booting
(below is a Windows & Linux access script for an easy way to connect to redboot)
When you succeed you will be rewarded with a RedBoot> prompt.
DIR-300 Info:
IP: 192.168.20.81/255.255.255.0, Gateway: 0.0.0.0
Default server: 192.168.20.80
now start a local tftp server on your computer and place ap61.ram as well as ap61.rom in the root dir of this server
back to the redboot enter:
load ap61.ram
go
now a new temporarily bootloader should start. (on serial console it will display some warning. but you dont need to care about). It will be waiting for connection at the LAN side of the router, so follow the instructions that follow.
Plug off your cable from the wan port and reconfigure your local (computer) ip to 192.168.1.2 (set your DHCP server to serve 192.168.1.1 as the only address in the DHCP pool and the TFTP must also be available at 192.168.1.2). Now you should be pluging on to any of the lan ports. Then connect via telnet to 192.168.1.1 (or to the ip your dhcp server served to the redboot) and port 9000. A DD-WRT> prompt should welcome you.
IMPORTANT: while doing the following steps. never plugoff the lan cable or the power cord
fis init
About to initialize  FLASH image system - continue (y/n)? y
*** Initialize FLASH Image System
... Erase from 0xbffe0000-0xbfff0000: .
... Program from 0x807f0000-0x80800000 at 0xbffe0000: .

ip_address -h 192.168.1.2
IP: 192.168.1.1/255.255.255.0, Gateway: 0.0.0.0
Default server: 192.168.1.2

load -r -b %{FREEMEMLO} ap61.rom
Using default protocol (TFTP)
Raw file loaded 0x80080000-0x800a8717, assumed entry at 0x80080000

fis create -l 0x30000 -e 0xbfc00000 RedBoot
An image named 'RedBoot' exists - continue (y/n)? y
... Erase from 0xbfc00000-0xbfc30000: ...
... Program from 0x80080000-0x800a8718 at 0xbfc00000: ...
... Erase from 0xbffe0000-0xbfff0000: .
... Program from 0x807f0000-0x80800000 at 0xbffe0000: .

reset
now the unit will reboot and the new bootloader will be executed and is waiting for your connection.
this will take 30+ sec.
[edit] Alternate Install Method using Emergency Room Web Interface
- Setup your PC with static IP on 192.168.0.0 subnet (i.e. 192.168.0.2).
- Make sure the PC has the following two files:
- dlink-revb-factory-webflash.bin
- dir300-revb-ddwrt-webflash.bin (or the 600 equivalent, depending on whether you have the 300 or 600)
- Open your web browser and get it ready to connect to 192.168.0.1.
- Press and HOLD the reset button on the router and connect power. Hold the reset button for about 3~5 seconds, then release.
- Browse to and upload the first image file, the ‘factory’ one.
- When you see the message «IMAGE UPLOAD SUCCESS», the flash will begin to be erased and re-written.
- Wait until the power LED turns to solid ‘Yellow’. At this point, the initial dd-wrt image has been written to flash, the device has rebooted and is running.
- The DD-WRT screen should load. If not, you did something wrong. Go back and try again.
- There is a report that «emergency room web interface» may not support IE8, so if it does not work then try another browser: «Note that Internet Explorer 8 did not work for me on the emergency room web interface. It gave me a general page view error during the firmware upload. I had to use another browser to make it work (I used chrome but fire fox would probably work as well).»
Подготовка
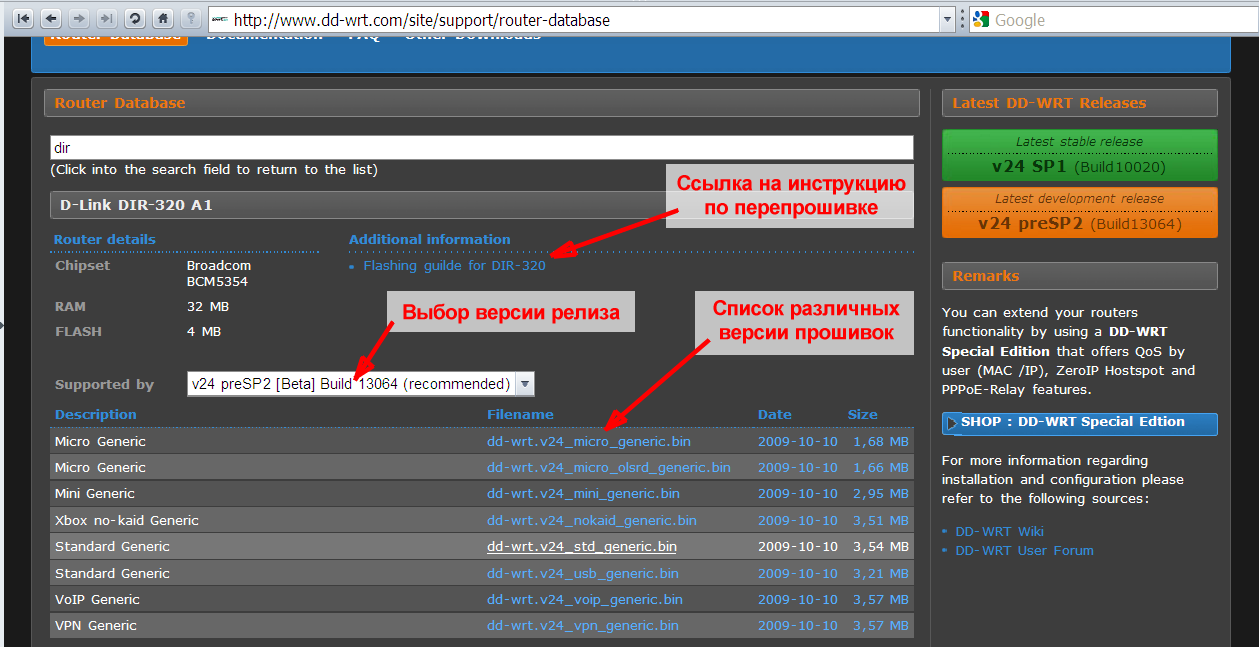
Узнаем что будем перешивать
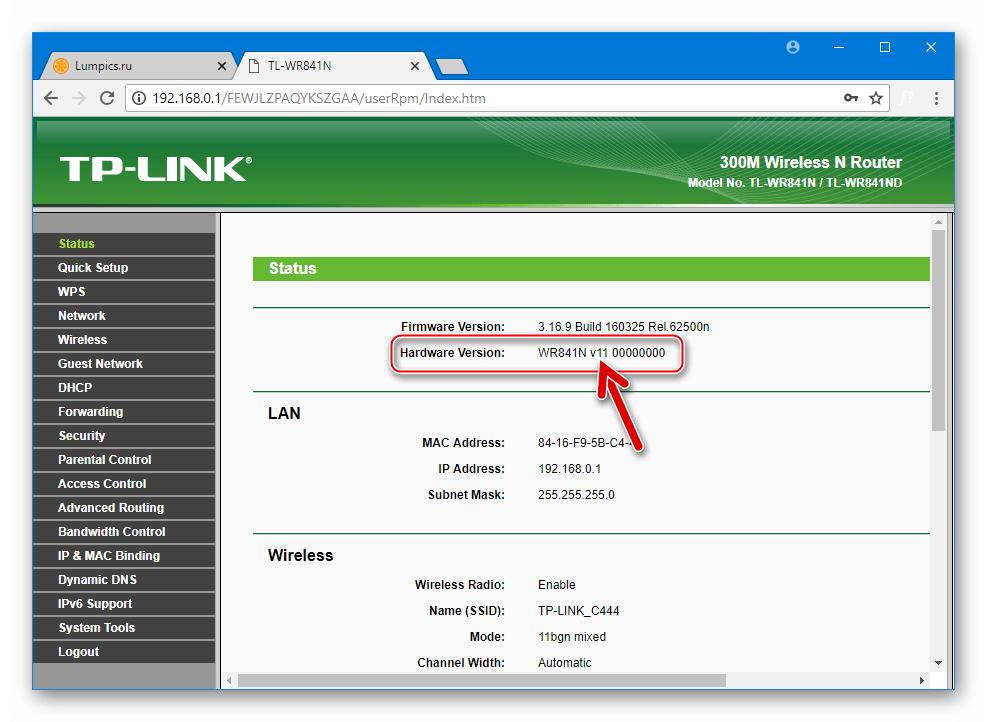
Первое что нужно сделать — это узнать номер ревизии маршрутизатора (наклейка на обратной стороне).
У меня такая железка: D-Link DIR-300 H/W Version: A1, F/W: 1.03
Все дальнейшее описание прошивки предполагается что ревизия маршрутизатора A1. Для ревизии B1 способ прошивки несколько иной, читать тут: http://sergey-s-betke.blogs.novgaro.ru/networking/devices/d-link/dap-1150/proshivaem-d-link-proshivkoj-dd-wrt
Качаем необходимые файлы
Идем на http://www.dd-wrt.com/site/support/router-database ищем наш маршрутизатор, качаем файлы
- ap61.ram
- ap61.rom
- linux.bin
Устанавливаем TFTP-сервер
Процедура прошивки проводилась на компьютере с OS Ubuntu. Требуется установленный TFTP-сервер.
$ sudo apt-get install tftp tftpd
Если необходимо — вносим изменения в конфигурационный файл /etc/inetd.conf
Складываем нужные нас файлы в папку /srv/tftp
Запускаем сервис
$ sudo service openbsd-inetd start
Если работаем на Windows, то рекомендую http://tftpd32.jounin.net/
[edit] Out-of-the-box factory firmware upgrade
To install dd-wrt on either a D-Link DIR-300 Revision B1 or a D-Link DIR-600 Revision B1, you need to flash it directly from the router’s web admin page (yes, that is correct… from D-Link’s standard web interface). These are the steps to follow:
- Download the latest firmware from: , and find the current year, then pick a build folder, then search for dir600 or dir300, whichever is appropriate. There will be two files, «dlink-revb-factory-webflash.bin» and «dir600-revb-ddwrt-webflash.bin» / «dir300-revb-ddwrt-webflash.bin». You only need the factory-webflash file. The other file is used for upgrading to a newer dd-wrt version.
- Connect to the DIR-600/DIR-300 using an ethernet cable.
- You’re finished!
[edit] Install DD-WRT
The following will work for the initial flash AND a recovery
connect to the bootloader with telnet on port 9000 and ip 192.168.1.1 (If you have installed Micro_Redboot read the wiki page about it first)


now do the following (consider that fis create operations are taking sometimes *several* minutes to finish, in my particular case it took more than 5 minutes):
fis init
ip_address -h 192.168.1.2
load -r -b 0x80041000 linux.bin
fis create linux
fconfig boot_script true
fconfig boot_script_timeout 5
now type fconfig again and configure the bootscript to:
fis load -l linux
exec
and press enter for every other option to confirm the defaults.
Now type reset again. The unit should now boot dd-wrt and work as known from other atheros based platforms
You are done now. Wait for your router to reboot. It will take about 1-2 minutes. It may blink and reset once or twice (as noted).
Now open a Browser and connect to address 192.168.1.1 you should be able to see the dd-wrt page.
That’s All
[edit] Приготовьтесь к автономной работе
- У вас не будет доступа в интернет через маршрутизатор во время замены прошивки. Вам придётся почти всё делать в автономном режиме, подключившись к маршрутизатору по локальной сети (не используя беспроводную сеть Wi-Fi, см. ). Учитывая множество проблем, с которыми вы можете столкнуться, попытка прошивки может завершится тем, что вы не сможете получить доступ в интернет и обратиться за помощью. Поэтому вам нужно будет заранее скачать на комьютер всё, что может понадобится, прежде чем начать. Это позволит просматривать информацию в автономном режиме в случае, если что-то пойдет не так.
- Пользователям Windows Vista на время перепрошивки рекомендуется отключить бесроводную сеть Wi-Fi на компьютере. См. .
- Запишите или сделайте снимок экрана текущих настроек маршрутизатора для дальнейшего использования. Среди настроек вам особенно могут понадобится:
- Имя пользователя и пароль для доступа в интернет, предоставленные интернет-провайдером.
- MAC-адрес маршрутизатора в глобальной сети WAN. Некоторые интернет-провайдеры не допускают немедленной смены оборудования без телефонного звонка. Поэтому после прошивки может понадобится выполнить настройку клонирования MAC-адреса.
- Статический IP-адрес, если используется.
- Во время экспериментов с прошивкой маршрутизатора рекомендуется иметь дополнительный способ доступа к Интернету, чтобы ускорить устранение неполадок в случае их появления.
- Рекомендуется сохранить информацию по следующим ссылкам на компьютер, чтобы иметь возможность просмотреть её в автономном режиме. Просто выберите в браузере меню Файл → Сохранить как.
- Страница модели вашего маршрутизатора в разделе Hardware-specific.
- Эта страница вики.
- Страница вики Recover from a Bad Flash, описывающая восстановление маршрутизатора после неудачной перепрошивки.
- Ответы на частозадаваемые вопросы Часто задаваемые вопросы.
- Кроме того, понадобится скачать следующие файлы:
- Первый бинарный файл «killer» для стирания заводской прошивки маршрутизатора. Может быть и не нужен, см. страницу вашей модели маршрутизатора в разделе Hardware-specific.
- Второй бинарный файл прошивки DD-WRT.
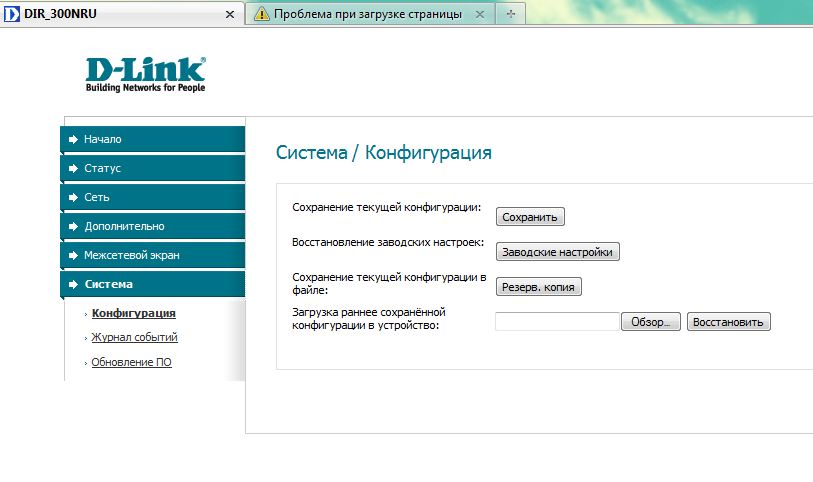
[edit] Восстановление фирменной прошивки
Предупреждение: При наборе команд не следует пользоваться буфером обмена т.к. буква «х» после процедуры «Вставить» не воспринимается, как символ «х». (набирайте адреса в ручную)
Начало:
3. Запускаем TFTP сервер для возможности заливать в устройства файлы
Установка загрузчика (RedBoot):
Отступление — в большенстве описаний, и оригинал статьи не исключение, необходимо по ходу перепрошивки устройства менять IP адрес вашего ПК, рекомендую воспользоваться кнопкой «Альтернативная конфигурация» в свойствах TCP/IP протокола вашей сетевой карты и сразу прописать следующие адреса и маски:
192.168.20.2/24 (255.255.255.0)
192.168.1.2/24
192.168.0.2/24
Это позволит не Беспокоиться о том, правильный ли в данный момент времени у Вас адрес или нет.
connect1.bat
также нам понадобится еще один пакетный файл
connect20.bat
файл redboot.txt, как и в случае заливки DD-WRT содержит два символа — ^C
Теперь Мы готовы приступить к восстановлению оригинальной прошивки
— Подключаем ПК к LAN порту
— Подаем питание на устройство
— запускаем connect1.bat
Через несколько секунд появится приветствие
DD-WRT> ip_address -h 192.168.1.2

Default server: 192.168.1.2

DD-WRT> fis init

About to initialize  FLASH image system – continue (y/n)? y

*** Initialize FLASH Image System

… Erase from 0xbffe0000-0xbfff0000: .

… Program from 0×80ff0000-0×81000000 at 0xbffe0000: .

DD-WRT> load -r -b %{FREEMEMLO} dir300redboot.rom

Using default protocol (TFTP)

Raw file loaded 0×80040800-0×800607ff, assumed entry at 0×80040800

DD-WRT> fis create -l 0×30000 -e 0xbfc00000 RedBoot

An image named ‘RedBoot’ exists – continue (y/n)? y

… Erase from 0xbfc00000-0xbfc30000: …

… Program from 0×80040800-0×80060800 at 0xbfc00000: ..

… Erase from 0xbffe0000-0xbfff0000: .

… Program from 0×80ff0000-0×81000000 at 0xbffe0000: .

DD-WRT> reset
После введенных комманд потребуется около 30 сек на перезагрузку устройства
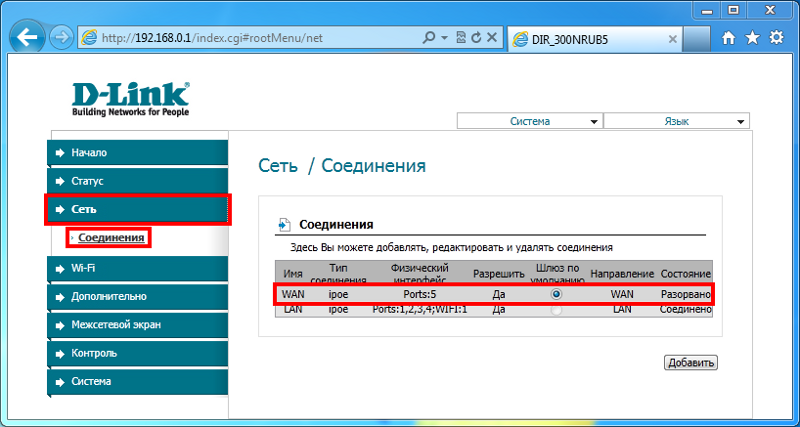
Переключаем кабель в порт WAN, подаем питание и запускаем connect20.bat
ждем соединения с устройством и приглашения
RedBoot> load -r -b %{FREEMEMLO} shadowandy_board_config.bin

Using default protocol (TFTP)

Raw file loaded 0×80036400-0×800463ff, assumed entry at 0×80036400

RedBoot> fwrite -f 0xbfff0000 -b 0×80036400 -l 0×10000 -e 0×80036400

About to write image into flash – continue (y/n)? y

… Erase from 0xbfff0000-0xc0000000: .

… Program from 0×80036400-0×80046400 at 0xbfff0000: .

update image info..

Update RedBoot non-volatile configuration – continue (y/n)? y

RedBoot> reset
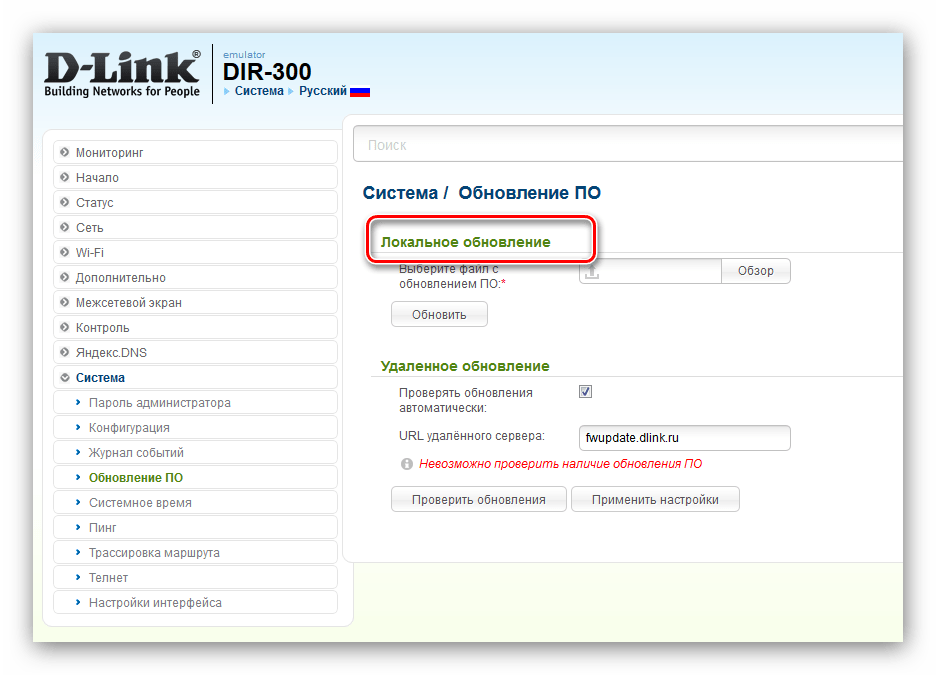
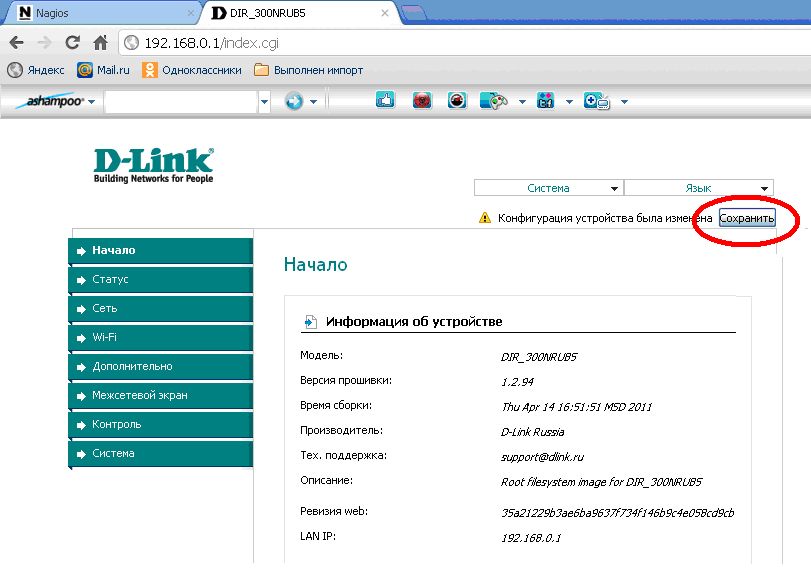
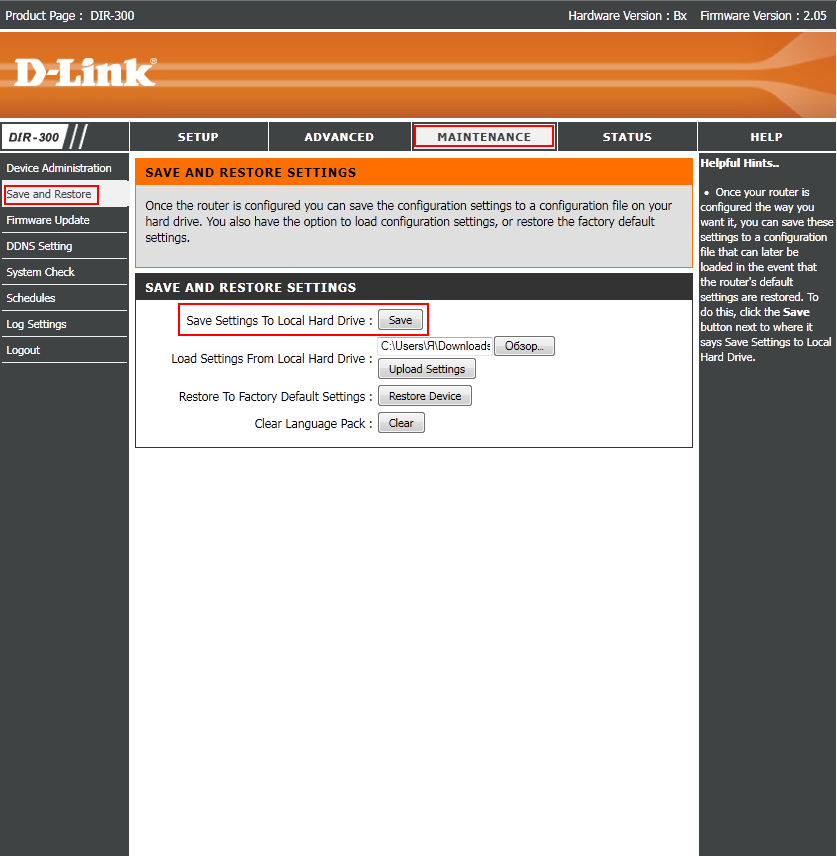
Теперь в пору скачать с официального сайта компании D-link, если конечно это еще не сделано, последнюю актуальную фпрошивку и языковой файл.
После окончания загрузки прошивки, необходимо сделать завершающие штрихи.
— Нажать на 30 сек кнопку сброс устройства
— запустить connect20.bat
— дождаться приглашения и выполнить следующее
RedBoot> fconfig img_entry_addr 0×80040000

img_entry_addr: Setting to 0×80040000

Update RedBoot non-volatile configuration – continue (y/n)? y

… Erase from 0xbfff0000-0xbfffffff: .

… Program from 0×80036400-0×80046400 at 0xbfff0000: .

RedBoot> fconfig img_flash_addr 0xbfc20000

img_flash_addr: Setting to 0xbfc20000

Update RedBoot non-volatile configuration – continue (y/n)? y

… Erase from 0xbfff0000-0xbfffffff: .

… Program from 0×80036400-0×80046400 at 0xbfff0000: .

RedBoot> fconfig img_length 0×003c0000

img_length: Setting to 0×003c0000

Update RedBoot non-volatile configuration – continue (y/n)? y

… Erase from 0xbfff0000-0xbfffffff: .

… Program from 0×80036400-0×80046400 at 0xbfff0000: .
После чего остается залогиниться учетными данными по умолчанию (смотрите наклейку на вашем устройстве) и залить языковой модуль.
Устройство вернулось к своему первоначальному виду.
![Прошиваем dd-wrt в d-link dir-300 [rtzra's hive]](https://wudgleyd.ru/wp-content/uploads/f/6/b/f6b11f77875af3fb6a08e78cc1f94422.png)


Удачи вам!
P.S. Возникла необходимость откатится на оригинальную прошивку, хочу оговориться, что процедуру пришлось повторить дважды т.к. с первого раза MAC адрес устройства не был восстановлен ![]()
Вероятно мои действия имели какую либо ошибку.
[edit] Install RedBoot
configure your local ip to 192.168.20.80
connect your lan cable to the WAN port of the router.
plugoff the power cord and replug it. You must press the RESET key for 5 sec.
now enter the redboot using telnet and ip 192.168.20.81 and port 9000. connect your lan cable to the dir300 wan port.
you might need several tries since its only available for 1 second after aprox. 5 sec. of booting
(below is a Windows & Linux access script for an easy way to connect to redboot)
When you succeed you will be rewarded with a RedBoot> prompt.
DIR-300 Info:
IP: 192.168.20.81/255.255.255.0, Gateway: 0.0.0.0
Default server: 192.168.20.80
now start a local tftp server on your computer and place ap61.ram as well as ap61.rom in the root dir of this server
back to the redboot enter:
load ap61.ram
go
now a new temporarily bootloader should start. (on serial console it will display some warning. but you dont need to care about). It will be waiting for connection at the LAN side of the router, so follow the instructions that follow.
Plug off your cable from the wan port and reconfigure your local (computer) ip to 192.168.1.2 (set your DHCP server to serve 192.168.1.1 as the only address in the DHCP pool and the TFTP must also be available at 192.168.1.2). Now you should be pluging on to any of the lan ports. Then connect via telnet to 192.168.1.1 (or to the ip your dhcp server served to the redboot) and port 9000. A DD-WRT> prompt should welcome you.
IMPORTANT: while doing the following steps. never plugoff the lan cable or the power cord
fis init
About to initialize  FLASH image system - continue (y/n)? y
*** Initialize FLASH Image System
... Erase from 0xbffe0000-0xbfff0000: .
... Program from 0x807f0000-0x80800000 at 0xbffe0000: .

ip_address -h 192.168.1.2
IP: 192.168.1.1/255.255.255.0, Gateway: 0.0.0.0
Default server: 192.168.1.2

load -r -b %{FREEMEMLO} ap61.rom
Using default protocol (TFTP)
Raw file loaded 0x80080000-0x800a8717, assumed entry at 0x80080000

fis create -l 0x30000 -e 0xbfc00000 RedBoot
An image named 'RedBoot' exists - continue (y/n)? y
... Erase from 0xbfc00000-0xbfc30000: ...
... Program from 0x80080000-0x800a8718 at 0xbfc00000: ...
... Erase from 0xbffe0000-0xbfff0000: .
... Program from 0x807f0000-0x80800000 at 0xbffe0000: .

reset
now the unit will reboot and the new bootloader will be executed and is waiting for your connection.
this will take 30+ sec.
[edit] Способ 1: использование веб-интерфейса маршрутизатора
Сбросьте настройки маршрутизатора к завродским значениям.
Это, скорее всего, не потребуется, но если память или NVRAM маршрутизатора почти заполнены, обновление прошивки может привести к его повреждению. Таким образом, рекомендуется, по крайней мере, до подробного знакомства с конкретным устройством.
Выполните сброс в веб-интерфейсе (Administration → Factory Defaults в DD-WRT) или используйте альтернативный метод:
Сброс 30/30/30
Внимание: на некоторых устройствах нельзя использовать сброс 30/30/30, включая все устройства ARM.
Кнопка сброса Reset: при нормальном функционировании маршрутизатора удерживайте кнопку сброса до тех пор, пока индикаторы не начнут мигать (или до 30 секунд). Будьте осторожны при использовании этого метода! Изучите инструкцию к вашей текущей прошивке, чтобы избежать проблем.
Войдите в веб-интерфейс маршрутизатора.
Для нормальной работы веб-интерфейса может потребоватся Javascript
Попробуйте другой браузер при возникновении проблем.
Вам будет предложено ввести имя пользователя и пароль. Если ваш маршрутизатор уже имеет версию DD-WRT, начиная с 28 февраля 2006 г., имя пользователя по умолчанию — root. В предыдущих версиях по умолчанию используется пустое имя пользователя. Как для заводской, так и для прошивки DD-WRT маршрутизаторов Linksys имя пользователя по умолчанию можно оставить пустым или установить любое значение, а пароль по умолчанию — admin. Для других маршрутизаторов выполните поиск значений по умолчанию в Интернете.
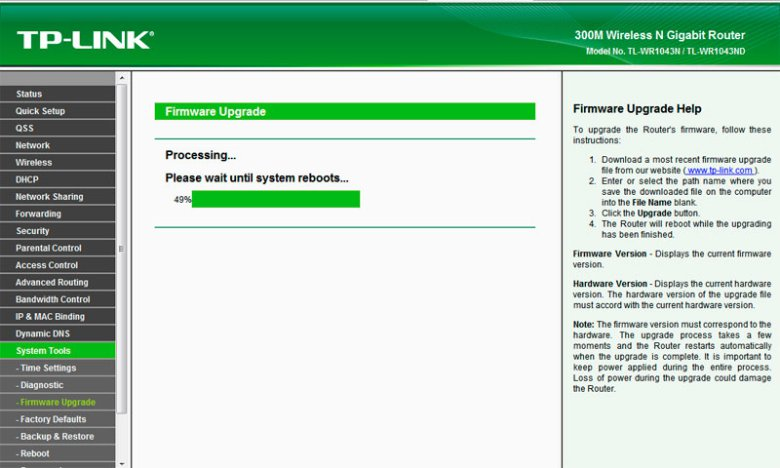
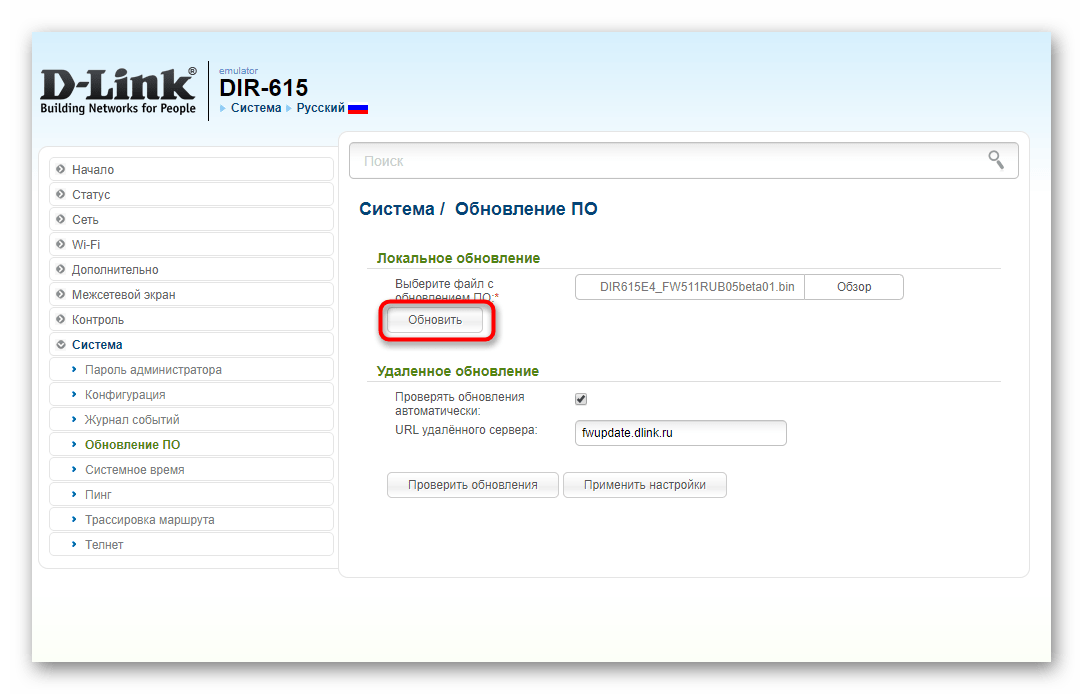
Загрузите прошивку.
ПРИМЕЧАНИЕ. При перепрошивке с заводской прошивки может потребоваться несколько перепрошивок подряд. См. для дополнительной информации.
ВНИМАНИЕ: Не прерывайте процесс, пока маршрутизатор мигает и перезагружается. Не выключайте компьютер, не закрывайте браузер и не выключайте маршрутизатор во время этого процесса!
Этот раздел инструкции написан для веб-интерфейса DD-WRT. Интерфейс заводской прошивки будет другим. Смотрите раздел .
Перейдите на вкладку Administration → Firmware Upgrade.
Необязательно: выберите параметр Reset to Defaults, чтобы сбросить настройки к заводским значениям после перепрошивки (примечание: это может вызвать проблемы при перепрошивке).
Нажмите кнопку «Browse» и выберите загруженный бинарный файл .bin прошивки DD-WRT, контрольная сумма которого проверена.
Нажмите кнопку «Upgrade» и дождитесь появления страницы перенаправления, подтверждающей успешную загрузку.
Подождите не менее 5 минут, прежде чем нажать кнопку «Continue». Это зависит от оборудования маршрутизатора.
При успешной прошивке теперь можно получить доступ к веб-интерфейсу DD-WRT по IP-адресу 192.168.1.1.
Снова сбросьте настройки маршрутизатора к завродским значениям.
Делайте это только после того, как убедитесь, что маршрутизатор работает после обновления прошивки.
Это требуется при перепрошивке из заводской прошивки! Смотрите раздел выше.
В случае обновления версии DD-WRT это необходимо только при больших скачках в версии сборки, изменении версии ядра (например, с 2.4 на 2.6 или с 2.6 на 3.10) или при наличии проблем. Для последнего, сбросьте, повторно протестируйте, и затем ищите форум, прежде чем сделать новое сообщение.
Возможные ошибки при загрузке прошивки.
Если веб-интерфейс DD-WRT не доступен через 10 минут, попробуйте очистить кэш браузера, обновить IP-адрес («ipconfig -renew» в окне командной строки Windows), выполнить другой сброс или отключить питание.
Проверьте связь с маршрутизатором командой Ping: ответ TTL=64 указывает на нормальную работу, а TTL=100 обычно указывает на TFTP-сервер, ожидающий загрузки прошивки. Сервер TFTP, как правило, доступен только в первые пару секунд после включения питания. См. статью Tftp flash.
Процесс загрузки прошивки может завершится сообщением «Upload Failed» («Ошибка загрузки»), если используется неверный тип файла, ядро или размер бинарного файла прошивки DD-WRT (или может просто «превратиться кирпич»). Например, это может произойти, если вы используете файл wrt54g.bin тогда, когда вам нужно было выбрать generic версию. Также для некоторых маршрутизаторов может потребоватся, чтобы сборка Mini была перепрошита перед полной версией. Убедитесь, что у вас правильная версия, как описано в первом разделе.
См. статью Recover from a Bad Flash («Восстановление при неудачной перепрошивке») или попробуйте другой браузер для загрузки прошивки.
Если не удается выполнить вход в систему, используя имя пользователя и пароль по умолчанию, выполните сброс еще раз.
[edit] Проведите предварительное исследование
Прочтите часто задаваемые вопросы по прошивке на странице Часто задаваемые вопросы.
Если вы не подготовитесь и не проведете предварительное исследование, это может привести к значительному разочарованию, потере времени и сделает ваш маршрутизатор нерабочим. Другими словами, вам, возможно, придется буквально выбросить его или потратить много времени на его восстановление. С некоторыми исследованиями вы сэкономите много часов времени.
Будьте осторожны с использованием этой текущей страницы вики в качестве инструкции по перепрошивке. Рекомендуется в качестве руководства использовать страницу вашего роутера в разделе Hardware-specific
Тем не менее, чтение этой страницы важно для общего понимания.
[edit] Install DD-WRT
The following will work for the initial flash AND a recovery
connect to the bootloader with telnet on port 9000 and ip 192.168.1.1 (If you have installed Micro_Redboot read the wiki page about it first)
now do the following (consider that fis create operations are taking sometimes *several* minutes to finish, in my particular case it took more than 5 minutes):
fis init
ip_address -h 192.168.1.2
load -r -b 0x80041000 linux.bin
fis create linux
fconfig boot_script true
fconfig boot_script_timeout 5
now type fconfig again and configure the bootscript to:
fis load -l linux
exec
and press enter for every other option to confirm the defaults.
Now type reset again. The unit should now boot dd-wrt and work as known from other atheros based platforms
You are done now. Wait for your router to reboot. It will take about 1-2 minutes. It may blink and reset once or twice (as noted).
Now open a Browser and connect to address 192.168.1.1 you should be able to see the dd-wrt page.
That’s All
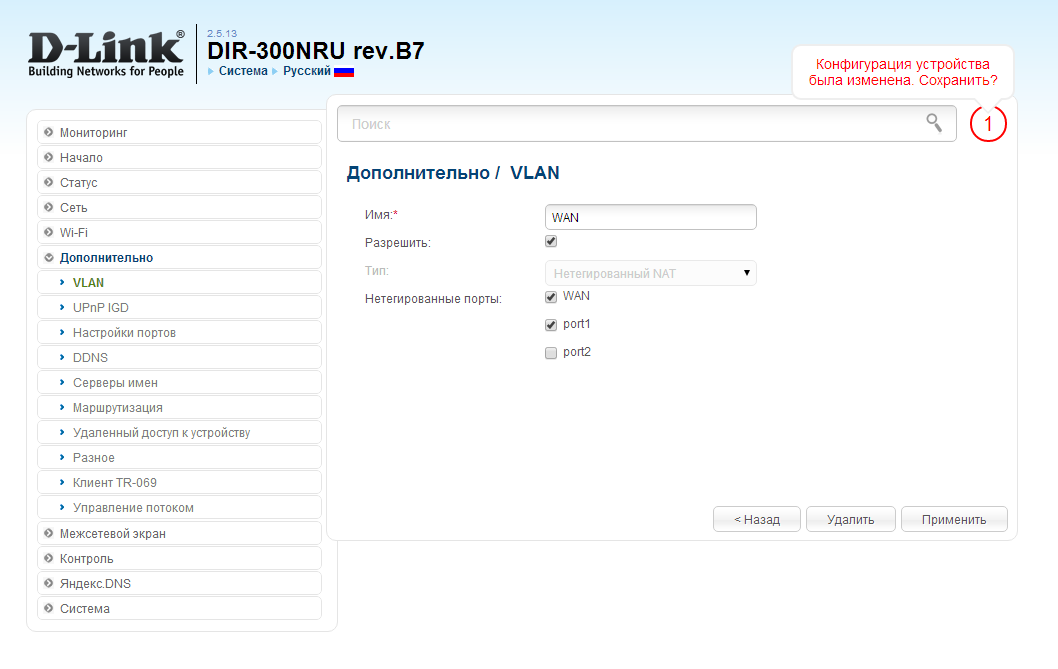
Specific configuration
Interfaces
The default network configuration is:
| Interface Name | Description | Default configuration |
|---|---|---|
| br-lan | LAN & WiFi | 192.168.1.1/24 |
| eth0.1 | LAN ports (1 to 4) | None |
| eth0.2 | WAN port | DHCP |
| ath0 | WiFi | Disabled |
Switch Ports (for VLANs)
Numbers 0-3 are Ports 1-4 as labeled on the unit, number 4 is the Internet (WAN) on the unit, 5 is the internal connection to the router itself. Don’t be fooled: Port 1 on the unit is number 3 when configuring VLANs. vlan0 = eth0.0, vlan1 = eth0.1 and so on.
| Port | Internet (WAN) | LAN 1 | LAN 2 | LAN 3 | LAN 4 |
|---|---|---|---|---|---|
| Switch port | 4 | 3 | 2 | 1 |
Failsafe mode
→ failsafe_and_factory_reset
- Unplug the router’s power cord
- Connect any router LAN port directly to your PC
- Configure your PC with a static IP address: 192.168.1.2
- Plug the power on to the router
- Wait until the “SYS” LED starts flashing repeatedly
- Press the button (on the side of the router) – the “SYS” LED will now start flashing at a faster rate
- Login to the router by using telnet to connect to the IP address 192.168.1.1 – there will be an immediate unauthenticated login to a root shell
Commands:
- mount_root — will mount the normal root filesystem
- firstboot — all settings will be reset
[edit] Install DD-WRT
The following will work for the initial flash AND a recovery
connect to the bootloader with telnet on port 9000 and ip 192.168.1.1 (If you have installed Micro_Redboot read the wiki page about it first)
![[openwrt wiki] d-link dir-300 rev.a1 (airlink ar335w/ar430w)](https://wudgleyd.ru/wp-content/uploads/6/c/c/6cc3c04f3e7a3a53efa53ea183071a51.jpeg)
now do the following (consider that fis create operations are taking sometimes *several* minutes to finish, in my particular case it took more than 5 minutes):
fis init
ip_address -h 192.168.1.2
load -r -b 0x80041000 linux.bin
fis create linux
fconfig boot_script true
fconfig boot_script_timeout 5
now type fconfig again and configure the bootscript to:
fis load -l linux
exec
and press enter for every other option to confirm the defaults.
Now type reset again. The unit should now boot dd-wrt and work as known from other atheros based platforms
You are done now. Wait for your router to reboot. It will take about 1-2 minutes. It may blink and reset once or twice (as noted).
Now open a Browser and connect to address 192.168.1.1 you should be able to see the dd-wrt page.
That’s All


