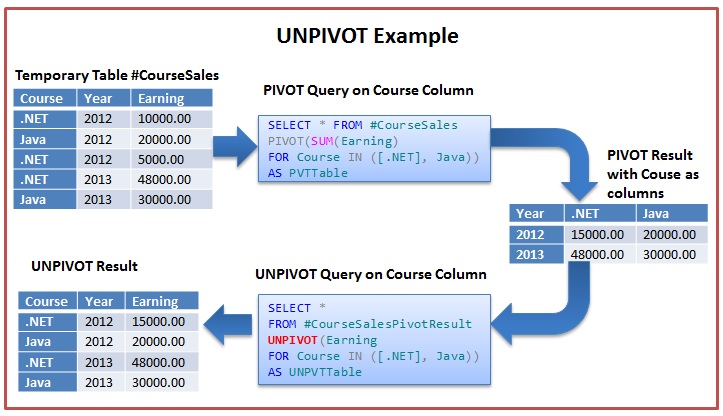
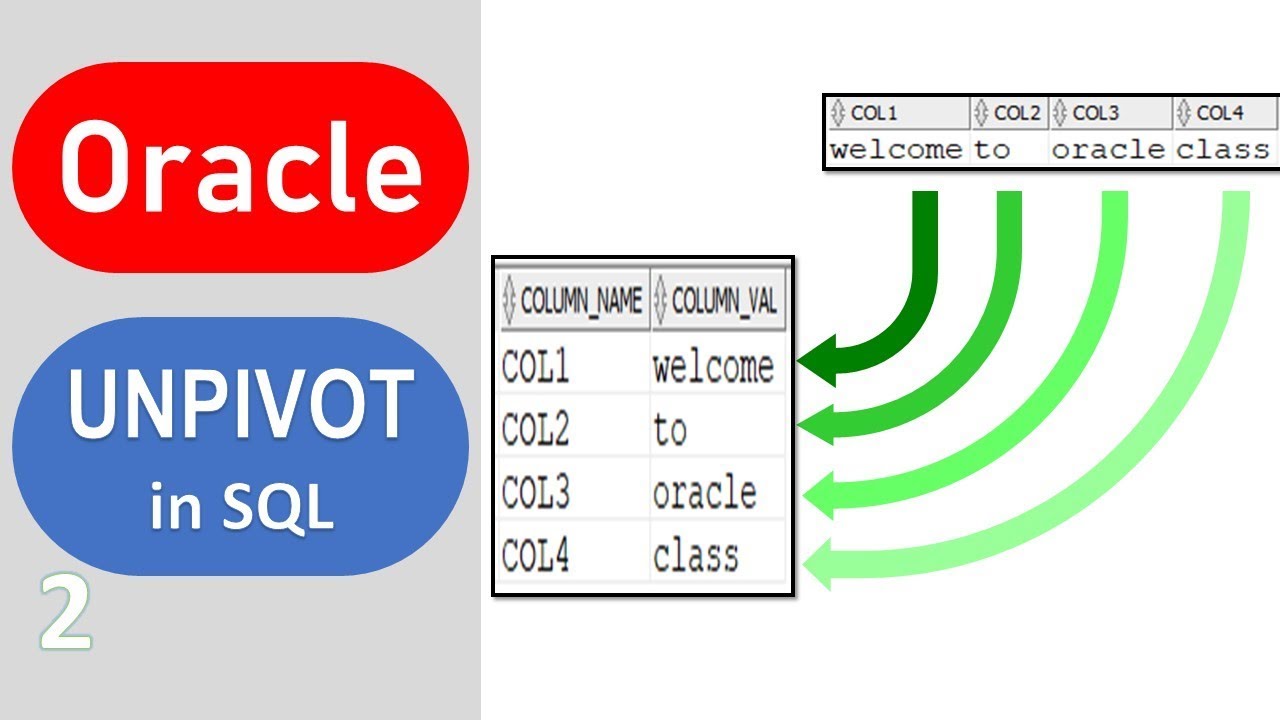
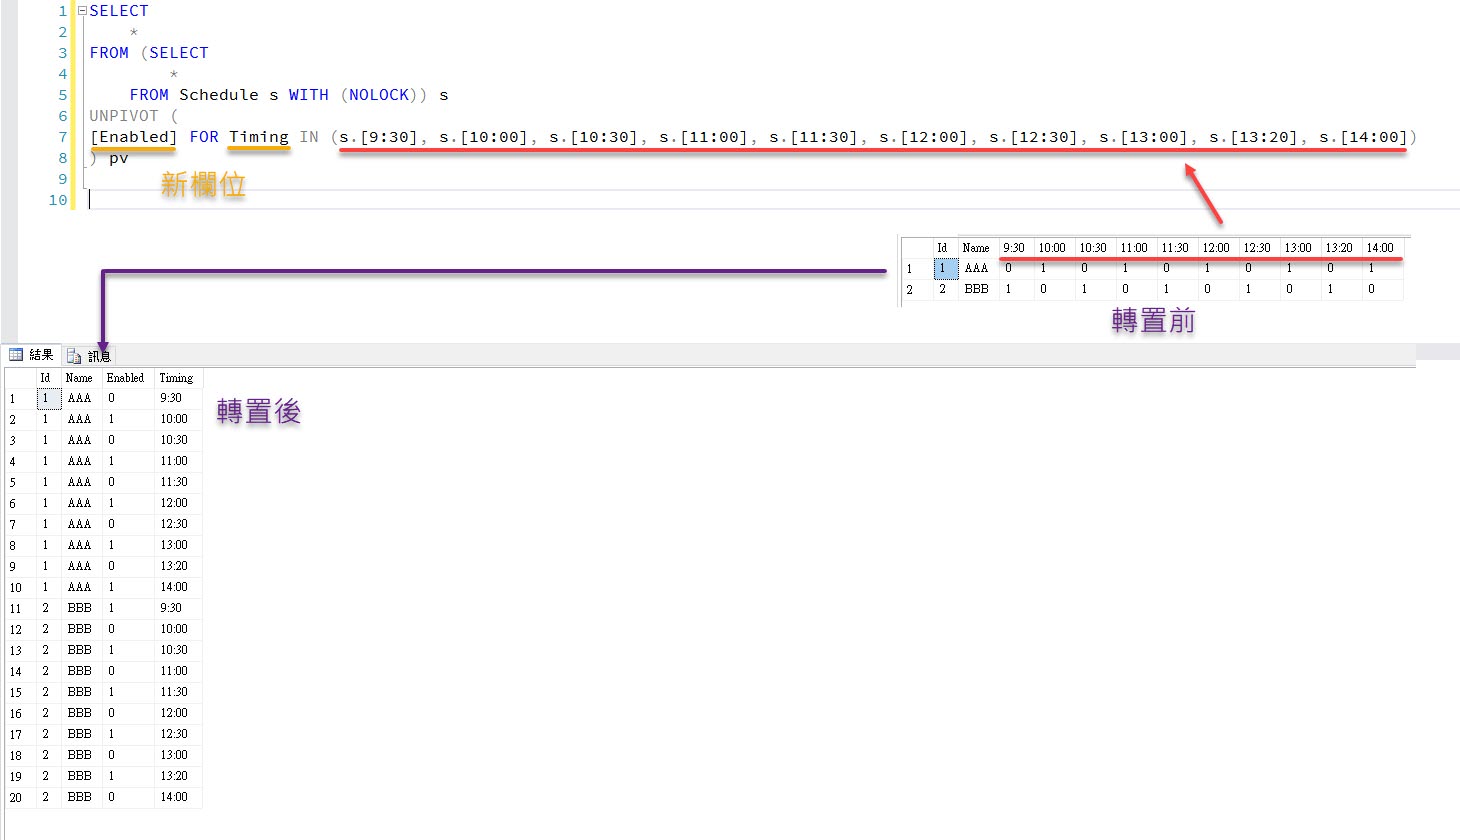
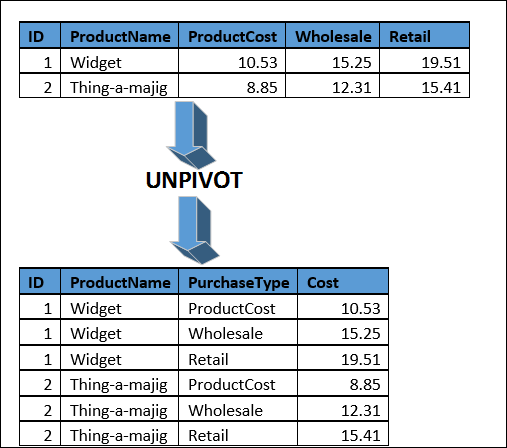
UNPIVOT
The operator converts column-based data into separate rows. To see the operator in action we need to create a test table.
CREATE TABLE unpivot_test (
  id              NUMBER,
  customer_id     NUMBER,
  product_code_a  NUMBER,
  product_code_b  NUMBER,
  product_code_c  NUMBER,
  product_code_d  NUMBER
);

INSERT INTO unpivot_test VALUES (1, 101, 10, 20, 30, NULL);
INSERT INTO unpivot_test VALUES (2, 102, 40, NULL, 50, NULL);
INSERT INTO unpivot_test VALUES (3, 103, 60, 70, 80, 90);
INSERT INTO unpivot_test VALUES (4, 104, 100, NULL, NULL, NULL);
COMMIT;
So our test data starts off looking like this.
SELECT * FROM unpivot_test;

        ID CUSTOMER_ID PRODUCT_CODE_A PRODUCT_CODE_B PRODUCT_CODE_C PRODUCT_CODE_D
---------- ----------- -------------- -------------- -------------- --------------
         1         101             10             20             30
         2         102             40                            50
         3         103             60             70             80             90
         4         104            100

4 rows selected.

SQL>
The operator converts this column-based data into individual rows.
SELECT *
FROM   unpivot_test
UNPIVOT (quantity FOR product_code IN (product_code_a AS 'A', product_code_b AS 'B', product_code_c AS 'C', product_code_d AS 'D'));

        ID CUSTOMER_ID P   QUANTITY
---------- ----------- - ----------
         1         101 A         10
         1         101 B         20
         1         101 C         30
         2         102 A         40
         2         102 C         50
         3         103 A         60
         3         103 B         70
         3         103 C         80
         3         103 D         90
         4         104 A        100

10 rows selected.

SQL>
There are several things to note about the query:
- The required column names, in this case and , are define in the clause. These can be set to any name not currently in the driving table.
- The columns to be unpivoted must be named in the clause.
- The value will match the column name it is derived from, unless you alias it to another value.
- By default the clause is used. To override the default behaviour use the clause.
The following query shows the inclusion of the clause.
SELECT *
FROM   unpivot_test
UNPIVOT INCLUDE NULLS (quantity FOR product_code IN (product_code_a AS 'A', product_code_b AS 'B', product_code_c AS 'C', product_code_d AS 'D'));

        ID CUSTOMER_ID P   QUANTITY
---------- ----------- - ----------
         1         101 A         10
         1         101 B         20
         1         101 C         30
         1         101 D
         2         102 A         40
         2         102 B
         2         102 C         50
         2         102 D
         3         103 A         60
         3         103 B         70
         3         103 C         80

        ID CUSTOMER_ID P   QUANTITY
---------- ----------- - ----------
         3         103 D         90
         4         104 A        100
         4         104 B
         4         104 C
         4         104 D

16 rows selected.

SQL>
Prior to 11g, we can get the same result using the DECODE function and a pivot table with the correct number of rows. In the following example we use the CONNECT BY clause in a query from dual to generate the correct number of rows for the unpivot operation.
SELECT id,
       customer_id,
       DECODE(unpivot_row, 1, 'A',
                           2, 'B',
                           3, 'C',
                           4, 'D',
                           'N/A') AS product_code,
       DECODE(unpivot_row, 1, product_code_a,
                           2, product_code_b,
                           3, product_code_c,
                           4, product_code_d,
                           'N/A') AS quantity
FROM   unpivot_test,
       (SELECT level AS unpivot_row FROM dual CONNECT BY level
For more information see:
- PIVOT and UNPIVOT Operators in Oracle Database 11g
Hope this helps. Regards Tim…
Синтаксис
Синтаксис предложения PIVOT в SQL Server (Transact-SQL):
SELECT first_column AS ,
, , …
FROM
() ASPIVOT
(
aggregate_function()
FOR
IN (, , … )
) AS ;
Параметры или аргументы
first_column — столбец или выражение, которое будет отображаться в качестве первого столбца в сводной таблице.first_column_alias — заголовок столбца для первого столбца в сводной таблице.pivot_value1, pivot_value2, … pivot_value_n — список значений для поворота.source_table — оператор SELECT, который предоставляет исходные данные для сводной таблицы.source_table_alias — псевдоним для source_table.aggregate_function — агрегирующая функция, такая как SUM, COUNT, MIN, MAX или AVG.aggregate_column — столбец или выражение, которое будет использоваться с aggregate_function.pivot_column — столбец, содержащий значения поворота.pivot_table_alias — псевдоним для сводной таблицы.
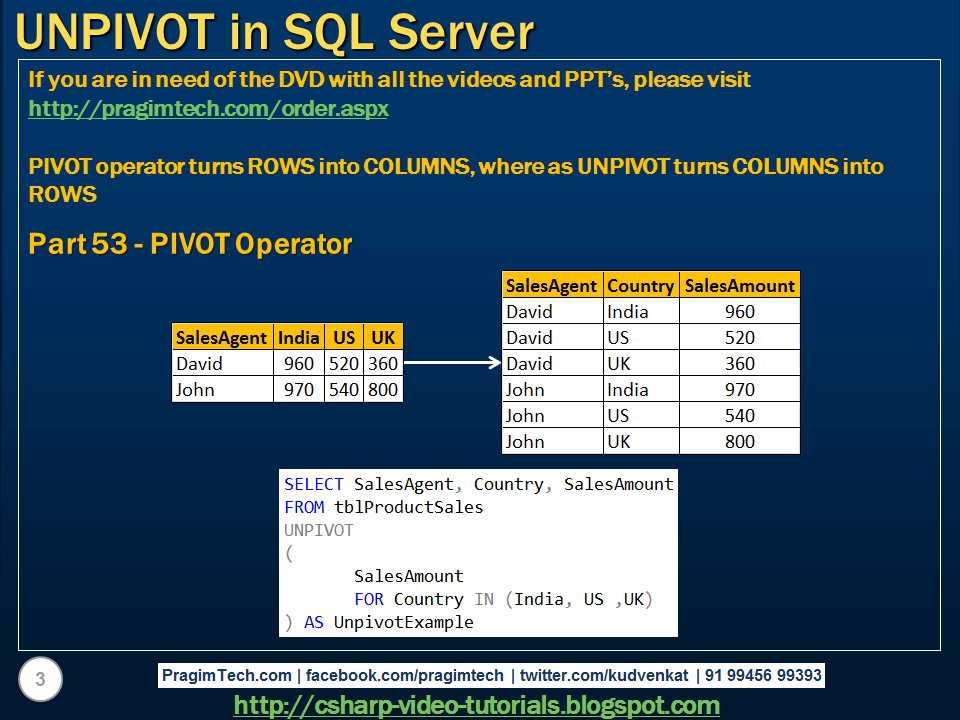
Операторы PIVOT и UNPIVOT
Pivot и unpivot являются нестандартными реляционными операторами, которые поддерживаются Transact-SQL. Вы можете их использовать для манипулирования выражением табличного значения в другой таблице, pivot преобразует такое значение, возвращая уникальные значения одного столбца этого выражения в виде множества столбцов, и выполняет агрегирование любых остальных значений столбца, которые нужны в результирующем выводе.
В примере 24.24 показано, как работает pivot.
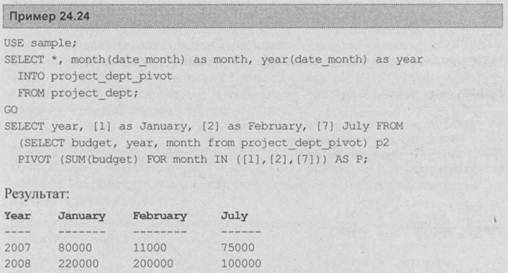
В первой части примера 24.24 создается новая таблица, project_dept_pivot, которая будет использована для демонстрации того, как работает оператор pivot. Эта таблица идентична таблице projectdept (введенной в примере 24.1), за исключением двух дополнительных столбцов: month и year. Столбец month таблицы projectdeptpivot содержит годы 2007 и 2008, которые появляются в столбце date_month таблицы projectdept. Также столбцы month таблицы project_dept_pivot (January, February и July) содержат итоговые значения бюджетов, соответствующие этим месяцам в таблице projectdept.
Второй оператор select содержит внутренний запрос, который встроен в предложение from внешнего запроса. Предложение pivot является частью внутреннего запроса. Оно начинается с задания агрегатной функции sum (суммы бюджетов). Вторая часть задает основной столбец (month) и значения этого столбца, которые будут использоваться в качестве заголовков столбца (в примере 24.24 это первый, второй и седьмой месяц года). Значение конкретного столбца в строке вычисляется с использованием заданной агрегатной функции над строками, которые соответствуют заголовку столбца.
Оператор unpivot выполняет реверсирование операции pivot путем циклического сдвига столбцов в строках. В примере 24.25 показано использование этого оператора.
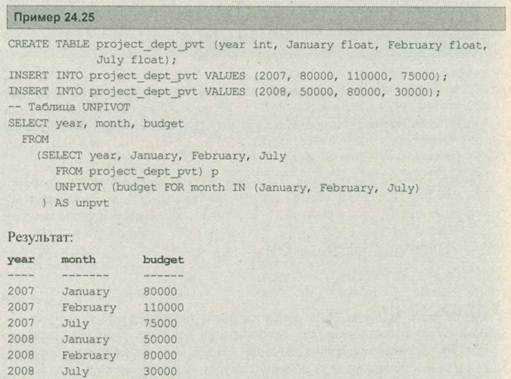
В примере 24.25 используется таблица project_dept_part для демонстрации реляционного оператора unpivot. Первыми входными данными unpivot является имя столбца (budget), который содержит нормализованные значения.
После этого опция for применяется для определения имени целевого столбца (month). Под конец в качестве части опции in указываются выбранные значения целевого столбца.
Универсальный генератор строк для оператора Unpivot в Oracle11g
(Flexible Row Generator with Oracle 11g Unpivot Operator, by Lucas Jellema)
Генератор
строк — очень полезный механизм для многих (полу-) продвинутых SQL-запросов. В
предыдущих статьях мы обсудили различные методы генерации строк.
Тому примерами являются оператор CUBE, табличные функции (Table Functions)
и фраза «Connect By Level < #» количества подходящих записей, не говоря уже о старом добром UNION ALL
с многократным «select from dual». Эти приемы разнятся по гибкости и компактности. CUBE
и Connect By обеспечивают легкую генерацию большого количества строк как с незначительным, так и
сложным управлением значениями в таких строках, в то время как UNION ALL сложен и громоздок, даже при том, что он
предоставляет большие возможности управления точными значениями.
Оператор Unpivot в Oracle11g предоставляет нам новый способ
сгенерировать строки с великолепными возможностями управления над значениями в
строках и более компактный и изящный синтаксис, чем альтернатива UNION ALL.
Давайте рассмотрим простой пример.
Предположим, что нам нужен набор строк с определенными значениями, возможно, для использования в качестве встроенного представления
внутри нашего сложного запроса или в качестве автономного представления. В этом примере я взял шесть довольно бесполезных величин, но он излагает концепцию,
что значение имеет.
Единственным select-предложением выборки из DUAL, а не шестью запросами из DUAL, которые по
UNION ALL вместе, мы выбираем шесть требуемых значений, как из индивидуальных столбцов – от a
до f. Оператор UNPIVOT, который мы затем применяем к этому результату, берет единственную строку с шестью столбцами и превращает ее в шесть строк с двумя
столбцами, один из которых содержит имя исходного столбца исходной строки, а другой — значение в том исходном столбце:
select *
from   ( ( select ‘value1′  a
           ,      ‘value27′ b
           ,      ‘value534′ c
           ,      ‘value912′ d
           ,      ‘value1005′ e
           ,      ‘value2165′ f
           from dual
         )
              unpivot  >
              ( value
                for value_type in ( a,b,c,d,e, f)
              )
       )
/
Результат этого запроса таков:
:
V VALUE
- ———
A value1
B value27
C value534
D value912
E value1005
F value2165

6 rows selected.
Замечание:
в ситуациях, где требуется прямая генерация большого количества строк, прием strong>«CONNECT BY» все
еще будет превалирующим. Например, чтобы сгенерировать алфавит, следует использовать предложение типа:
1  select chr(rownum+64) letter
 2  from   (select level
 3          from   dual
 4          connect
 5          by     level<27
 6*        )
Однако, чтобы сгенерировать поднабор, скажем, все гласные из алфавита, подход с применением оператора strong>UNPIVOT
может оказаться полезным.
select vowel
from   ( ( select ‘a’ v1
           ,      ‘e’ v2
           ,      ‘i’ v3
           ,      ‘o’ v4
           ,      ‘u’ v5
           from dual
         )
              unpivot
              ( vowel
                for dummy in ( v1,v2,v3,v4,v5)
              )
       )
/
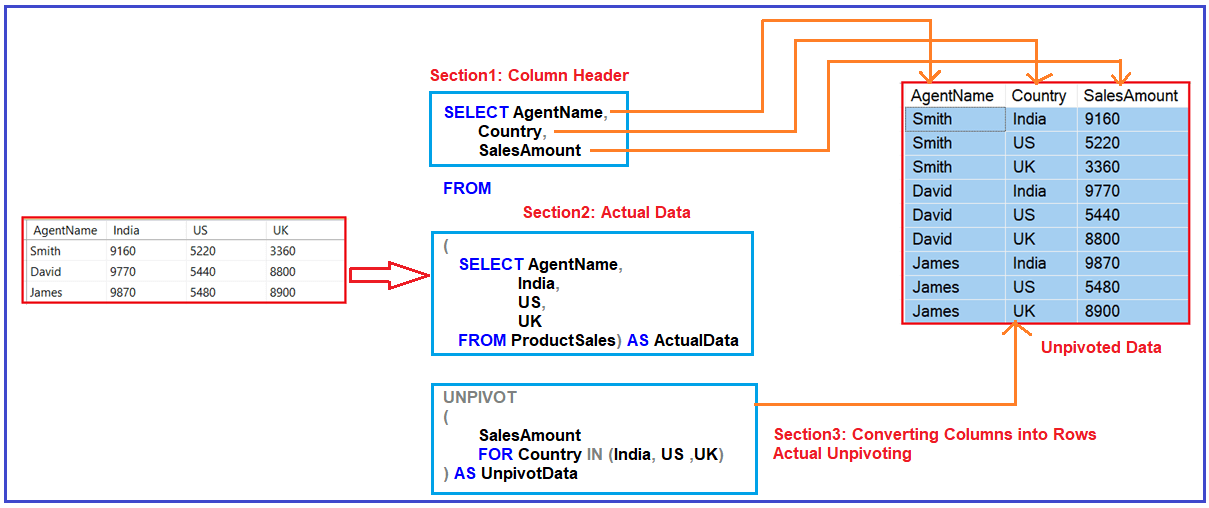
Transposing Columns into Rows with UNPIVOT
The SQL PIVOT keyword we’ve looked at above will translate rows into columns. Oracle offers an UNPIVOT keyword, which performs the opposite. It transforms columns into rows.
The syntax of the SQL UNPIVOT keyword is:
It has a similar structure to the PIVOT keyword, with a few differences:
- It allows you to treat NULL values in a specific way.
- It does not include the XML keyword.
- It does not de-aggregate rows, as the query has no knowledge of the data behind the aggregation.
There are a few clauses with the UNPIVOT keyword:
- unpivot_clause: This specifies the name of the column for each of the column values from the pivoted data.
- unpivot_for_clause: This specifies the name of the column for the number values shown in the pivoted data.
- unpivot_in_clause: This specifies the list of pivoted columns.
If this sounds confusing, some examples will help to explain it better.
SQL Pivot Tables with Two Column Examples
Here is an other example for pivot tables in sql again that can be run on SQL Server AdventureWorks sample database.
This Pivot table is formed of two columns on the left side of the pivot format and again as month values on the dimension.
Code
Here is the pivot table view of the above t-sql select statement.

Of course it is not best practise to write month names in Transact-SQL statements like in above examples.
Instead of writing month name list manually, developers can use the SQL function ListMonthNames() that will return a list of month names along with month numbers.
Then the sql script can be build by using a dynamic pivot table query like shown in following section.


Оператор UNPIVOT
UNPIVOT – это оператор Transact-SQL, который выполняет действия, обратные PIVOT. Сразу скажу, что да он разворачивает таблицу в обратную сторону, но в отличие от оператора PIVOT он ничего не агрегирует и уж тем более не раз агрегирует.
UNPIVOT требуется еще реже, чем PIVOT, но о нем также необходимо знать.
Здесь я думаю, давайте сразу перейдем к рассмотрению примера.
Пример использования UNPIVOT
Допустим, таблица имеет следующую структуру:
   CREATE TABLE .(
         (50) NULL,
          NULL,
          NULL,
          NULL,
          NULL,
          NULL,
   ) ON
   GO
Где, fio — ФИО сотрудника, а number1, number2… и так далее это какие-то номера этого сотрудника:)
Данные будут, например, такие:

И допустим, нам необходимо развернуть эту таблицу, для этого мы будем использовать оператор UNPIVOT, а запрос будет выглядеть следующим образом:
   SELECT fio, column_name, number
   FROM dbo.test_table_unpivot
   UNPIVOT(
          number for column_name in (
                                     ,,,,
                                     )
          )AS test_unpivot
Где,
- fio – столбец с ФИО, он в принципе не изменился;
- column_name – псевдоним столбца, который будет содержать названия наших колонок;
- number – псевдоним для значений из столбцов number1, number2…
Aliasing PIVOT Columns
The queries we’ve looked at so far will display the column headers as the customer_id values that are stored in the table. What if you want to give them a different name? The PIVOT keyword allows you to specify a column alias. This can be done on both the pivot_clause and the pivot_in_clause.
This example gives an alias to the SUM value:
You can see that we have aliased the SUM(sale_amount) using AS sales_total. The results of this query are:
| location | 1_SALES_TOTAL | 2_SALES_TOTAL | 3_SALES_TOTAL | 4_SALES_TOTAL |
| west | 545 | (null) | 1382 | (null) |
| central | (null) | (null) | 433 | 584 |
| north | 1128 | 875 | (null) | 987 |
| south | (null) | 881 | 714 | (null) |
| east | 192 | 147 | 407 | 785 |
The Oracle PIVOT column names are now displaying as 1_SALES_TOTAL, 2_SALES_TOTAL, and so on. This has been determined by the <customer_id>_<alias_name>. The first column of 1_SALES_TOTAL is the sales_total value for customer_id 1.
Instead, you could alias the column values inside the IN clause:
| location | CUST1 | CUST2 | CUST3 | CUST4 |
| west | 545 | (null) | 1382 | (null) |
| central | (null) | (null) | 433 | 584 |
| north | 1128 | 875 | (null) | 987 |
| south | (null) | 881 | 714 | (null) |
| east | 192 | 147 | 407 | 785 |
The columns values are showing exactly what you aliased them as. Instead of showing 1 it shows CUST1.
Finally, you can combine the pivot_clause alias and the pivot_in_clause alias:
| location | CUST1_SALES_TOTAL | CUST2_SALES_TOTAL | CUST3_SALES_TOTAL | CUST4_SALES_TOTAL |
| west | 545 | (null) | 1382 | (null) |
| central | (null) | (null) | 433 | 584 |
| north | 1128 | 875 | (null) | 987 |
| south | (null) | 881 | 714 | (null) |
| east | 192 | 147 | 407 | 785 |
This has concatenated both the alias from the pivot_in_clause (cust1) and the alias from the pivot_clause (sales_total), separating them by an underscore: cust1_sales_total.
3.3.4. Функция, возвращающая таблицу
В следующем примере мы создаем функцию, которая будет возвращать в качестве результата таблицу. В качестве примера, создадим функцию, которая будет возвращать таблицу товаров, и для каждой строки рассчитаем произведение колонок количества и цены:
CREATE FUNCTION GetPrice()
RETURNS TABLE
AS
 RETURN
 (
  SELECT Дата, , Цена,
    Количество, Цена*Количество AS Сумма
  FROM Товары
 )
Начало функции такое же, как у скалярной – указываем оператор CREATE FUNCTION и имя функции. Я специально создал эту функцию без параметров, чтобы вы увидели, как это делается. Не смотря на то, что параметров нет, после имени должны идти круглые скобки, в которых не надо ничего писать. Если не указать скобок, то сервер вернет ошибку и функция не будет создана.
Разница есть и в секции RETURNS, после которой указывается тип TABLE, что говорит о необходимости вернуть таблицу. После этого идет ключевое слово AS и RETURN, после которого должно идти возвращаемое значение. Для функции данного типа в секции RETURN нужно в скобках указать запрос, результат которого и будет возвращаться функцией.
Когда пишете запрос, то все его поля должны содержать имена. Если одно из полей не имеет имени, то результатом выполнения оператора CREATE FUNCTION будет ошибка. В нашем примере последнее поле является результатом перемножения полей «Цена» и «Количество», а такие поля не имеют имени, поэтому мы его задаем с помощью ключевого слова AS.
Посмотрим, как можно использовать такую функцию с помощью оператора SELECT:
SELECT *
FROM GetPrice()
Так как мы используем простой оператор SELECT, то мы можем и ограничивать вывод определенными строками, с помощью ограничений в секции WHERE. Например, в следующем примере выбираем из результата функции только те строки, в которых поле «Количество» содержит значение 1:
SELECT * FROM GetPrice()
WHERE Количество=1
Функция возвращает в качестве результата таблице, которую вы можете использовать как любую другую таблицу базы данных. Давайте создадим пример в котором можно будет увидеть использование функции в связи с таблицами. Для начала создадим функцию, которая будет возвращать идентификатор работников таблицы tbPeoples и объединенные в одно поле ФИО:
CREATE FUNCTION GetPeoples()
RETURNS TABLE
AS
 RETURN
 (
  SELECT idPeoples, vcFamil+' '+vcName+' '+vcSurName AS FIO
  FROM tbPeoples
 )
Функция возвращает нам идентификатор строки, с помощью которого мы легко можем связать результат с таблицей телефонов. Попробуем сделать это с помощью простого SQL запроса:
SELECT *
FROM GetPeoples() p, tbPhoneNumbers pn
WHERE p.idPeoples=pn.idPeoples
Как видите, функции, возвращающие таблицы очень удобны. Они больше, чем процедуры похожи на объекты просмотра, но при этом позволяют принимать параметры. Таким образом, можно сделать так, чтобы сама функция возвращала нам только то, что нужно. Вьюшки такого не могут делать по определению. Чтобы получить нужные данные, вьюшка должна выполнить свой SELECT запрос, а потом уже во внешнем запросе мы пишем еще один оператор SELECT, с помощью которого ограничивается вывод до необходимого. Таким образом, выполняется два запроса SELECT, что для большой таблицы достаточно накладно. Функция же может сразу вернуть только то, что нужно.
Рассмотрим пример, функция GetPeoples у нас возвращает все строки таблицы. Чтобы получить только нужную фамилию, нужно писать запрос типа:
SELECT *
FROM GetPeoples()
WHERE FIO LIKE 'ПОЧЕЧКИН%'
В этом случае будут выполняться два запроса: этот и еще один внутри функции. Но если передавать фамилию в качестве параметра в функцию и там сделать секцию WHERE, то можно обойтись и одним запросом SELECT:
CREATE FUNCTION GetPeoples1(@Famil varchar(50))
RETURNS TABLE
AS
 RETURN
 (
  SELECT idPeoples, vcFamil+' '+vcName+' '+vcSurName AS FIO
  FROM tbPeoples
  WHERE vcFamil=@Famil
 )
Пример
Оператор PIVOT может использоваться в SQL Server (Transact-SQL).
Рассмотрим пример. Если бы у нас была таблица employees, которая содержала следующие данные:
| employee_number | last_name | first_name | salary | dept_id |
|---|---|---|---|---|
| 14012 | Зубова | Рената | 54000 | 45 |
| 28954 | Маркин | Тибул | 80000 | 45 |
| 31957 | Скрепкин | Григорий | 42000 | 45 |
| 41312 | Платов | Роман | 57500 | 30 |
| 64029 | Корнеев | Иван | 65000 | 30 |
И мы запустили следующий оператор SQL, который создает кросс-табулирующий запрос с использованием предложения PIVOT:
Transact-SQL
SELECT ‘TotalSalary’ AS TotalSalaryByDept,
,
FROM
(SELECT dept_id, salary
FROM employees) AS SourceTable
PIVOT
(
SUM(salary)
FOR dept_id IN (, )
) AS PivotTable;
|
1 |
SELECT’TotalSalary’ASTotalSalaryByDept, , FROMemployees)ASSourceTable PIVOT SUM(salary) FORdept_idIN(,) |
Это вернет следующий результат:
| TotalSalaryByDept | 30 | 45 |
|---|---|---|
| TotalSalary | 122500 | 176000 |
В этом примере создается сводная таблица для отображения TotalSalary (общей зарплаты) для dept_id 30 и dept_id 45. Результаты отображаются в одной строке, причем два dept_id (отдела) отображаются в каждом столбце.
Теперь давайте разобъем предложение PIVOT и объясним, как это работает.
Определение столбцов в результатах кросс-табуляции
Во-первых, мы хотим указать, какие поля включать в результаты кросс-табуляции. В этом примере мы хотим включить литеральное значение «TotalSalary» в качестве первого столбца в сводной таблице. И мы хотим создать один столбец для dept_id 30 и второй столбец для dept_id 45. Это дает нам 3 столбца в нашей сводной таблице.
Transact-SQL
SELECT ‘TotalSalary’ AS TotalSalaryByDept,
,
|
1 |
SELECT’TotalSalary’ASTotalSalaryByDept, , |
Укажем данные исходной таблицы
Затем нам нужно указать оператор SELECT, который вернет исходные данные для сводной таблицы.
В этом примере мы хотим вернуть значения dept_id и salary из таблицы employees:
Transact-SQL
(SELECT dept_id, salary
FROM employees) AS SourceTable
|
1 |
(SELECTdept_id,salary FROMemployees)ASSourceTable |
Вы должны указать псевдоним для исходного запроса. В этом примере мы использовали псевдоним запроса как SourceTable.


Указать агрегирующую функцию
Затем нам нужно указать, какую агрегирующую функцию использовать при создании нашего запроса для кросс — табуляции. Вы можете использовать любую агрегирующую функцию, такую как функции SUM, COUNT, MIN, MAX или AVG.
В этом примере мы будем использовать функцию SUM. Это суммирует значения salary:
Transact-SQL
PIVOT
(SUM(salary)
|
1 |
PIVOT (SUM(salary) |
Указать Pivot значеня
Наконец, нам нужно указать, какие pivot значения включать в наши результаты. Они будут использоваться в качестве заголовков столбцов в нашем запросе кросс-табуляции.
В этом примере мы вернем только значения dept_id 30 и 45. Эти значения станут заголовками столбцов в нашей pivot таблице
Также обратите внимание, что эти значения представляют собой конечный список значений dept_id и не обязательно будут содержать все возможные значения
Transact-SQL
FOR dept_id IN (, )
| 1 | FORdept_idIN(,) |
Теперь, когда мы собираем все это вместе, мы получаем следующую pivot таблицу:
| TotalSalaryByDept | 30 | 45 |
|---|---|---|
| TotalSalary | 122500 | 176000 |
What is UNPIVOT in SQL server?
As the PIVOT converts tables rows into columns UNPIVOT exactly does the reverse. UNPIVOT operates on an already pivoted resultset in terms of retry original resultset. In UNPIVOT statement you have to specify two columns first columns contains the value from the no of pivoted columns and the second column includes the name of pivoted columns.
So, now let’s take one example that clearly explains how you can convert row-level data to the column level and how you can convert column level to the row-level data using pivot and unpivots. Here we will take a small example of a sales and inventory management system where we will display product wise sales based on the year.
Простой способ транспонирования столбцов и строк в Sql?
как я могу просто переключать столбцы со строками в SQL? Есть ли простая команда для транспонирования?
ie повернуть этот результат:
PIVOT кажется слишком сложным для этого сценария.
Дополнительная Информация:
- дана таблица имя, вы можете определить все имена столбцов из sys.колонки или для XML обмана с помощью local-name ().
- вы также можете создать список различных цветов (или значений для одного столбца), используя для XML.
- вышеизложенное может быть объединено в динамический пакет sql для обработки любой таблицы.
-
вертикальное расширение
похоже на PIVOT, курсор имеет динамическую возможность добавлять больше строк по мере расширения набора данных, чтобы включить больше номеров политик.
-
горизонтальное расширение
в отличие от PIVOT, курсор выделяется в этой области, поскольку он может расширяться, чтобы включить новый добавленный документ, не изменяя сценарий.
-
расстройства
основное ограничение транспонирования строк в столбцы с помощью Курсор является недостатком, который связан с использованием курсоров в целом – они приходят при значительных затратах на производительность. Это происходит потому, что курсор создает отдельный запрос для каждой следующей операции выборки.
-
вертикальное расширение
подобно PIVOT и Курсору, недавно добавленные политики могут быть получены в XML-версии сценария без изменения исходного сценария.
-
горизонтальное расширение
В отличие от оси, недавно добавленные документы могут отображаться без изменения сценария.
-
расстройства
с точки зрения ввода – вывода статистика XML – версии скрипта почти аналогична сводной-единственное отличие заключается в том, что XML имеет второе сканирование таблицы dtTranspose, но на этот раз из логического кэша чтения данных.
SQL Server PIVOT with Example
We will try to understand the above PIVOT query and operation with the help of an example. Let us consider two tables – categories and products. The categories table contains some category names to which the products belong and the products table contains the names of products belonging to one or another category. The tables are represented below. We will use them as our reference for the examples.
| category_id | category_name |
| 1 | Mobile |
| 2 | Headphone |
| 3 | Tablet |
| 4 | Laptop |
Table: categories
| product_id | category_id | product_name | release_date |
| 1027 | 2 | Bose Noise Cancelling Headphone 700 | 5/13/2019 |
| 1028 | 2 | Sennheiser HD 450BT | 2/4/2020 |
| 1029 | 2 | Sony WH-1000XM3 | 8/15/2018 |
| 1030 | 2 | SoundMagic ES18 | 1/1/2017 |
| 1021 | 1 | Apple iPhone 11 Pro | 9/20/2019 |
| 1022 | 1 | Samsung Galaxy Note 10 Plus | 8/23/2019 |
| 1035 | 3 | Samsung Galaxy Tab S6 | 10/11/2019 |
| 1036 | 3 | Microsoft Surface Pro | 6/15/2017 |
| 1037 | 3 | iPad Air | 3/18/2019 |
| 1038 | 3 | Lenovo Tab M8 | 8/8/2019 |
| 1039 | 3 | Dell Venue 7 | 1/4/2014 |
| 1040 | 3 | HP 7 VoiceTab | 10/23/2014 |
Suppose we want to get the count of products belonging to the different categories i.e. we want to find out how many types of mobiles, how many types of headphones do we have in our stock for sale. We can do so with the help of the following query which uses the GROUP BY function on the category_name column and count aggregate function on the product_id column. The INNER JOIN retrieves the values of the category_name column from the categories table. By doing so it determines the number of products available for each category. p and c are table aliases for products and categories tables and product_count is the column alias for the aggregated product_id column.
The resultset of the above query is the following.
| category_name | product_count |
| Headphone | 4 |
| Mobile | 2 |
| Tablet | 6 |
Now suppose we want the above data in the below format with the number of products under each category.
| Headphone | Mobile | Tablet |
| 4 | 2 | 6 |
We can do so with the help of the PIVOT operator. The PIVOT operator as mentioned in the introduction will turn the table around on the category_name column value (i.e. Headphone, Mobile, Tablet) so that it can hold the count of products (4, 2, 6) in each category. But to do so we have to first fetch the required data (called base data) from the tables using SELECT query and store it in a temporary table (called derived table). Then we can then apply the PIVOT operator on it. The following SELECT query fetches the base data and stores it in a temporary table called temp_table.
The resultset of the above query is the following. We have not taken the count of the product_id here but just extracted the relevant data from the tables and stored it in the derived table temp_table.
| category_name | product_id |
| Headphone | 1027 |
| Headphone | 1028 |
| Headphone | 1029 |
| Headphone | 1030 |
| Mobile | 1021 |
| Mobile | 1022 |
| Tablet | 1035 |
| Tablet | 1036 |
| Tablet | 1037 |
| Tablet | 1038 |
| Tablet | 1039 |
| Tablet | 1040 |
Now we will apply the PIVOT operator on the derived table which contains the above resultset to format the resultset as we want it. The following query does the same. The first part of the query is the same above query (which has already been shown separately for understanding but is an integral part of the below complete query). The second part of the query is the PIVOT which gets the product_id’s from the temp_table, takes their count and maps them to the static category_names provided explicitly with the FOR clause.
The above query produces the is the following pivoted resultset which is what we wanted.
| Mobile | Headphone | Tablet |
| 2 | 4 | 6 |
So this is the way PIVOT works. We can improvise the above query by adding one more column in the SELECT list. The below query adds the year from the release_date column using the year () function to the SELECT list. The rest of the query is the same.
The query produces the following resultset. As we can see the additional column (aliased release_year in the query) has been has been taken as another column and its values as row values and the product count distributed category and release year wise.
| release_year | Mobile | Headphone | Tablet |
| 2014 | 2 | ||
| 2017 | 1 | 1 | |
| 2018 | 1 | ||
| 2019 | 2 | 1 | 3 |
| 2020 | 1 |
Was this tutorial helpful?
YesNo
A Simple UNPIVOT Example
To demonstrate the SQL UNPIVOT keyword, we need to have some pivoted data first. We could supply a subquery, but then the UNPIVOT query would be very confusing. So, let’s create a view that shows pivoted data.


We can create a view called pivoted_sales.
After the view is created, we can select from it to check the data:
| LOCATION | CUST1 | CUST2 | CUST3 | CUST4 |
| west | 545 | (null) | 1382 | (null) |
| central | (null) | (null) | 433 | 584 |
| north | 1128 | 875 | (null) | 987 |
| south | (null) | 881 | 714 | (null) |
| east | 192 | 147 | 407 | 785 |
Now let’s look at an example of the UNPIVOT keyword.
The results of this query are:
| LOCATION | CUSTOMER_ID | TOTAL_SALES |
| west | CUST1 | 545 |
| west | CUST3 | 1382 |
| central | CUST3 | 433 |
| central | CUST4 | 584 |
| north | CUST1 | 1128 |
| north | CUST2 | 875 |
| north | CUST4 | 987 |
| south | CUST2 | 881 |
| south | CUST3 | 714 |
| east | CUST1 | 192 |
| east | CUST2 | 147 |
| east | CUST3 | 407 |
| east | CUST4 | 785 |
In this query:
- The unpivot_clause is “total_sales”, which in the results is the name of the last column. This column contains the number values or the SUM of the sales for each customer and region.
- The unpivot_for_clause is “customer_id”. This is the name given to the second column, which is populated from the different column headers in the pivoted data.
- The unpivot_in_clause is each of the column headers from the pivoted data. The columns from the underlying table are cust1, cust2, cust3, and cust4, and these are specified in the IN clause.
Conclusion
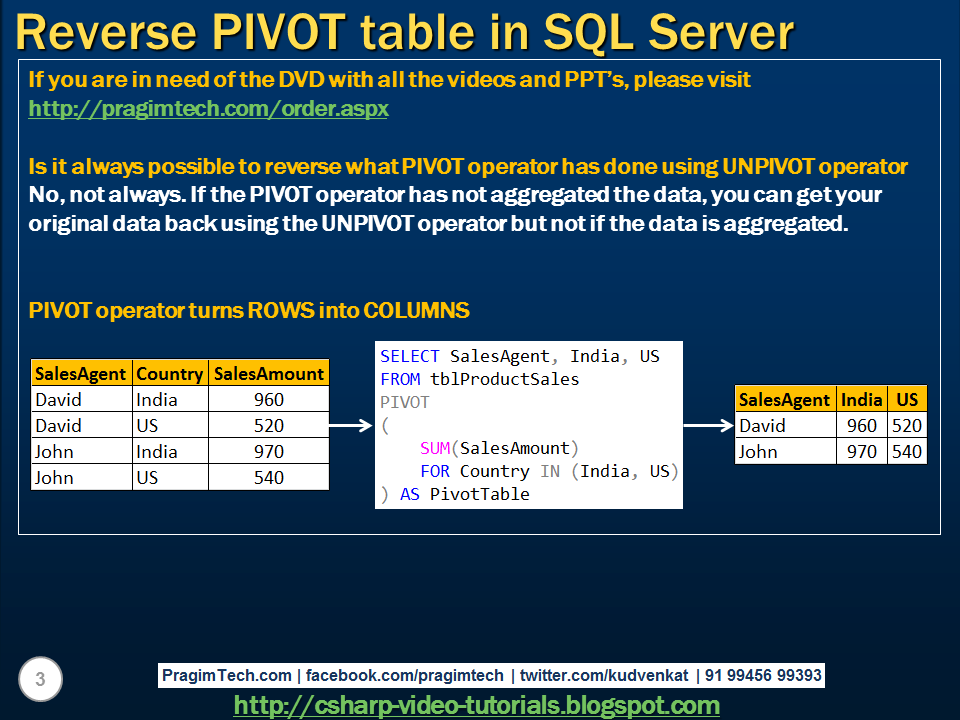
Pivoting is a technique used to transpose rows to columns. PIVOT is a tSql proprietary operator and is not part of the ANSI Standard. PIVOT operator accepts two parameters; Spreading element or what we want to see on columns and aggregating element or what we want to see in the intersection of each distinct row and column. The grouping element is the third parameter involved in pivot operation. It is what we want to see on rows. The grouping element is not a formal part of the PIVOT operator and represents all columns that are not defined as spreading or aggregating elements. The implicit nature of the grouping element can lead to logical errors. This is why is recommended to construct a table expression for the PIVOT operator that provides exactly three elements needed for the operation.
A PIVOT operator is limited to only one aggregate function. To perform multi aggregate pivot we need to introduce a PIVOT operator per aggregation.
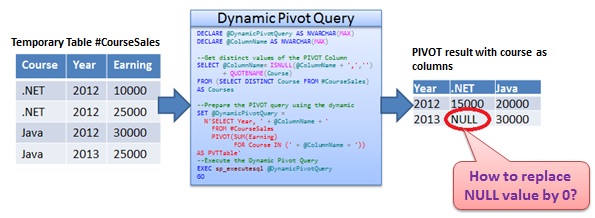
The IN clause of the PIVOT operator accepts only a hard-coded, comma-separated list of spreading element values. In the situations when the values are not known, we use dynamic sql to construct the query.
Thanks for reading.
Dean Mincic
MS SQL Server 2005 – New Feature | PIVOT and UNPIVOT
April 12, 2009
Using PIVOT and UNPIVOT Operator
You can use the PIVOT and UNPIVOT relational operators to manipulate a table-valued expression into another table. PIVOT rotates a table-valued expression by turning the unique values from one column in the expression into multiple columns in the output, and performs aggregations where necessary on any remaining column values that are desired in the final output. UNPIVOT performs the opposite operation to PIVOT by rotating columns of a table-valued expression into column values.
PIVOT provides syntax that is simpler and more readable than what may otherwise be specified in a complex series of SELECT…CASE statements.
A common scenario where PIVOT can be useful is when you want to generate cross-tabulation reports to summarize data. For example, suppose you want to query the PurchaseOrderHeader table in the AdventureWorks sample database to determine the number of purchase orders placed by certain employees. The following query provides this report, broken down by vendor:
USE AdventureWorks;
GO
SELECT VendorID,  AS Emp1,  AS Emp2,  AS Emp3,  AS Emp4,  AS Emp5
FROM
(SELECT PurchaseOrderID, EmployeeID, VendorID
FROM Purchasing.PurchaseOrderHeader) p
PIVOT
(
COUNT (PurchaseOrderID)
FOR EmployeeID IN
( , , , ,  )
) AS pvt
ORDER BY VendorID
Output:
VendorID Emp1 Emp2 Emp3 Emp4 Emp5
1 	 4    3    5    4    4
2 	 4    1    5    5    5
3 	 4    3    5    4    4
4 	 4    2    5    5    4
5 	 5    1    5    5    5
This means that the unique values returned by the EmployeeID column themselves become fields in the final result set. As a result, there is a column for each EmployeeID number specified in the pivot clause — in this case employees 164, 198, 223, 231, and 233. The PurchaseOrderID column serves as the value column, against which the columns returned in the final output, called the grouping columns, are grouped. In this case, the grouping columns are aggregated by the COUNT function. Note that a warning message appears indicating that any NULL values appearing in the PurchaseOrderID column were not considered when computing the COUNT for each employee.
UNPIVOT performs almost the reverse operation of PIVOT, by rotating columns into rows. Suppose the table produced in the example above is stored in the database as pvt, and you want to rotate the column identifiers Emp1, Emp2, Emp3, Emp4, and Emp5 into row values that correspond to a particular vendor. This means that you must identify two additional columns. The column that will contain the column values you are rotating (Emp1, Emp2,…) will be called Employee, and the column that will hold the values that currently reside under the columns being rotated will be called Orders. These columns correspond to the pivot_column and value_column, respectively, in the Transact-SQL definition. The query looks like this.
Create the table and insert values as portrayed in the above example:
CREATE TABLE pvt (VendorID int, Emp1 int, Emp2 int,
Emp3 int, Emp4 int, Emp5 int)
GO
INSERT INTO pvt VALUES (1,4,3,5,4,4)
INSERT INTO pvt VALUES (2,4,1,5,5,5)
INSERT INTO pvt VALUES (3,4,3,5,4,4)
INSERT INTO pvt VALUES (4,4,2,5,5,4)
INSERT INTO pvt VALUES (5,5,1,5,5,5)
GO
--Unpivot the table.
SELECT VendorID, Employee, Orders
FROM
(SELECT VendorID, Emp1, Emp2, Emp3, Emp4, Emp5
FROM pvt) p
UNPIVOT
(Orders FOR Employee IN
(Emp1, Emp2, Emp3, Emp4, Emp5)
)AS unpvt
GO
Output:
VendorID Employee Orders
1 	 Emp1 	  4
1 	 Emp2 	  3
1 	 Emp3 	  5
1 	 Emp4 	  4
1 	 Emp5 	  4
2 	 Emp1 	  4
2 	 Emp2 	  1
2 	 Emp3 	  5
2 	 Emp4 	  5
2 	 Emp5 	  5
...
Note: UNPIVOT is not the exact reverse of PIVOT. PIVOT performs an aggregation and hence merges possible multiple rows into a single row in the output. UNPIVOT does not reproduce the original table-valued expression result because rows have been merged. Besides, NULL values in the input of UNPIVOT disappear in the output, whereas there may have been original NULL values in the input before the PIVOT operation.
Reference taken from MS BOL: http://msdn.microsoft.com/en-us/library/ms177410.aspx
Advertisement
Categories: SQL Server 2005
PIVOT, Rotate a table, UNPIVOT
Explanation
If you analyzed the above UNPIVOT query then I have selected ProductName, TotalSales, YearName from the table @TableSales and using the UNPIVOT operator I have converted columns area into a row area for YearName column and give an alias to this column as YearName and then UNPIVOT TotalSales for YearName in ,, and . Basically, this is the reverse process of PIVOT.
This is very basic examples for PIVOT and UNPIVOT, here we also can PIVOT and UNPIVOT for multiple columns that we will learn in the next article where I will show you how you can PIVOT and UNPIVOT more than one columns in SQL server, still If you have any questions regarding PIVOT and UNPIVOT in QL server then you can write your questions in the comments section that is given below the article.