Be made without using a security context
The Be made without using a security context option is used for connecting to data sources that do not require any authentication, for example like a text file. When this option is selected for connect to a linked server, will have the same effect as selecting the “Not be made” option.
If you attempt to execute a linked server query:
SELECT * FROM .AdventureWorks2014.HumanResources.Employee e
The following message e may appear:
OLE DB provider “SQLNCLI11” for linked server “WSERVER2012\SQLEXPRESS” returned message “Invalid authorization specification”.
Msg 7399, Level 16, State 1, Line 1
The OLE DB provider “SQLNCLI11” for linked server “WSERVER2012\SQLEXPRESS” reported an error. Authentication failed.
Msg 7303, Level 16, State 1, Line 1

Cannot initialize the data source object of OLE DB provider “SQLNCLI11” for linked server “WSERVER2012\SQLEXPRESS”.
Creating a Linked Server using Stored Procedures
As an alternative to using the options in the user interface, you can execute stored procedures in Management Studio to create your linked server.
To create a linked server using stored procedures:
- In Management Studio (SSMS), connect to your Database Engine instance.
- In the toolbar at the top of Management Studio, click New Query.
- In the editor window that appears, type the following statement for creating the linked server, where is the name of the linked server, is the type of data store that you are linking to SQL Server, and (Connector Name) is the name of your DSN for the data store:
EXEC master.dbo.sp_addlinkedserver @server=N'', @srvproduct=N'', @provider=N'MSDASQL', @datasrc=N''
If your data store requires authentication, then type the following statement, where is the name of the linked server and and are your credentials:
EXEC master.dbo.sp_addlinkedsrvlogin @rmtsrvname=N'', @useself=N'False', @locallogin=NULL, @rmtuser=N'', @rmtpassword=N''
- In the toolbar at the top, click Execute.
- The Messages pane opens and displays a message indicating whether the statements were executed successfully.
- In the Object Explorer, select Linked Servers and then click Refresh.
- The linked server appears as a node under the Linked Servers branch in the Object Explorer, and you can expand the node to browse the contents of the server down to the table level.
Language
English
Настройка MS SQL Server
Перед установкой базы данных необходимо проверить аутентификацию сервера и настроить SQL Server для работы в сети.
Настройка аутентификации сервера
Для работы программ по сети нужно создать в Users Manager учетные записи пользователей. (Меню «Администрирование»). Перед тем как это сделать, необходимо изменить способ аутентификации в настройках сервера.
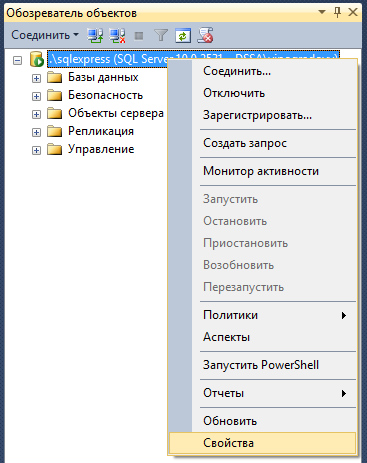
Запустите программу «Среда SQL Server Management Studio». Подключитесь к вашему серверу и затем кликните правой кнопкой по имени сервера и выберите пункт «Свойства»
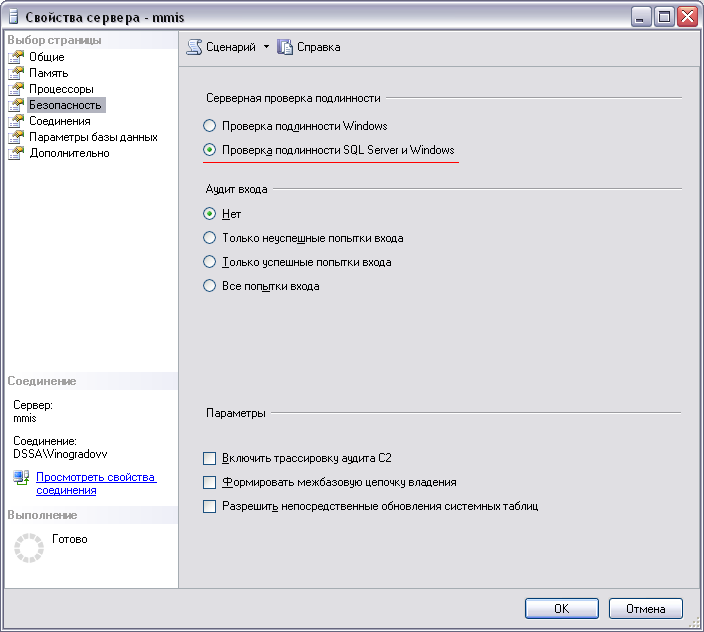
 Во вкладке «Безопасность» укажите «Проверка подлинности SQL Server и Windows»
 Среда SQL Server Management Studio Express
Нажмите «Ок» и затем перезапустите службу SQL Server.

Политика паролей
Если у Вас установлена Window Server любой версии, то откройте через меню «Пуск» — «Администрирование» — «Локальная политика безопасности».
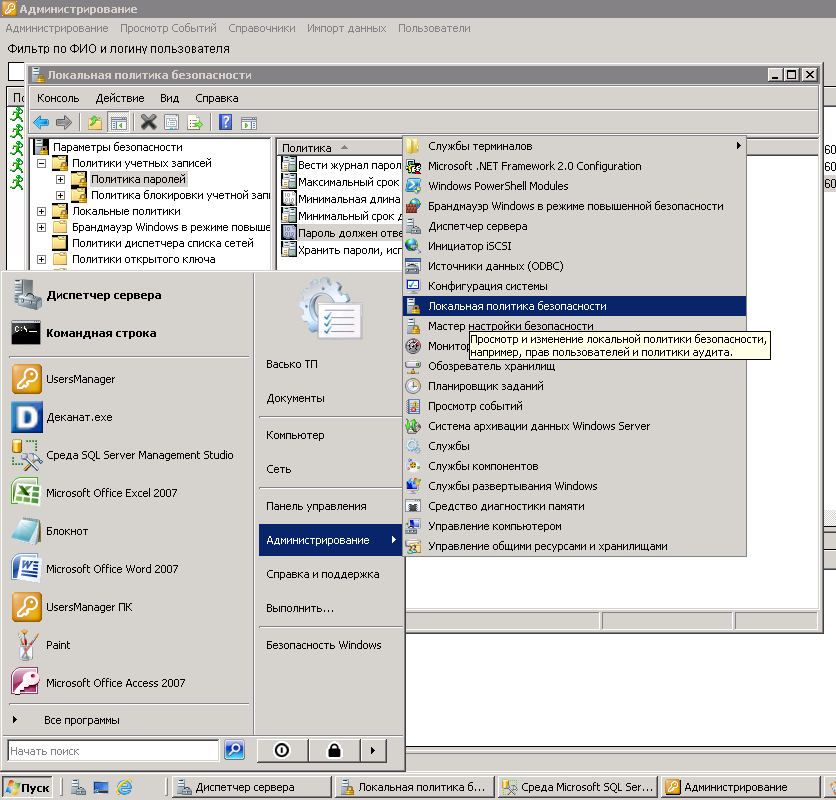
Во вкладке «Политика паролей» посмотрите на значение пункта «Пароль должен отвечать требованиям …..».Если в строке стоит статус «Включен», то кликните по пункт 2-м щелчком и выберите галочку «Отключен».
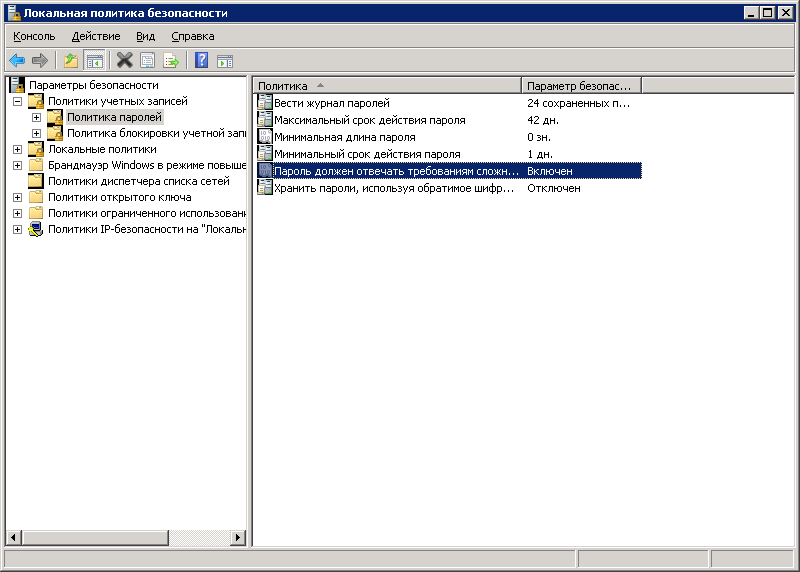
После установки базы данных и создания в Users Manager учетных записей политику паролей можно включить обратно.
Настройка MS SQL Server 2005-2017 для работы в сети
После установки SQL Server, по умолчанию, он не доступен по сети. Если SQL сервер не доступен или при запуске программы (Деканат, ПК, Ведомости и т.д) возникает ошибка, то это может свидетельствовать о следующем:
— Не установлен режим подлинности Windows аутентификация; — Не включена возможность удаленного соединения (для SQL server 2005); — Не доступен протокол TCP/IP; — Отсутствует физическое подключение к сети; — Блокирование сервера Брандмауэром Windows.
После установки SQL Server необходимо настроить его для работы в сети. Настройки зависят от версии сервера.
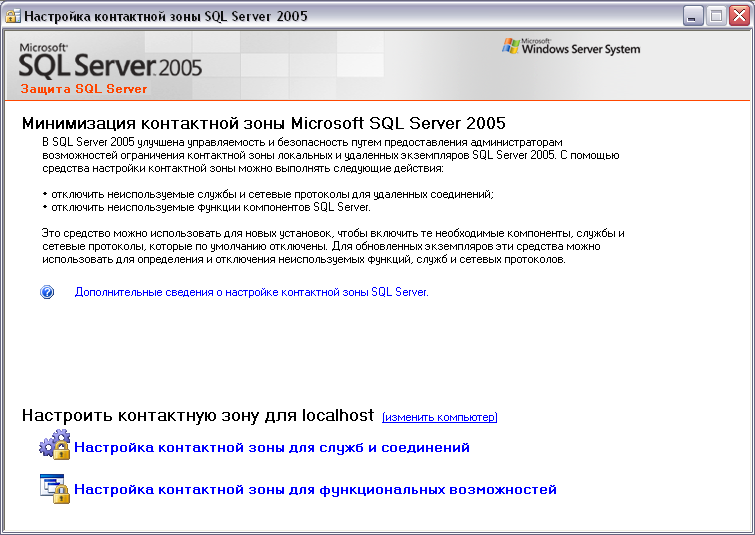
Выберите в меню Пуск — Программы — Microsoft SQL Server 2005>Средства настройки> Настройка контактной зоны SQL Server. В открывшейся форме выберите «Настройка контактной зоны для служб и соединений» и нажмите «Сохранить»
 Настройка контактной зоны
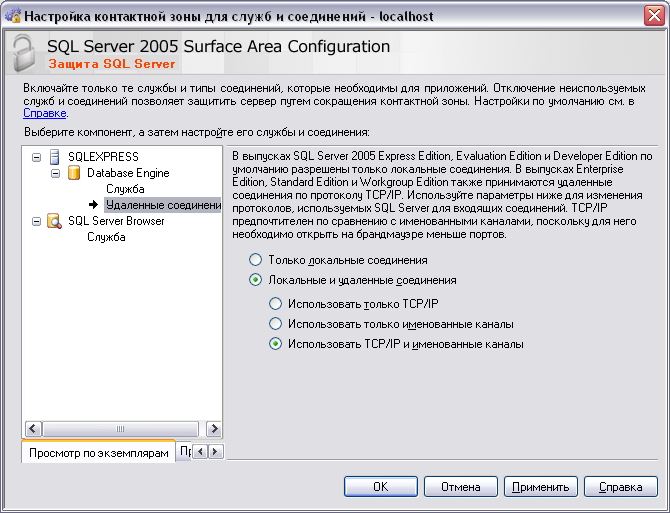
2.2. Укажите галочку «Использовать TCP/IP и именованные каналы». Нажмите кнопку «Применить».
 Настройка контактной зоны
2.3 В списке компонентов перейдите на пункт «SQL Server Browser». Убедитесь, что служба запущена. Укажите режим запуска «Авто» и запустите службу.
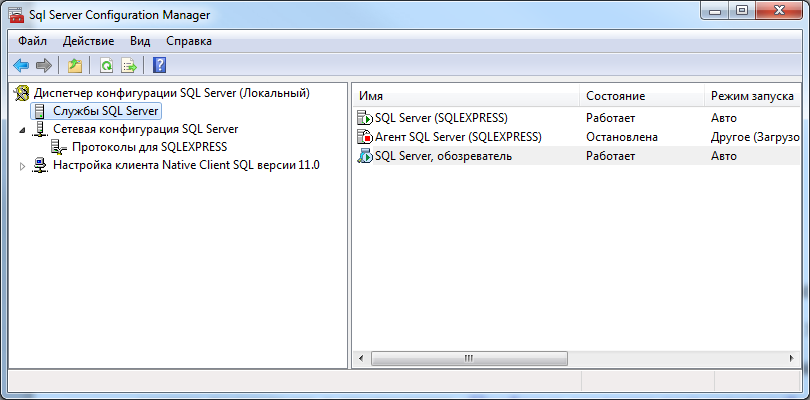
Откройте меню «Пуск» – «Все программы» – «Microsoft Sql Server 2008/2012» – «Средства настройки» – «Диспетчер конфигурации SQL Server»
Во вкладке «Службы SQL Server» убедитесь, что служба «SQL Server, обозреватель» запущена. В колонке «Состояние» должно быть значение «Работает», а в колонке «Режим запуска» — «Авто». Также и для службы SQL Server (sqlexpress).
Агент SQL Server можно не включать
Перейдите в пункт «Сетевая конфигурация SQL Server». Проверьте состояние протокола TCP/IP (должна быть состояние «Включено»).
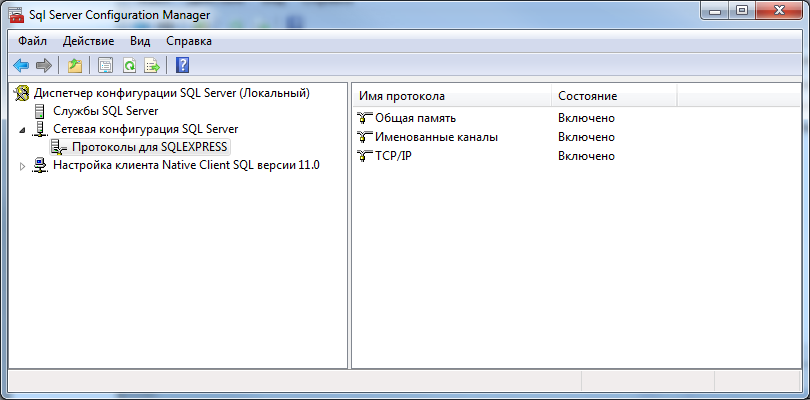 После смены состояния перезапустите службу SQL Server.
Настройка Брэндмаура
Если после выполнения всех перечисленных действий сервер не доступен по сети, то проверьте настройки брандмауэра/антивируса/сетевого экрана.
Если на серверном компьютере включен брандмауэр или установлен сетевой экран (Firewall), то это может препятствовать соединению с сервером. Для быстрого получения ответа можно временно выключить работу «защитной» программы (не рекомендуется).
Открытые порта 1433 в брандмауэре:
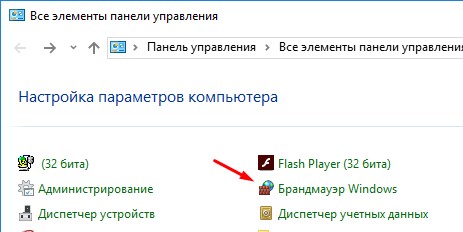
1. Откройте панель управления и выберите пункт Брандмауэр Windows.
2. Перейдите в дополнительные параметры
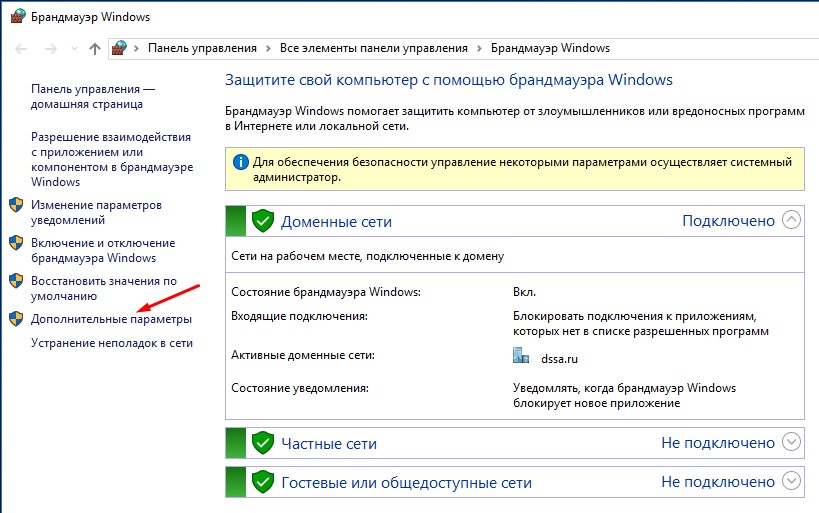
3. Выберите узел «Правила для входящих подключений» и затем, в правой панели — Создать правило
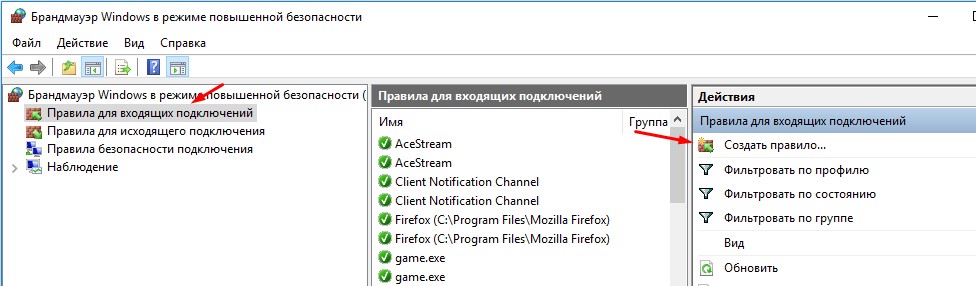
3. Выберите пункт «Для порта» и нажмите Далее

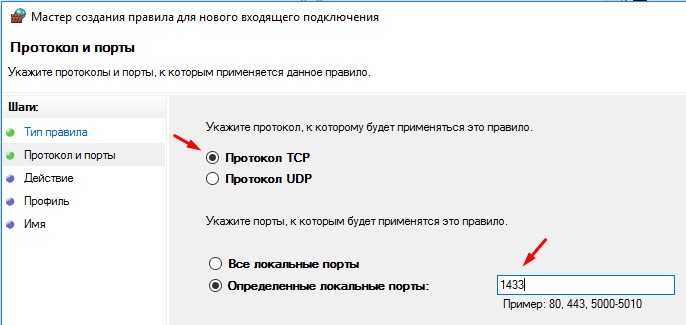
4. Укажите Протокол TCP и пункт «Определенные локальные порты». В поле укажите порт 1433 и нажмите Далее
5. В окне выбора профилей оставьте выбранными 3 галочки: доменный, частный, публичный. Нажмите кнопку Далее.

6. Укажите пункт «Разрешить подключение» и нажмите Далее

7. Укажите имя правилу (на свое усмотрение)

Удаление схем и пользователей
Данный пункт может применяться если у Вас уже была установлена БД Деканат. Данные действия надо выполнить, если не удается создать учетные записи программы.


1. Запустите «Среда SQL Server Management Studio»;
2. Откройте и перейдите во вкладку «Деканат» — «Безопасность» — «Схемы»;
3. Удалите следующие схемы: Abit, Dek, VedKaf, Kaf, Plany, Test, GraphGroups;
4. Отройте вкладку Деканат» — «Безопасность» — «Пользователи»
5. Удалите имена пользователей с именами: Abit, VedKaf, Kaf, Plany, Test, GraphGroups.
Test Scenario
Old Source – SQL 2012(Sp2 with hotfix) on Win 08R2 || Destination – SQL 2000(Sp4) on Win 03
New Source – SQL 2012(Sp2 with hotfix) on Win 2012R2|| Destination – SQL 2000(Sp4) on Win 03
- Tried to create a net new linked server using the new client and the following error was generated.
SQL Server Native Client 11.0 does not support connections to SQL Server 2000 or earlier versions. OLE DB provide “SQLNCI11” for linked server “xxxxx” returned message “Client unable to establish connection”. (Microsoft SQL Server, Error:22)
- Scripted out the linker server (from old source) and tried to execute it on the new source and got the following error. This error indicates that ODBC connection cannot be located.
Cannot initialize the data source object of OLE DB provider “MSDASQL” for linked server “xxxxx“. OLE DB provider “MSDASQL” for linked server “xxxxx” returned message “ Data source name not found and no default driver specified”. (Microsoft SQL Server , Error:7303)
Here is part of the scripted linked server:
/****** Object:  LinkedServer     Script Date: 4/7/2015 9:57:51 AM ******/
EXEC master.dbo.sp_addlinkedserver @server = N'xxxxx', @srvproduct=N'MSDASQL', @provider=N'MSDASQL', @datasrc=N'xxxxx', @location=N'System'
 /* For security reasons the linked server remote logins password is changed with ######## */
EXEC master.dbo.sp_addlinkedsrvlogin @rmtsrvname=N'xxxxx',@useself=N'False',@locallogin=NULL,@rmtuser=N'testmeuser',@rmtpassword='testmepass'
Turn on RPC
Earlier on we skipped the Server Options page of the linked server. Back in the Management Studio right click linked server LINKED_MYSQL and from the drop-down choose to look at the properties at the bottom of the list. This brings up the LINKED_MYSQL properties window as shown. Click on Server Options. In the Server Options page change the values of RPC and RPCOUT to true, default for both being false.

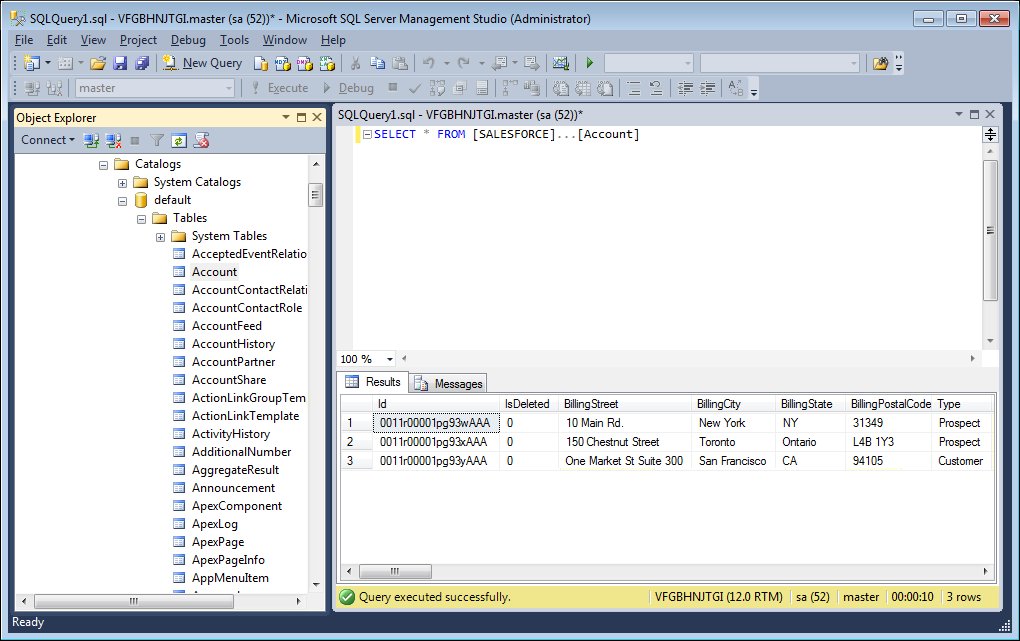
Now run the query that produced the error previously. The result is displayed in the next figure.
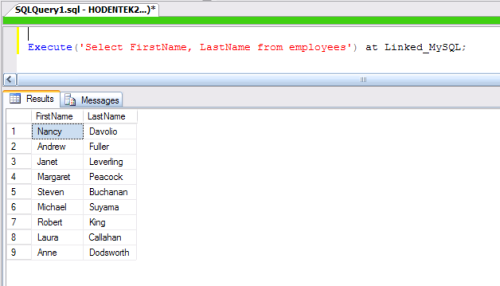
You might have noted that only two columns were returned from the employees table. This was deliberate as trying to get all the column would produce an error due partly to the data types of data stored in the table and their compatibility with MSDASQL and the ODBC driver (Again, an author’s opinion).
Create a Linked Server for the ODBC Data Source
After you have configured and started the TDS remoting service, create the linked server and connect. You can use the UI in SQL Server Management Studio or call stored procedures.
Create a Linked Server from the UI
Follow the steps below to create a linked server from the Object Explorer.
- Open SQL Server Management Studio and connect to an instance of SQL Server.
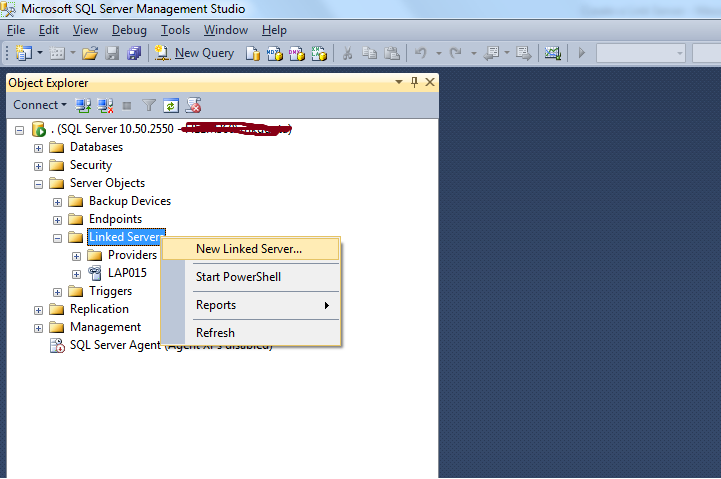
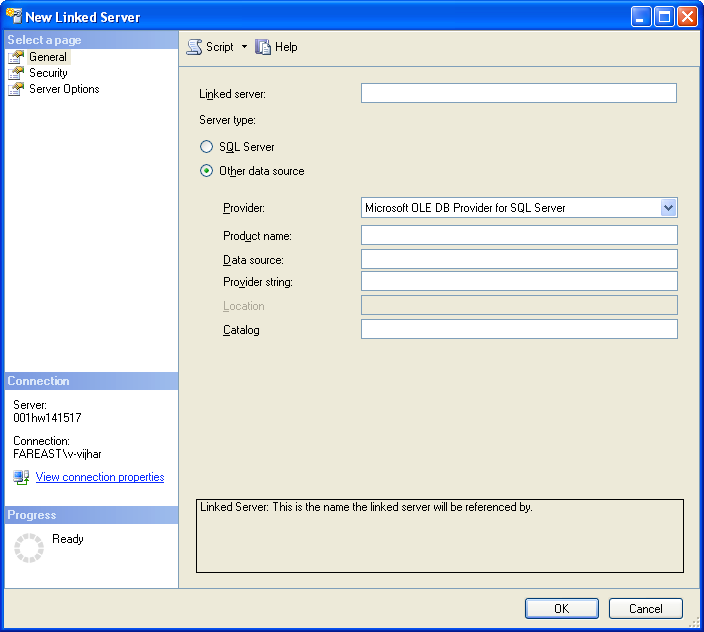
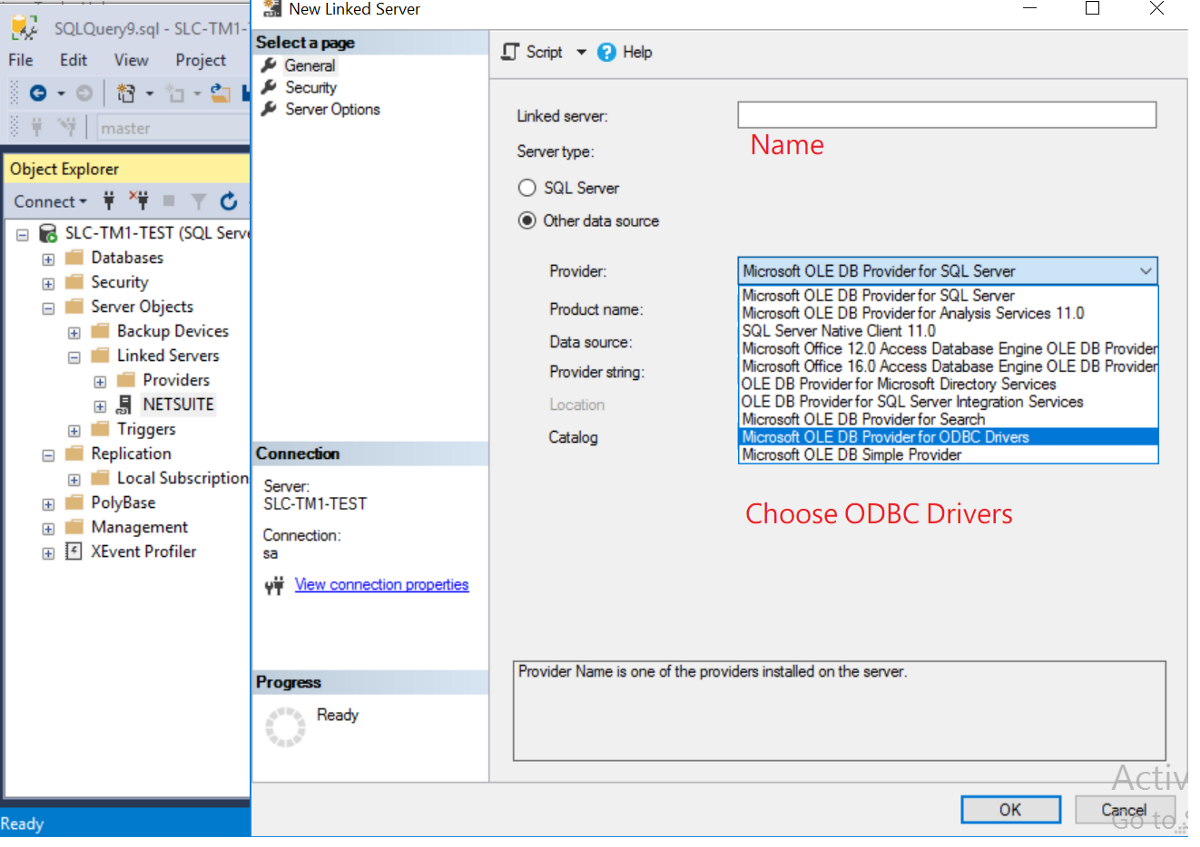
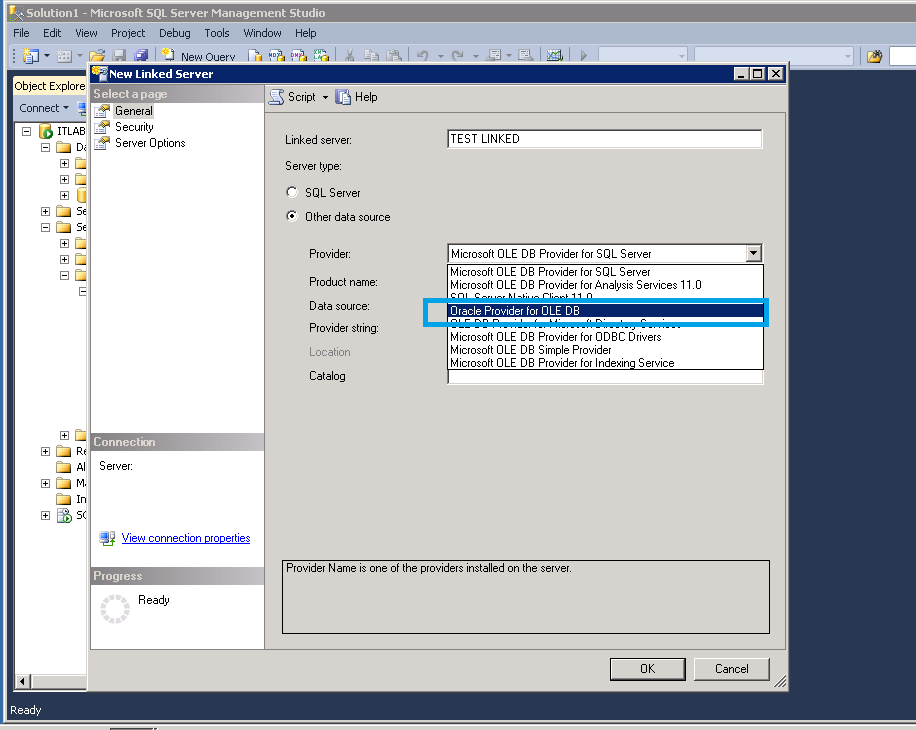
- In the Object Explorer, expand the node for the SQL Server database. In the Server Objects node, right-click Linked Servers and click New Linked Server. The New Linked Server dialog is displayed.
- In the General section, click the Other Data Source option and enter the following information after naming the linked server:
- Provider: Select the SQL Server Native Client Provider that corresponds to your version of SQL Server. For example, SQL Server Native Client 11.0.
-
Data Source: Enter the host and port the TDS remoting service is running on, separated by a comma.
Note that a value of «localhost» in this input refers to the machine where SQL Server is running so be careful when creating a linked server in Management Studio when not running on the same machine as SQL Server.
- Catalog: Enter the DSN for the ODBC data source you wish to connect to.
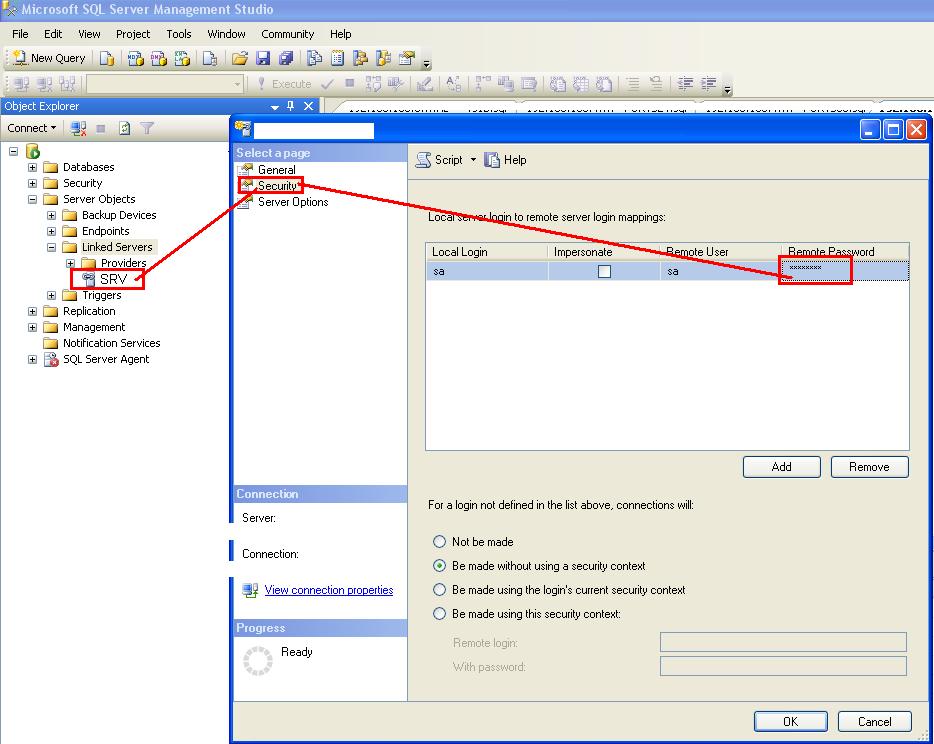
- In the Security section, select the option to have the connection «made using this security context» and enter the username and password of a user you created in the Users tab of the SQL Gateway.
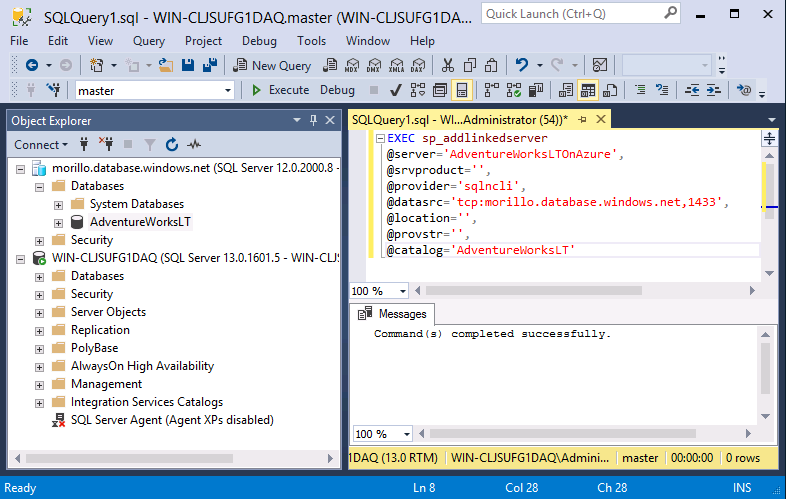
Create a Linked Server Programmatically
In addition to using the SQL Server Management Studio UI to create a linked server, you can use stored procedures. The following inputs are required:
- server: The linked server name.
- provider: Enter «SQLNCLI», for the SQL Server Native Client Provider.
-
datasrc: The host and port the service is running on, separated by a comma.
Note that a value of «localhost» in the datasrc input refers to the machine where SQL Server is running, so be careful when creating a linked server in Management Studio when not running on the same machine as SQL Server.
- catalog: Enter the system DSN configured for the service.
- srvproduct: Enter the product name of the data source; this can be an arbitrary value, such as «CData SQL Gateway» or an empty string.
-
Call sp_addlinkedserver to create the linked server:
-
Call the sp_addlinkedsrvlogin stored procedure to allow SQL Server users to connect with the credentials of an authorized user of the TDS remoting service. Note that the credentials you use to connect to the service must exist as credentials in the SQL Gateway application.
Not be made
If this radio button is chosen, any users that aren’t identified in the Local server login to remote server login mappings list cannot establish connection to the linked server.
For example, if login with different account (e.g. Ben) that not set in the login mapping list the list of the databases under the Catalogs folder will look like this:
If you attempt to execute a linked server query:
|
1 |
SELECT *FROMWSERVER2012\SQLEXPRESS.AdventureWorks2014.HumanResources.Employeee
|
The following result will appear:
Msg 7416, Level 16, State 1, Line 1
Access to the remote server is denied because no login-mapping exists.
Creating an ODBC DSN for MySQL
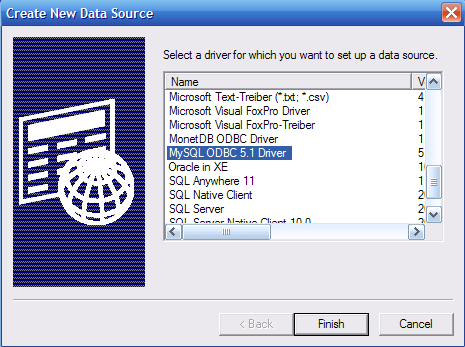
In the previous article on MySQL Servers cited earlier, a DSN was created for moving data. Essentially the same DSN can be used. Herein follows a brief review of the DSN MySQL_Link created along the same lines as in the previously referenced article. The ODBC driver used for creating this ODBC DSN is the one installed on the machine when the MySQL Server was installed as shown.
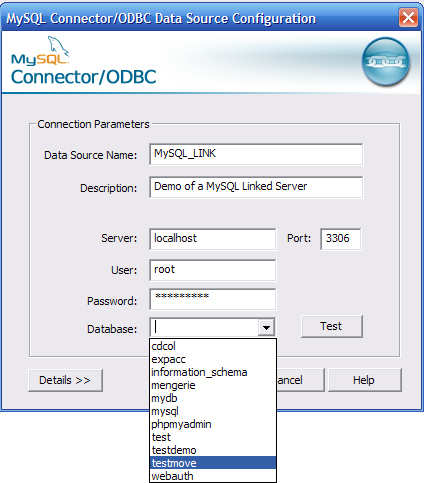
The final interactive window where you may test the connectivity is shown in the next figure. You may notice that the database Testmove has been named in the ODBC DSN. The name MySQL_LINK is the ODBC DSN.
When you close the window after clicking the OK button, an ODBC DSN item will be added to the System DSN tab of the ODBC wizard as shown.

Настройка MSSQL Server Express для доступа из локальной сети.
Столкнулся с проблемой доступа из локальной сети к развернутому экземпляру MSSQL Server Express. Рассмотрим как настроить доступ к экземпляру SQL.
Запускаем SQL Server Configuration Manager. Переходим в Сетевая конфигурация SQL Server — Протоколы для SQLEXPRESS (где SQLEXPRESS — имя экземпляра SQL Server).
Включаем протокол TCP/IP и переходим в его свойства, во вкладку IP-адреса. Опускаемся к пункту IPAll. Удаляем значение в поле TCP Dynamic Ports, оставляем поле пустым, а в TCP Port пишем 1433: 
Переходим в Сетевая конфигурация SQL Server — Службы SQL Server.
Вызываем свойства службы Браузер SQL Server, переходим во вкладку Служба. В пункте Режим запуска, выставляем параметр Авто, нажимаем ОК:
Be made without using a security context
The Be made without using a security context option is used for connecting to data sources that do not require any authentication, for example like a text file. When this option is selected for connect to a linked server, will have the same effect as selecting the “Not be made” option.
If you attempt to execute a linked server query:
|
1 |
SELECT *FROMWSERVER2012\SQLEXPRESS.AdventureWorks2014.HumanResources.Employeee
|
The following message e may appear:
OLE DB provider “SQLNCLI11” for linked server “WSERVER2012\SQLEXPRESS” returned message “Invalid authorization specification”.
Msg 7399, Level 16, State 1, Line 1
The OLE DB provider “SQLNCLI11” for linked server “WSERVER2012\SQLEXPRESS” reported an error. Authentication failed.
Msg 7303, Level 16, State 1, Line 1
Cannot initialize the data source object of OLE DB provider “SQLNCLI11” for linked server “WSERVER2012\SQLEXPRESS”.
About Marko Zivkovic
Marko aka “Zivko” is a senior software analyst from Nis, Serbia focusing on SQL Server and MySQL as well as client technologies like SSMS, Visual Studio, and VSCode. He has extensive experience with quality assurance, issue escalation/resolution, and product evangelism.


He is a prolific author of authoritative content related to SQL Server including a number of “platinum” articles (top 1% in terms of popularity and engagement). His writing covers a range of topics on MySQL and SQL Server including remote/linked servers, import/export, LocalDB, SSMS, and more.
In his part-time, Zivko likes basketball, foosball (table-soccer), and rock music.
See more about Marko at LinkedIn
View all posts by Marko Zivkovic
Configuring TNSNames
One would expect that when configuring a data source, you choose the type and then you insert the hostname and the login info to connect, along with a few parameters maybe, right?No, OF COURSE Oracle is different.
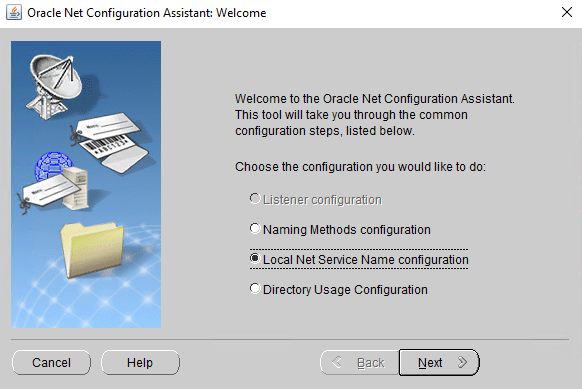
in theory, you should create a text file, place it in a specific directory in the Oracle Home and compile it with the network information of the Oracle server, we don’t have time for that; since I chose the full installation of the client, I’ll be using the net configurator helper app, that takes care of doing it:
 Welcome to 2021, Oracle
Select “Local Net Service Name Configurator” to configure the connection to your Oracle instance, it will ask you for the Oracle Service name, Port, Protocol and Host, all info that you should already have.
If you really wan to follow the manual way (maybe because the GUI doesn’t work, could happen), there are a lot of guides on the internet, but basically it comes down to this:
- Create an empty file called tnsnames.ora in the folder ORACLE_HOME/network/admin/
- Open the file with a text editor and insert the connection details following documentation, or the way easier explanation given on DBA Stack Exchange on the matter
Impersonate
The Impersonate check box when is checked passes the local login credentials to the linked server. For SQL Server Authentication, the same login with the exact credentials must exist on the linked server, otherwise when connected to the server with the SQL Server Authentication, the list of the databases under the Catalogs folder may look like this:

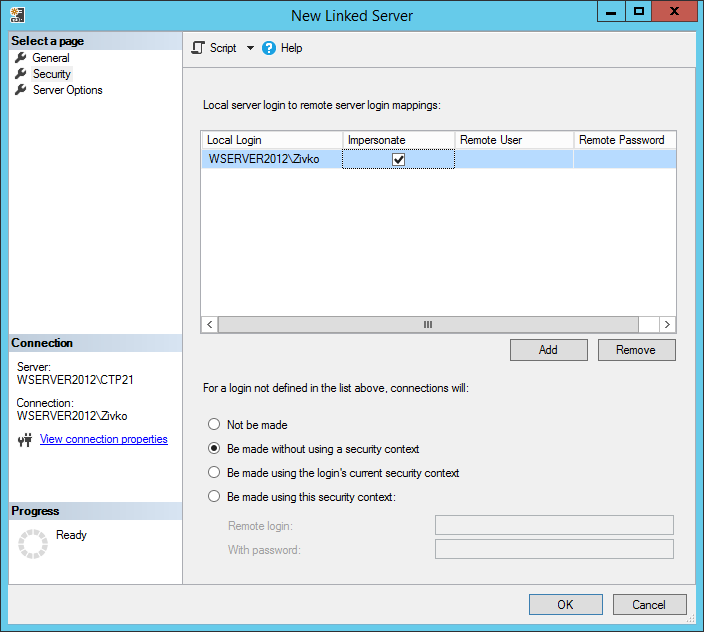
Let’s create a linked server using the local Windows login. From the Local Login combo box, choose the local Windows login and check the Impersonate checkbox and press the OK button:
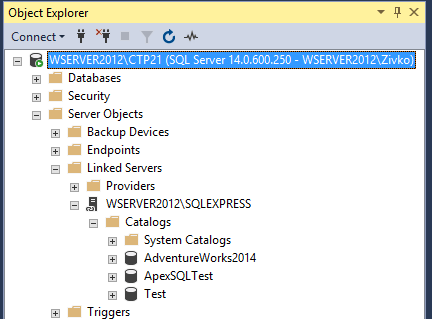
Under the Catalogs folder, all databases that are located on the linked server will be listed:
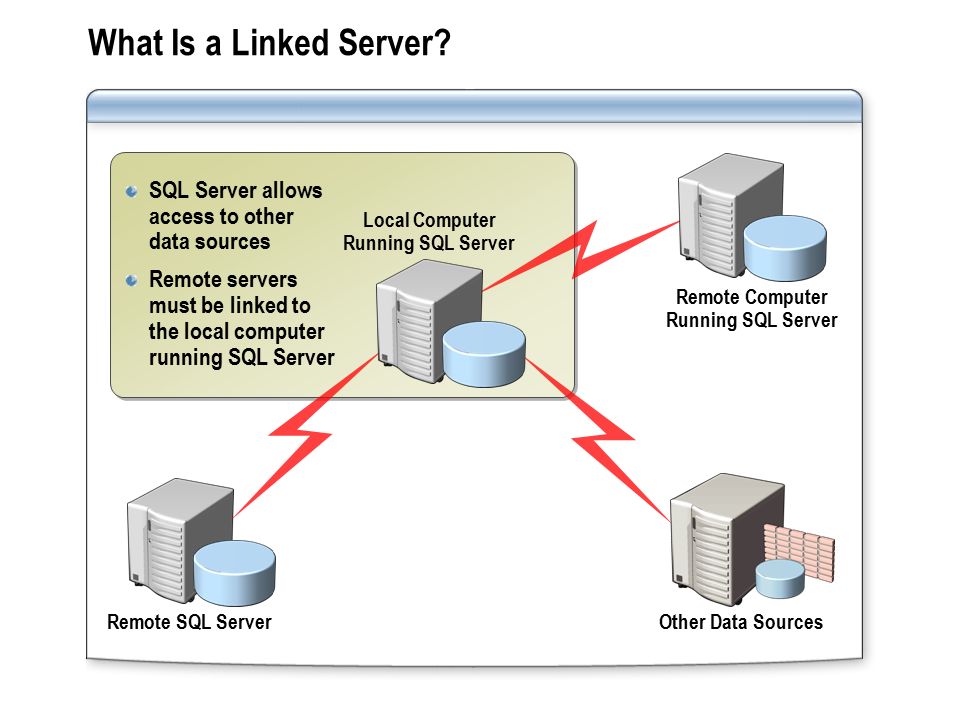
Клиент-серверная система SQL Server
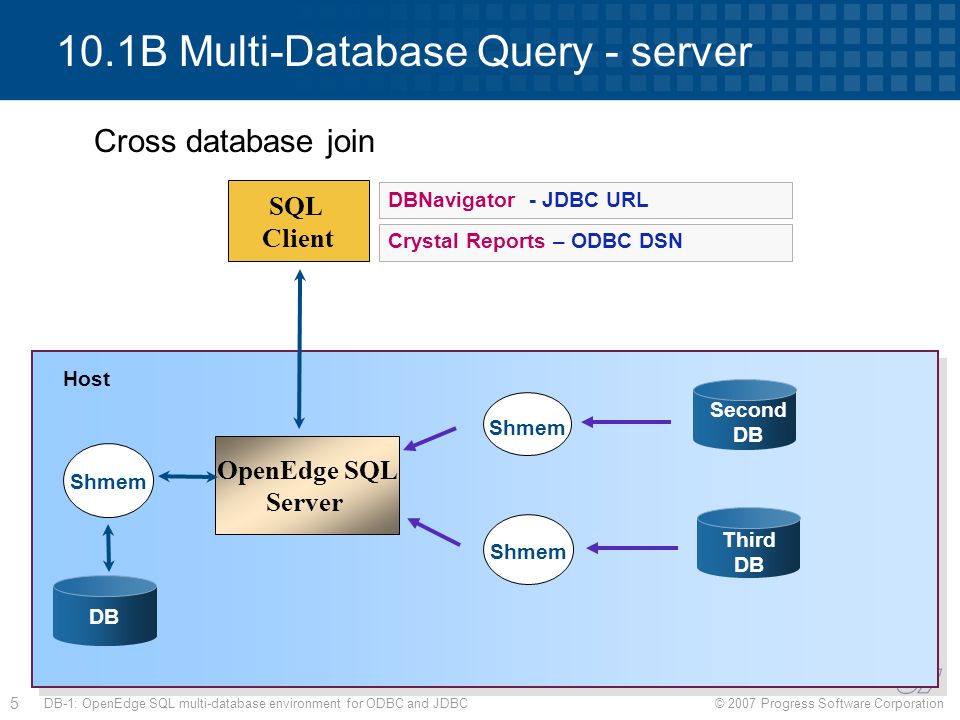
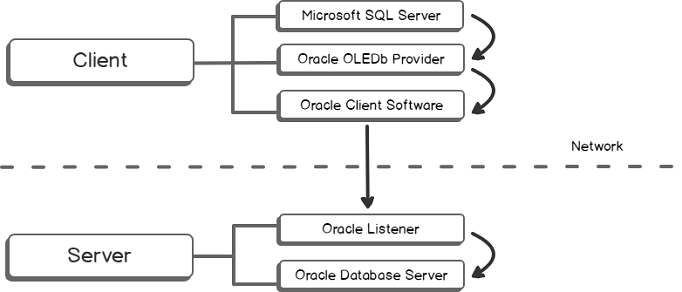
Клиент-серверная система SQL Server может иметь двухзвенную установку (two-tier setup) либо трехзвенную установку (three-tiersetup). Независимо от варианта установки, программное обеспечение и базы данных SQL Server размещаются на центральном компьютере, который называется сервер базы данных (database server). Пользователи работают на отдельных компьютерах, которые называются клиенты (clients). Доступ пользователей к серверу базы данных производится при помощи приложений с их компьютеров-клиентов (в двухзвенных системах) либо при помощи приложений, выполняющихся на специально предназначенном для этой цели компьютере, который называется сервер приложений (application server) (в трехзвенных системах).
В частности, в двухзвенных системах клиенты исполняют приложения, осуществляющие доступ к серверу базы данных непосредственно через сеть.
Таким образом, компьютеры-клиенты исполняют программный код, соответствующий нуждам предприятия, и код, отображающий для пользователя результаты доступа к базе данных. Такие клиенты называются толстыми (thick client), потому что они выполняют два вида работы (cм. рис. 1). Двухзвенная установка полезна при относительно небольшом количестве пользователей, потому что для соединения с каждым из пользователей расходуются системные ресурсы, такие как память и блокировки (locks). Чем больше будет количество соединений с пользователями, тем хуже будет производительность системы, из-за соперничества за ресурсы. В этих условиях вас может заинтересовать применение трехзвенной системы.
Рис. 1. Двухзвенная клиент-серверная система
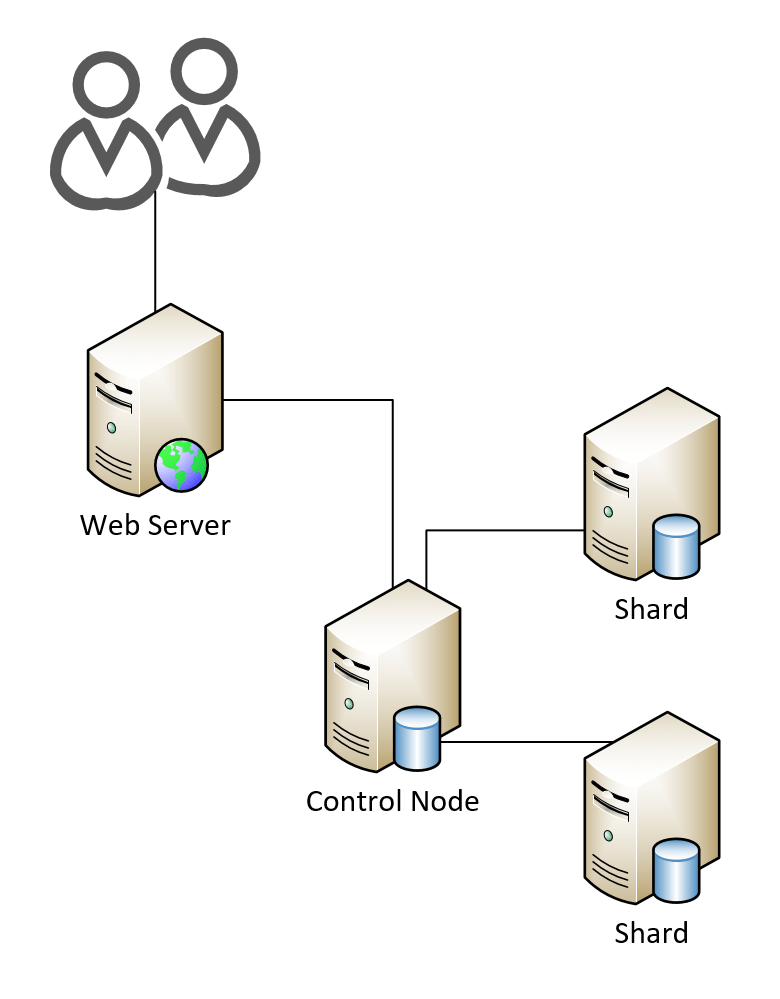
Как уже говорилось ранее, в трехзвенной установке имеется третий компьютер, который называется сервер приложений. В системах этого типа в задачи компьютеров-клиентов входит лишь исполнение программного кода по вызову функций с сервера приложений и отображение результатов доступа.
Такие клиенты называются тонкими (thin client). Cервер приложений исполняет приложения, которые выполняют задачи, требующиеся для нужд предприятия, эти приложения являются многопотоковыми (multithreaded), благодаря чему с ними могут работать много пользователей одновременно. Cервер приложений соединяется с сервером базы данных, осуществляет доступ к данным и возвращает результаты клиенту (см. рис. 2).
Достоинством трехзвенной системы является то, что можно позволить серверу приложений организовывать все клиентские соединения с сервером базы данных, вместо того, чтобы разрешить каждому клиенту самостоятельно устанавливать соединения (такая самостоятельность может привести к нерациональному использованию ресурсов сервера базы данных). Этот подход называется организация пула соединений (connection pooling), при этом предполагается, что запросы клиентов помещаются в пул (или, говоря точно, в очередь, queue), в котором они будут дожидаться ближайшего доступного соединения. Сразу же по освобождении соединения, оно может использоваться для нужд следующего запроса из очереди.
Организация пулов соединений позволяет в некоторой степени регулировать объем работы, выполняемой сервером базы данных, конфигурируя количество соединений, имеющихся в пуле и, следовательно, количество соединений, доступных для выполнения задач пользователей (количество соединений можно конфигурировать программно). Так можно избавиться от потребности в большом количестве пользовательских соединений, способных быстро израсходовать ресурсы и замедлить скорость работы. Организация пулов соединений может быть реализована при помощи Internet Information Server (продукта фирмы Microsoft) и программного обеспечения для организации пулов соединений, вроде COM+.
Для некоторых корпоративных систем и веб-сайтов требуется большая производительность, чем способен обеспечить один сервер. SQL Server обладает способностью разделять таблицы по нескольким серверам, благодаря чему можно распределить нагрузку по обработке данных.
Рис. 2. Трехзвенная клиент-серверная система
Configure the Linked Server
If the configurations above are successful, we’re finally in the familiar part of the process, connect to your SQL instance with SSMS and launch the GUI to create a new Linked Server (right click on Linked Servers -> New Linked Server)
The general page should be configured like so:
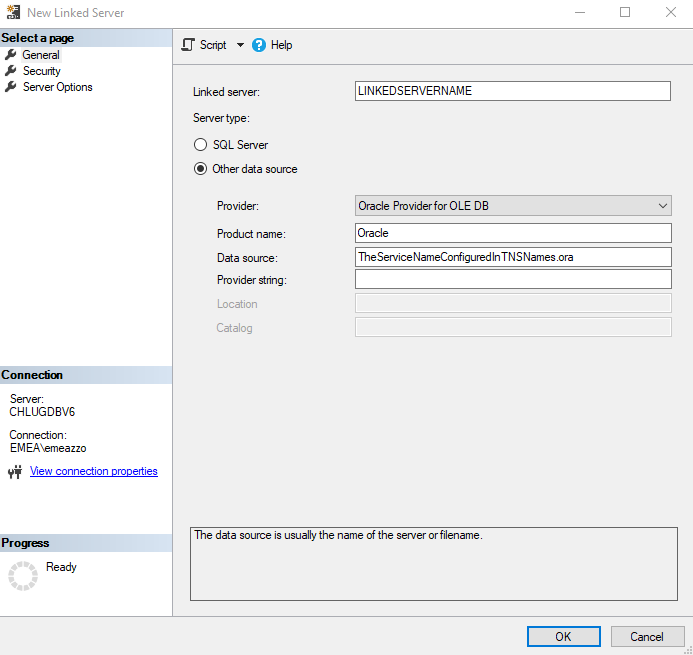
If the Oracle provider is nowhere to be found, then something went wrong with the client installation, uninstall everything and try again.
The last step is to configure the security login to the server, as in the following screenshot:

A custom security context needs to be set in order to pass username and password to Oracle for the remote login.
That’s it for the configuration, easy peasy.
Problem
Most of us, developers, love to write SQL code on our local machines not only because they’re executed faster, but also because we have a lot more control over the data as it is used only by us and is not team dependent. This was the case in my team until recently when the policy has changed and the new policy requires us to develop using a centralized database that was being hosted on one of the on-premise servers rather than using local SQL Servers for each individual developers.
There are both advantages and disadvantages to this approach. You can free up some space and RAM from your local machine by disabling the SQL Server Services, which can be an advantage for some. However, you’d need to connect to the server now and write queries keeping in mind that other developers are also using the same database. So, one should be aware of making any changes to the data.
The important steps to allow remote connections to an instance can be divided into the following parts, which are discussed in detail below.
- Allowing Remote Connections
- Add Remote User to the database
- Configuring the SQL Server Instance
- Configuring Windows Firewall
- Fetch the Connection Details
- Connecting to the remote machine
This article describes the steps on how to configure remote access on a SQL Server instance and connect to it from a developer’s machine using SSMS.
Создание связанного сервера в Microsoft SQL Server
Создать связанный сервер в Microsoft SQL Server можно следующим образом:
- Используя инструкции T-SQL;
- Используя графический интерфейс среды SQL Server Management Studio.
Сегодня мы рассмотрим оба способа.
Исходные данные для примеров
Давайте представим, что у нас есть файл Excel, к которому нам нужно периодически обращаться в своих запросах, поэтому мы решили создать связанный сервер для удобства.
Файл Excel мы сохранили на диск D и он содержит следующие данные.

Подготовка к созданию связанного сервера
Чтобы подключаться к внешним источникам данных и выполнять распределенные запросы, на сервере должен быть установлен соответствующий провайдер.
В нашем случае мы будем использовать провайдер Microsoft.ACE.OLEDB.12.0 x64.
Поэтому перед тем как переходить к созданию связанного сервера, нам необходимо убедиться в том, что данный провайдер у нас установлен, так как в противном случае примеры, которые мы рассмотрим ниже, работать не будут.
Чтобы проверить, есть ли у нас этот провайдер, мы можем запустить следующую процедуру или в обозревателе объектов открыть контейнер «Объекты сервера -> Связанные серверы -> Поставщики» и посмотреть там.
EXEC sp_enum_oledb_providers;
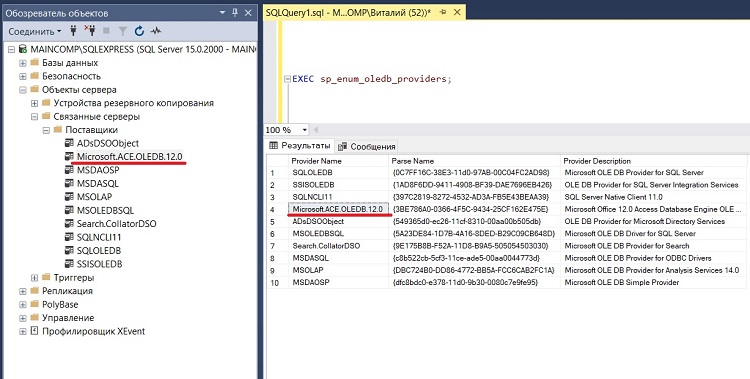
В случае если у Вас в списке нет нужного провайдера, Вам необходимо скачать его с официального сайта Microsoft и установить.
Создание связанного сервера на T-SQL
Для создания и управления связанными серверами в Microsoft SQL Server существуют специальные хранимые процедуры:
- sp_addlinkedserver – процедура создания связанного сервера;
- sp_addlinkedsrvlogin – процедура настройки безопасности связанного сервера.
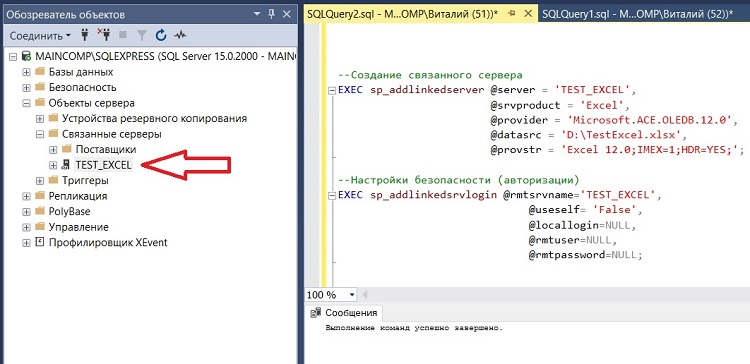
Таким образом, чтобы создать связанный сервер, нам необходимо выполнить следующие инструкции.
   --Создание связанного сервера
   EXEC sp_addlinkedserver @server = 'TEST_EXCEL',
                           @srvproduct = 'Excel',
                           @provider = 'Microsoft.ACE.OLEDB.12.0',
                           @datasrc = 'D:\TestExcel.xlsx',
                           @provstr = 'Excel 12.0;IMEX=1;HDR=YES;';

   --Настройки безопасности (авторизации)
   EXEC sp_addlinkedsrvlogin @rmtsrvname='TEST_EXCEL',
                             @useself= 'False',
                             @locallogin=NULL,
                             @rmtuser=NULL,
                             @rmtpassword=NULL;
В результате выполнения данных инструкций будет создан связанный сервер, источником которого будет выступать файл Excel, а также будут выполнены определённые настройки для авторизации на данном сервере.
В обозревателе объектов отобразится данный сервер.
Описание параметров процедуры sp_addlinkedserver
- @server – название связанного сервера;
- @srvproduct – название продукта;
- @provider – провайдер (поставщик);
- @datasrc – источник данных;
- @provstr – строка поставщика для подключения.
Описание параметров процедуры sp_addlinkedsrvlogin
- @rmtsrvname – название связанного сервера;
- @useself – указывает, как будет происходить авторизация, с указанием логина и пароля, либо с использованием сопоставления с контекстом безопасности;
- @locallogin – имя входа на локальный сервер;
- @rmtuser – удаленное имя входа, используемое для подключения к связанному серверу;
- @rmtpassword – пароль для удаленного имени входа.
Создание связанного сервера с помощью SQL Server Management Studio
Все то же самое, что мы сделали чуть выше с помощью инструкций T-SQL, мы можем выполнить и в графическом интерфейсе среды SQL Server Management Studio.
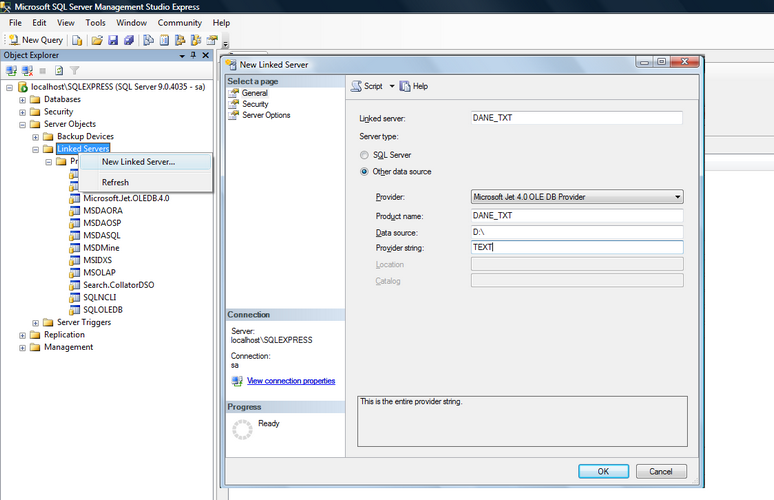
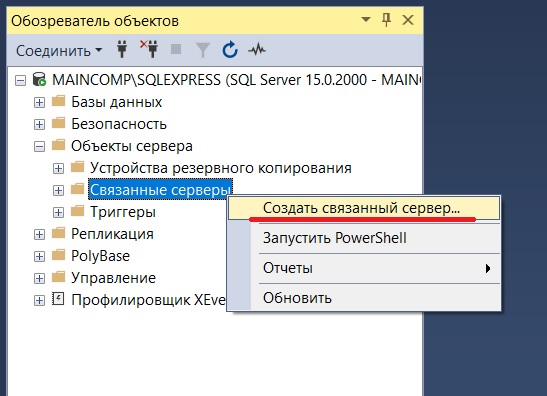
Для этого нажмите на контейнер «Связанные серверы» правой кнопкой мыши и выберите «Создать связанный сервер».
Затем в открывшемся окне внесите соответствующие данные для подключения (данные соответствуют параметрам процедуры sp_addlinkedserver).
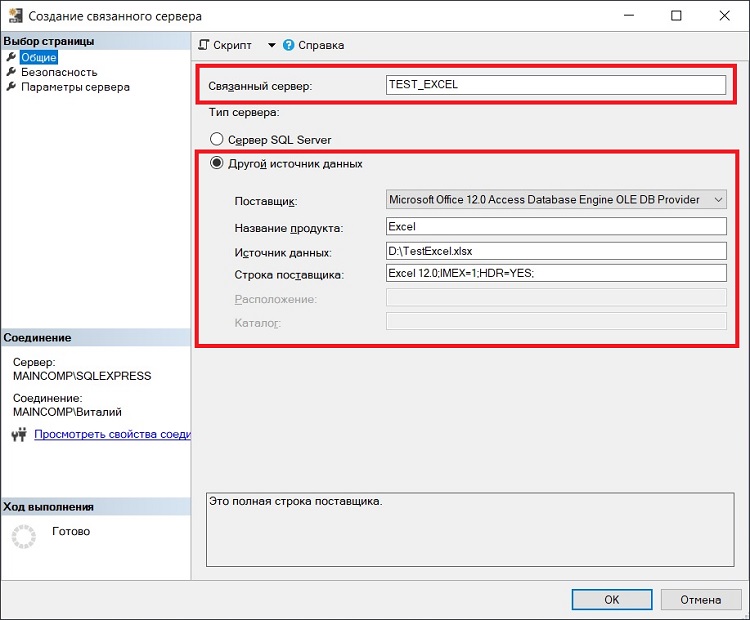
Чтобы сделать точно такую же авторизацию, которую мы сделали в примере с использованием процедуры sp_addlinkedsrvlogin, необходимо перейти на вкладку «Безопасность» и выбрать пункт «Устанавливать с использованием текущего контекста безопасности имени для входа».
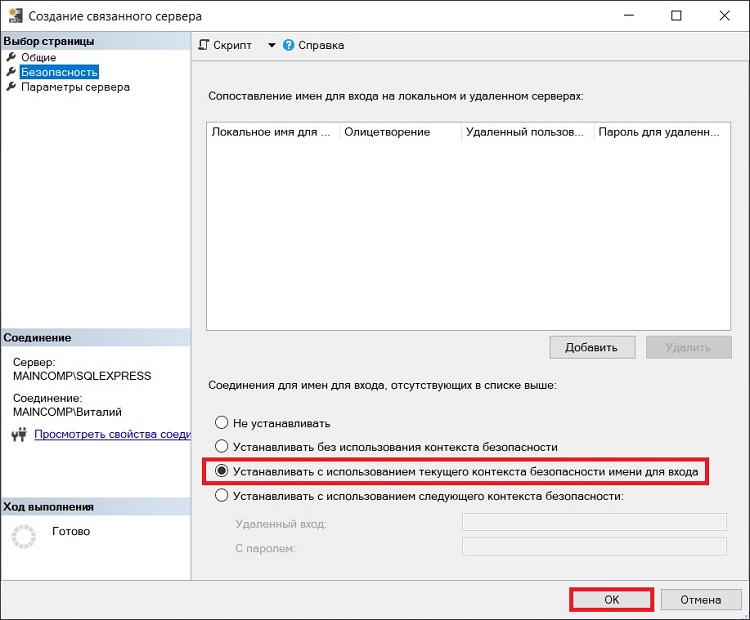
После этого нажать «ОК», и точно такой же связанный сервер с файлом Excel будет создан.
Connect to SQL Analysis Services as an ODBC Data Source
If you have not already, first specify connection properties in an ODBC DSN (data source name). This is the last step of the driver installation. You can use the Microsoft ODBC Data Source Administrator to create and configure ODBC DSNs.


To connect, provide authentication and set the Url property to a valid SQL Server Analysis Services endpoint. You can connect to SQL Server Analysis Services instances hosted over HTTP with XMLA access. See the Microsoft documentation to configure HTTP access to SQL Server Analysis Services.
To secure connections and authenticate, set the corresponding connection properties, below. The data provider supports the major authentication schemes, including HTTP and Windows, as well as SSL/TLS.
-
HTTP Authentication
Set AuthScheme to «Basic» or «Digest» and set User and Password. Specify other authentication values in CustomHeaders.
-
Windows (NTLM)
Set the Windows User and Password and set AuthScheme to «NTLM».
-
Kerberos and Kerberos Delegation
To authenticate with Kerberos, set AuthScheme to NEGOTIATE. To use Kerberos delegation, set AuthScheme to KERBEROSDELEGATION. If needed, provide the User, Password, and KerberosSPN. By default, the data provider attempts to communicate with the SPN at the specified Url.
-
SSL/TLS:
By default, the data provider attempts to negotiate SSL/TLS by checking the server’s certificate against the system’s trusted certificate store. To specify another certificate, see the SSLServerCert property for the available formats.
You can then access any cube as a relational table: When you connect the data provider retrieves SSAS metadata and dynamically updates the table schemas. Instead of retrieving metadata every connection, you can set the CacheLocation property to automatically cache to a simple file-based store.
See the Getting Started section of the CData documentation, under Retrieving Analysis Services Data, to execute SQL-92 queries to the cubes.